Fun with OCI Functions - Part 4
Deep Dive - Document Generator PBF


Deep Dive - Document Generator PBF
In Part 1, Part 2, and Part 3 of this series, we have used the Document Generator Pre-Built Function (PBF).
It is now time for a Deep Dive into the Document Generator PBF, even though some topics covered here also apply to any OCI Functions.
Introduction
Overview of the Document Generator PBF
In Part 1, we saw that the Document Generator PBF generates PDF documents based on Office Templates and JSON data.
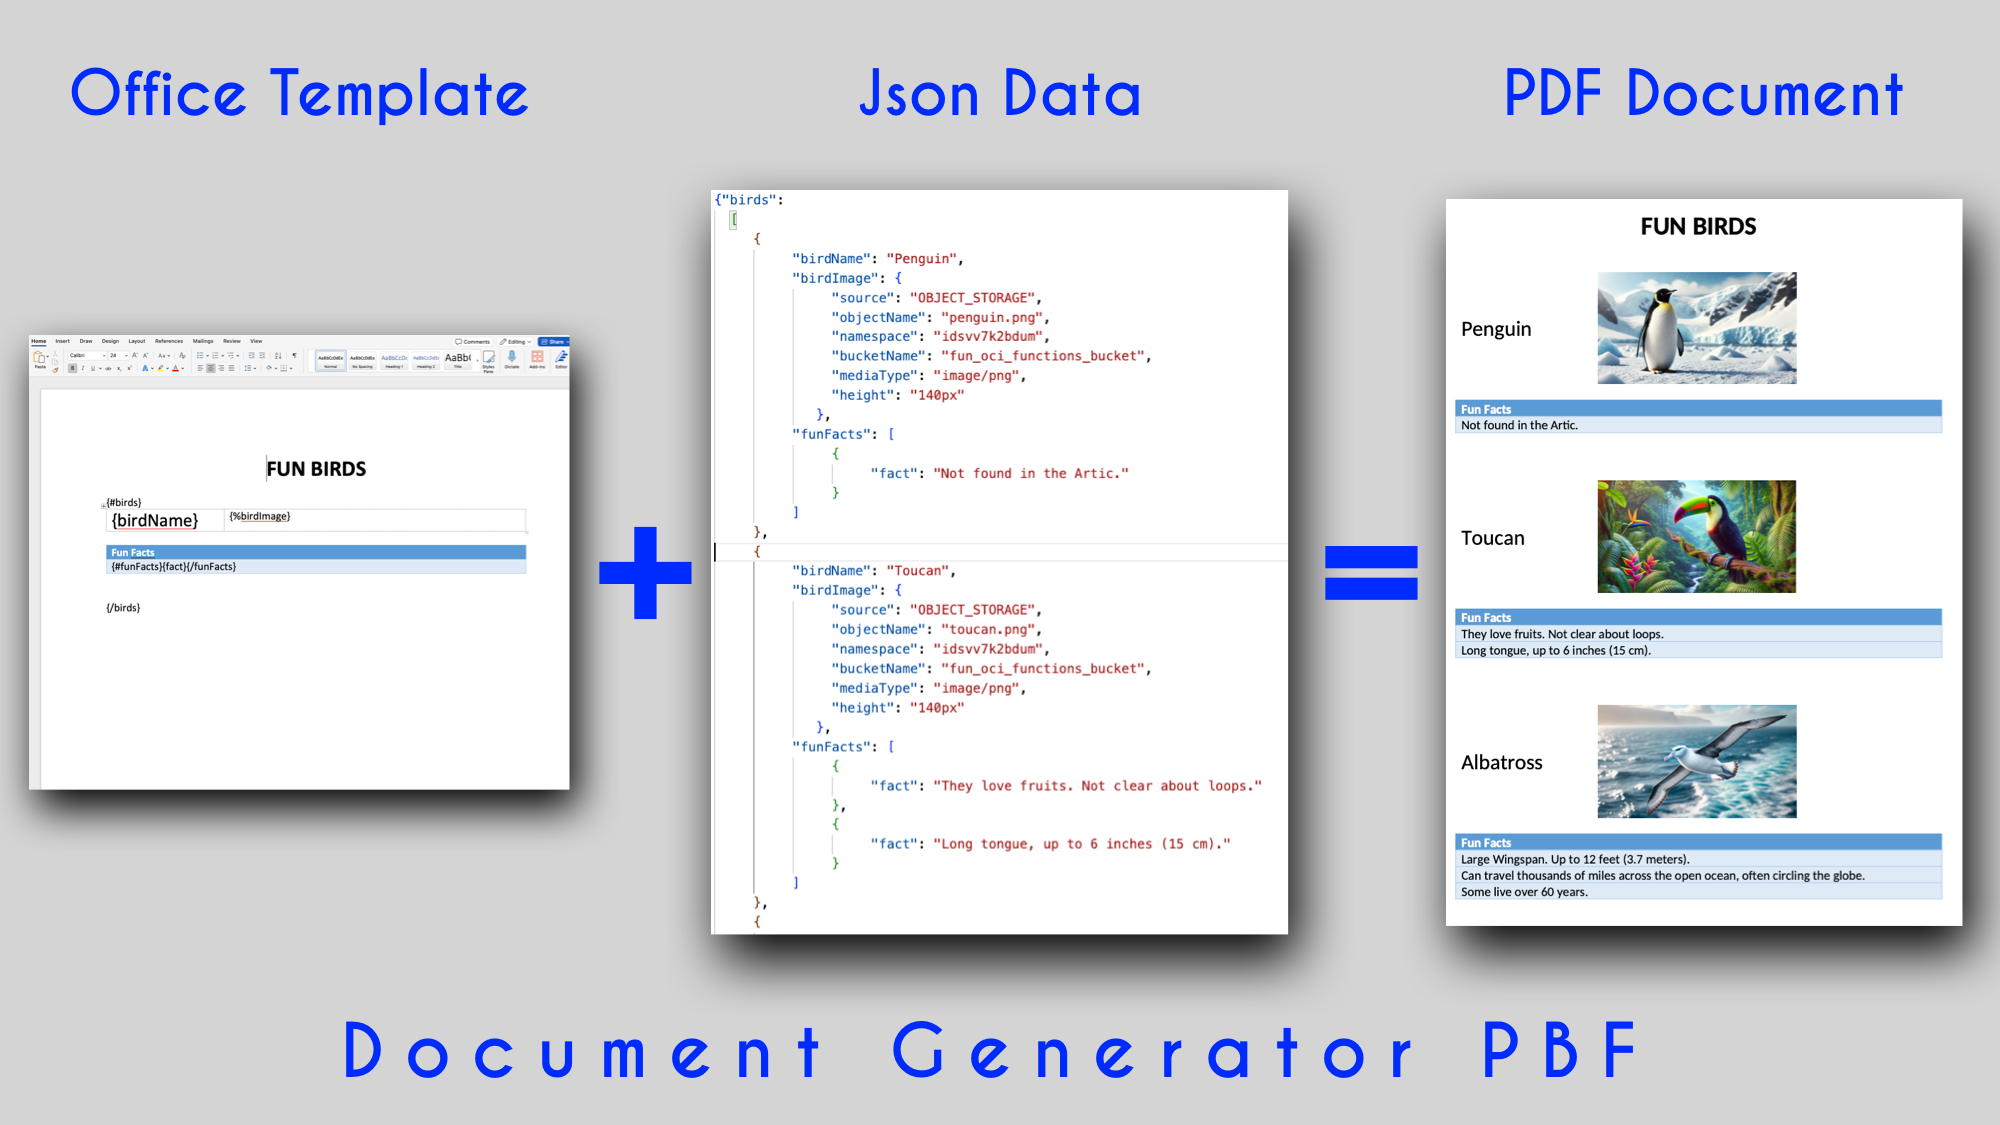
That is the very high-level view. Let's dive a bit deeper.
Primary use cases
- Creating invoices, inventory reports, inspection reports, or almost any other type of report
- Filling MS Word Form Templates with data
- Generating MS Excel Documents with data extracted from a Database
Key Features and Capabilities
- Runs serverless. No Infrastructure to manage
- Replaces Tags (ex: {company.name}) in Template with values (ex: ACME CORPORATION) from JSON data
- Supports MS Word Templates to generate MS Word or PDF documents
- Supports MS Excel Templates to generate MS Excel or PDF documents
- Is integrated with Oracle APEX
- Supports generating documents in Batch
- Provides a set of available fonts and allows customers to provide specific fonts
- Is integrated into the OCI ecosystem, including:
- Object Storage for Data, Templates, Fonts, Images
- OCI monitoring and Logging
- IAM Security
Generating documents
Let's show how to generate this simple invoice:

Office Template
You start by creating an Office Template. We can use the following MS Word docx Template to create an invoice Template. By default, Tags are delimited with { and }.
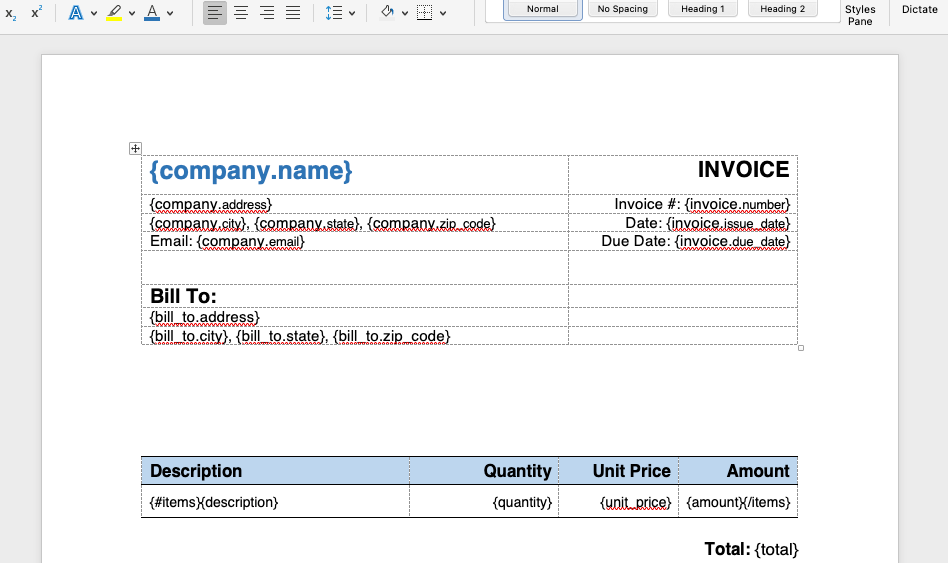
Note that here, an Office Template is a MS Word (docx) or MS Excel (xlsx) document that serves as a Template for Document Generator. We are not referring to dotx MS Word or xltx MS Excel templates.
You can get these sample Template, JSON data and generated PBF in my GitHub Repo.
Formatting the Template is easy as it is all done using MS Word features.
Tags
In this invoice Template, we used only 2 types of Tags:
Basic Tags
Example: {company.name}
This will be replaced by the value of the field name in a JSON Object
  "company": {
    "name": "ACME CORPORATION",
    ...
  }
Vertical Loop Tag
Example: {#items}{description} ... {amount}{/items}
It means that for each item in an array, we expect that a row will be created and filled with the values from that item. {#items} is the beginning of the loop and {/items} is the end of the loop.
The full list of MS Word Tags is here.
JSON Data
We create a JSON object such as:
{
  "invoice": {
    "number": "INV-2024-0042",
    "issue_date": "2025-03-17",
    "due_date": "2025-04-16"
  },
  "company": {
    "name": "ACME CORPORATION",
    "address": "123 Business Avenue",
    "city": "Silicon Valley",
    "state": "CA",
    "zip_code": "94025",
    "email": "accounts@acmecorp.com"
  },
  "bill_to": {
    "address": "789 Market Street, Suite 500",
    "city": "Los Angeles",
    "state": "CA",
    "zip_code": "90015"
  },
  "items": [
    {
      "description": "Enterprise Software License",
      "quantity": 1,
      "unit_price": "$5,000.00",
      "amount": "$5,000.00"
    },
    {
      "description": "Implementation Services",
      "quantity": 40,
      "unit_price": "$150.00",
      "amount": "$6,000.00"
    },
    {
      "description": "Premium Support Plan (Annual)",
      "quantity": 1,
      "unit_price": "$2,500.00",
      "amount": "$2,500.00"
    }
  ],
  "total": "$13,500.00"
}
Example of data corresponding to Tags:
- Basic Tag: company.name has the value "ACME CORPORATION".
- Loop Tag: items contains an array of elements.
- Basic Tag in a Loop: Each item in items has a description. The description for the first item is "Enterprise Software License". It will be used in the first row of the loop.
Request payload
You send a request payload to a Document Generator Function to specify where the Office template and the JSON data are located. You also indicate where you want to generate the Document.
In our example the request Payload may be:
{
  "requestType": "SINGLE",
  "tagSyntax": "DOCGEN_1_0",
  "data": {
    "source": "OBJECT_STORAGE",
    "namespace": "my_namespace",
    "bucketName": "my_bucket",
    "objectName": "part4/invoice.json"
  },
  "template": {
    "source": "OBJECT_STORAGE",
    "namespace": "my_namespace",
    "bucketName": "my_bucket",
    "objectName": "part4/invoice.docx",
    "contentType": "application/vnd.openxmlformats-officedocument.wordprocessingml.document"
  },
  "output": {
    "target": "OBJECT_STORAGE",
    "namespace": "my_namespace",
    "bucketName": "my_bucket",
    "objectName": "part4/invoice-output.pdf",
    "contentType": "application/pdf"
   }
}
Let's go quickly to the different parts.
- "requestType": "SINGLE" -> We want to generate only one output PDF. The complete documentation for single request is here.
- "tagSyntax": Only "DOCGEN_1_0" exists as of April 2025
- "data": We specify that the JSON Data is in Object Storage
- "template": We specify that the Template is in Object Storage
- "output": We specify that we want the generated document to be stored in Object Storage and be named "invoice-output.pdf" in a folder "part4"
Invocation
A simple invocation using the OCI CLI can be:
oci fn function invoke --function-id ocid1.fnfunc.oc1.iad.aaaazzz --file "-" --body '{
    "requestType": "SINGLE",
    "tagSyntax": "DOCGEN_1_0",
    "data": {
      "source": "OBJECT_STORAGE",
      "namespace": "idsvv7k2bduz",
      "bucketName": "fun_oci_functions_bucket",
      "objectName": "part4/invoice.json",
      "contentType": "application/json"
    },
    "template": {
      "source": "OBJECT_STORAGE",
      "namespace": "idsvv7k2bduz",
      "bucketName": "fun_oci_functions_bucket",
      "objectName": "part4/invoice.docx",
      "contentType": "application/vnd.openxmlformats-officedocument.wordprocessingml.document"
    },
    "output": {
      "target": "OBJECT_STORAGE",
      "namespace": "idsvv7k2bduz",
      "bucketName": "fun_oci_functions_bucket",
      "objectName": "part4/invoice-output.pdf",
      "contentType": "application/pdf"
    }
}' | jq
We see that the OCI CLI offers a simple way to invoke a Function with a Request payload.
Response Payload
We will receive a response that looks like:
{
  "responseType": "SINGLE",
  "code": 200,
  "status": "OK",
  "metadata": {
    "version": "1.1.5",
    "configurationParameters": {
      "FN_FN_NAME": "fun_oci_function_document_generator",
      "FN_APP_NAME": "fun_oci_functions_app",
      "FN_TYPE": "sync",
      "FN_APP_ID": "ocid1.fnapp.oc1.iad.aaaaaaaauzzz",
      "OCI_REGION_METADATA": "{\"realmDomainComponent\":\"oraclecloud.com\",\"realmKey\":\"oc1\",\"regionIdentifier\":\"us-ashburn-1\",\"regionKey\":\"IAD\"}",
      "FN_FN_ID": "ocid1.fnfunc.oc1.iad.aaaaaaaazzz",
      "FN_MEMORY": "1024"
    }
  },
  "document": {
    "type": "OBJECT_STORAGE",
    "namespace": "idsvv7k2bduz",
    "bucketName": "fun_oci_functions_bucket",
    "objectName": "part4/invoice-output.pdf",
    "contentType": "application/pdf",
    ...
  }
}
In this example, we received a response with:
- "code": 200. This is an application response that is similar to an HTTP status code
- "status": OK. This is an application status that is similar to an HTTP status text
- "metadata": Some Metadata about the processing context
- "document": The location of the generated document
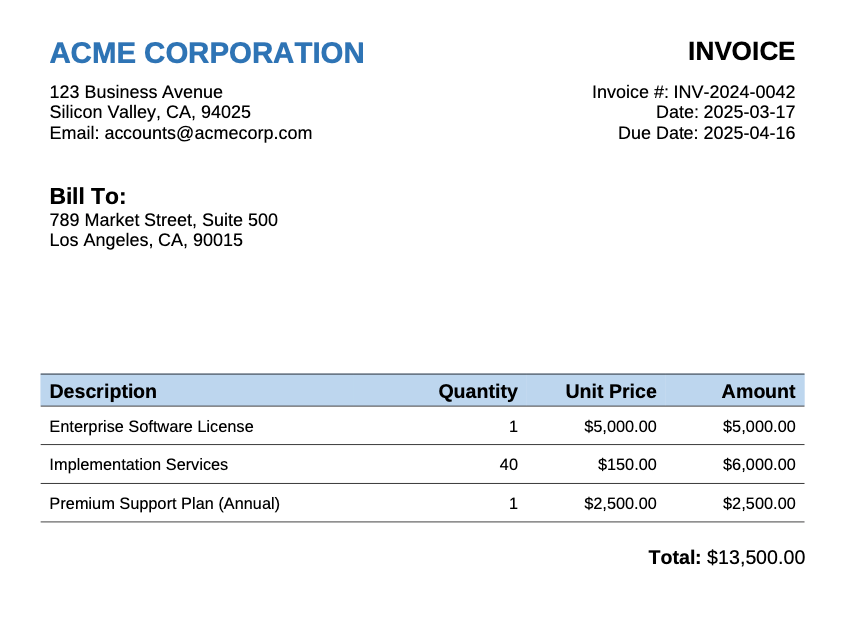
Generated document
If we download the generated document from Object Storage, we will get:
How Functions work
OK, time to go below the surface.
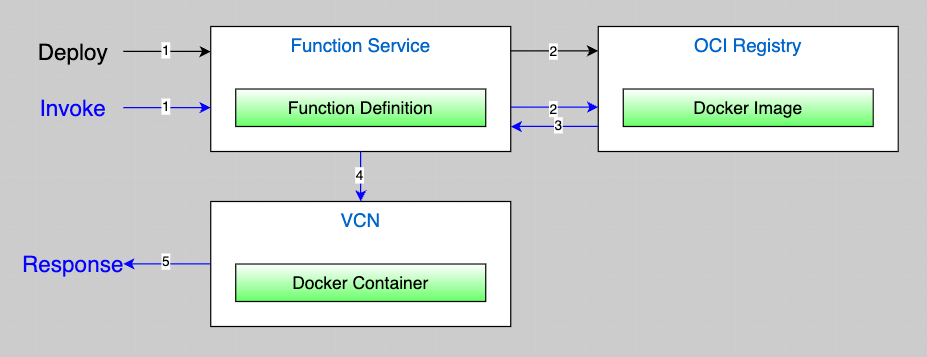
Flow - Deploy - Functions
- We have seen in the previous parts of Fun with OCI Functions that when we deploy an OCI Function with
fn deploy, a Docker image is created. - The Function Service takes that Docker image and stores the image in an OCI Registry that you have selected. We have defined our registry in Part 1 using Terraform.
Flow - Deploy - Pre-Built Functions
- For Pre-Built Functions, this process is all done for you.
- Again, the Function Service manages storing the Docker image itself without you having to specify an OCI Registry.
Flow - Invoke
- We use the Function Service (CLI, SDK, ...) specifying our Function Id
- The Function Service finds and fetches the Docker image from the OCI Registry
- The Docker image is returned
- The Function Service executes the function by running the function's Docker image as a container on a compute instance in a subnet associated with the application to which the function belongs
- A response is returned
Note: For the curious, see even more details here.
What OCI Functions give you
- Isolation.
- The Instance Container running your Functions runs in your VCN. You don't share the same Function with other customers.
- Parallelism
- If the OCI Function service receives a call to a function that is currently executing inside a running container, OCI Functions scales horizontally to serve both incoming requests, starting a second Docker container.
- When the function has finished executing and after a period of being idle, the Docker container is removed.
- You can scale horizontally without having to manage the Infrastructure up to your configured limits. That is the beauty of serverless computing at your service.
- Size constraints
- Document Generator requires 512 MB to work. Using bigger data sets, bundling fonts, or using batch processing might require more memory. The maximum memory setting as of April 2025 is 3 GB.
- Document Generator generates small documents in a few seconds. Again, using bigger data sets, or using batch processing might require more time. The maximum timeout setting as of April 2025 is 300 seconds.
Create a Document Generator PBF using the OCI Console
Document Generator PBFs are created just like any other Pre-Built Functions. Here is a step-by-step guide to create a new Document Generator PBF.
VCN
If you don't already have a VCN set up, you can follow the same steps that we did in Part 1 where we used the VCN Wizard.
Document Generator PBF
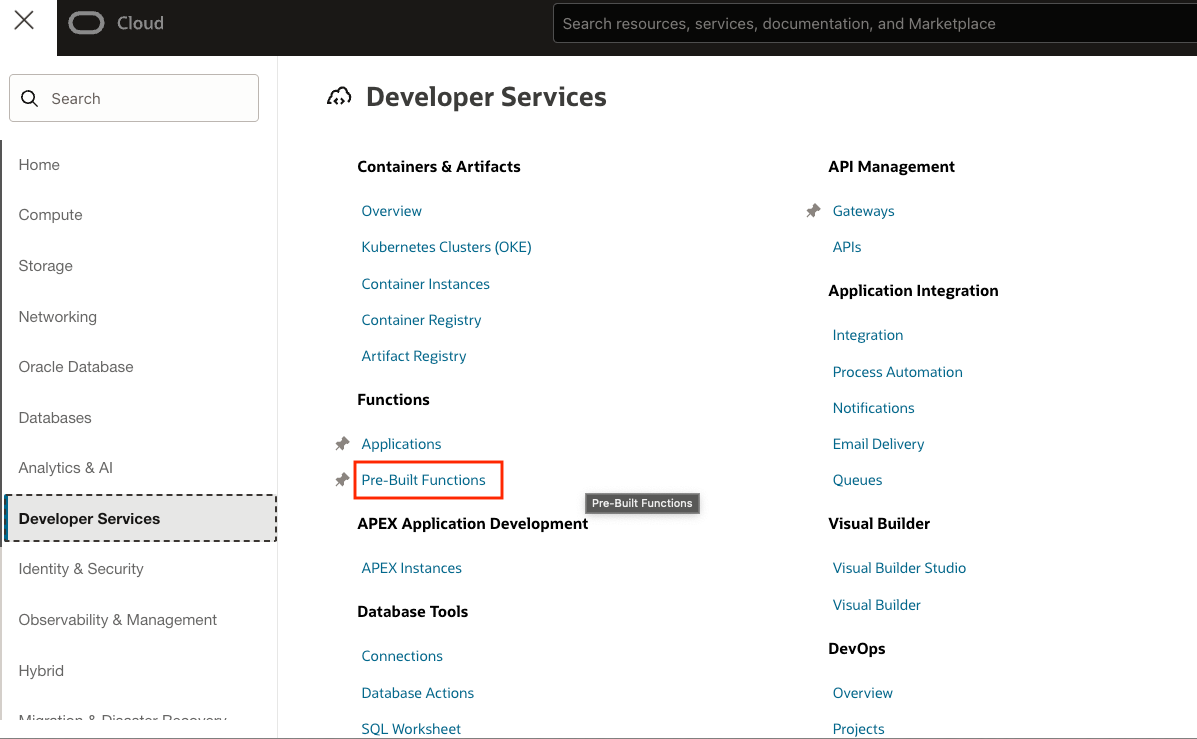
In the OCI Console Hamburger menu, Select Developer Services, then click Pre-Built Functions.

Select the Document Generator Pre-Built Function
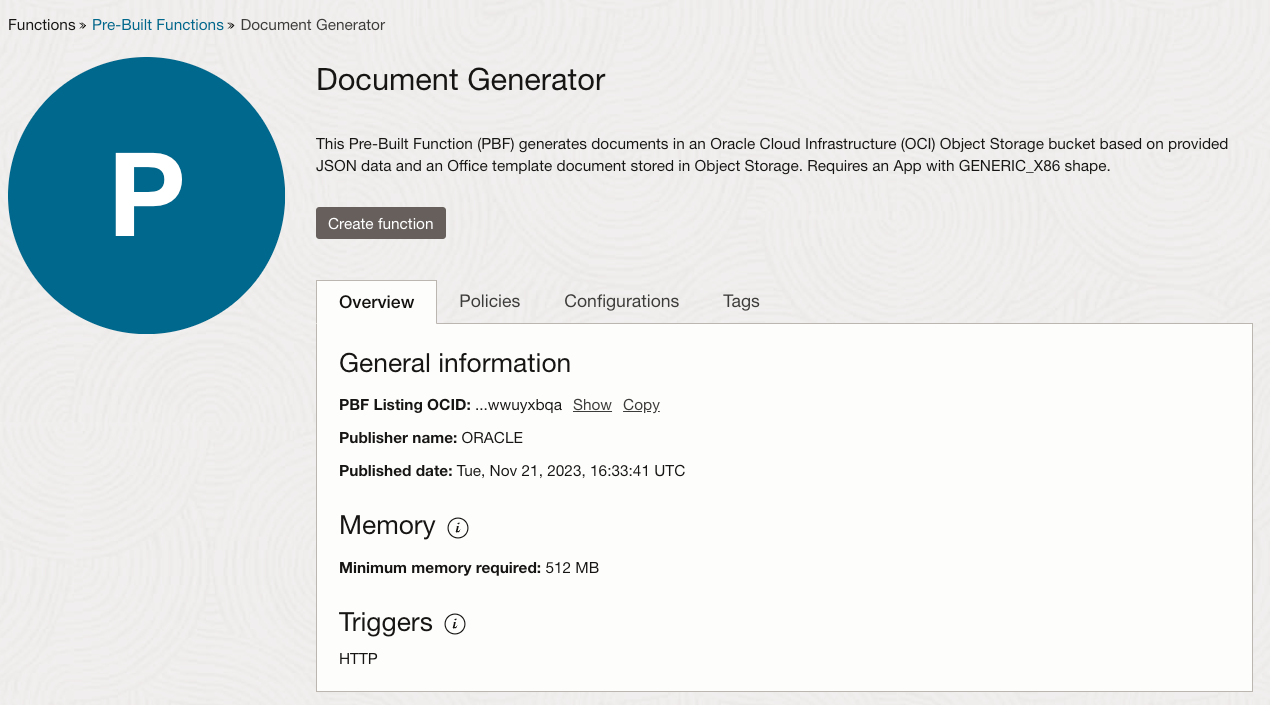
A nice Wizard helps you with the creation process. Click on the Create Function button.
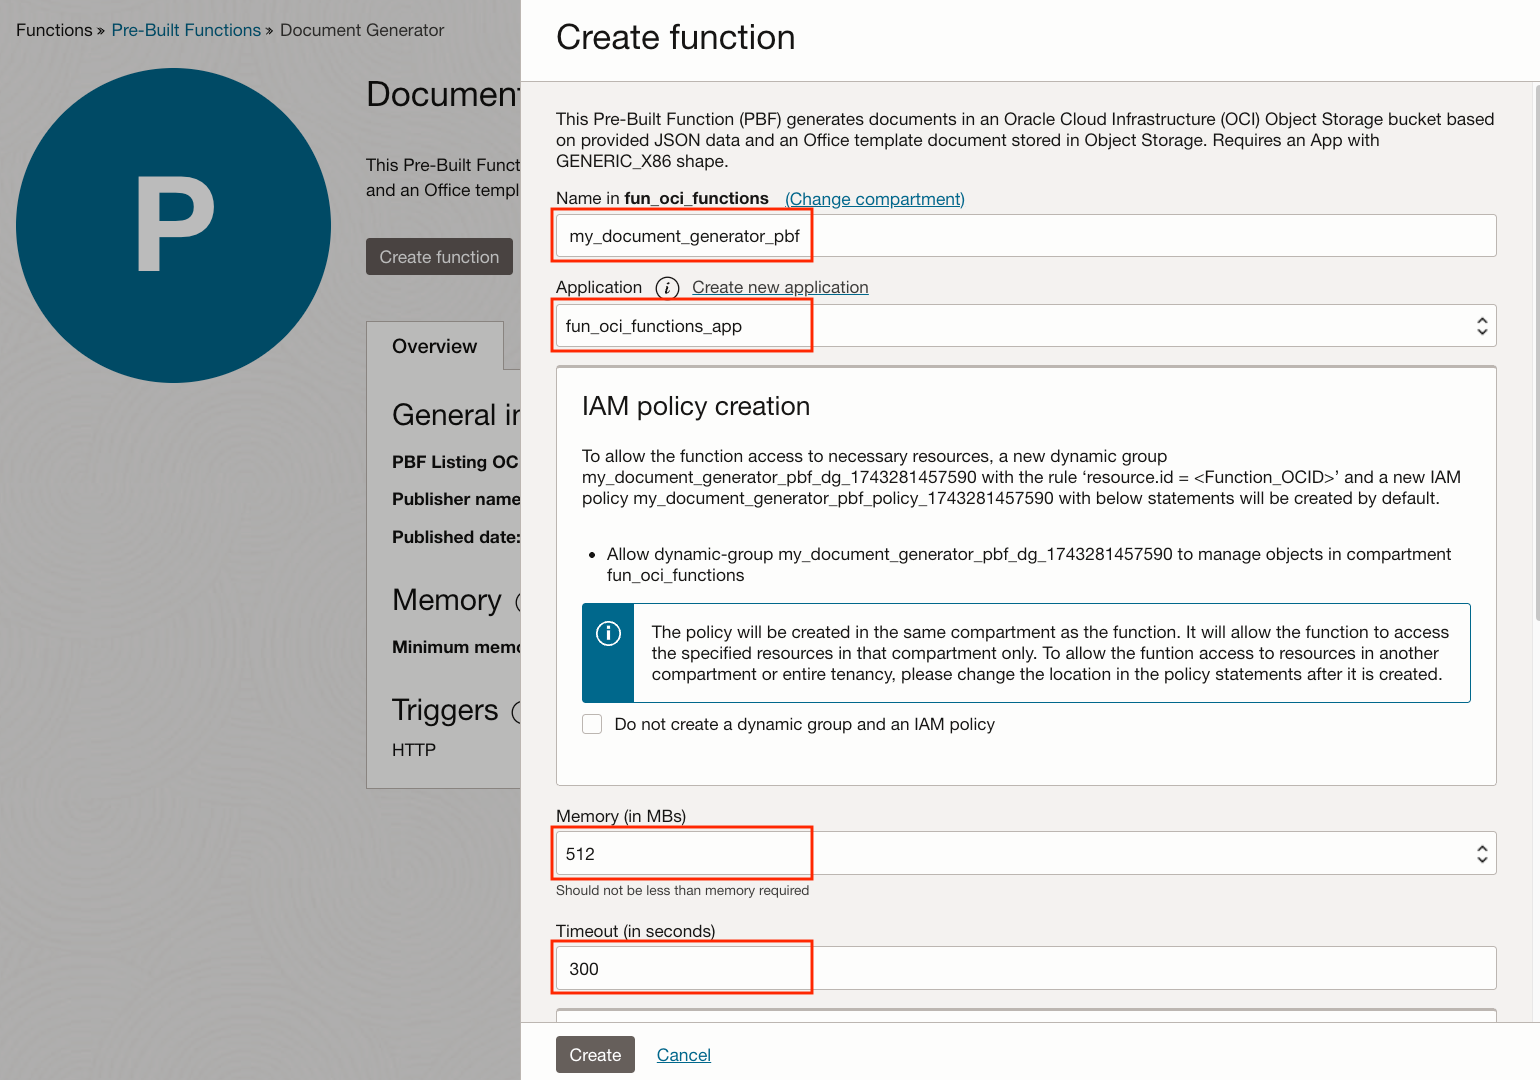
If you are not in your fun_oci_functions compartment, click on Change compartment to select it.
Fill the Wizard screen with this information:
- Name: my_document_generator_pbf
- Application: fun_oci_functions_app created in Part 1
- Policies: The Wizard automatically creates a Policy that allows the Document Generator to read and write to Object Storage
- Memory: 512 MB is adequate
- Timeout: We use the current maximum of 300 seconds
Click on the Create button.
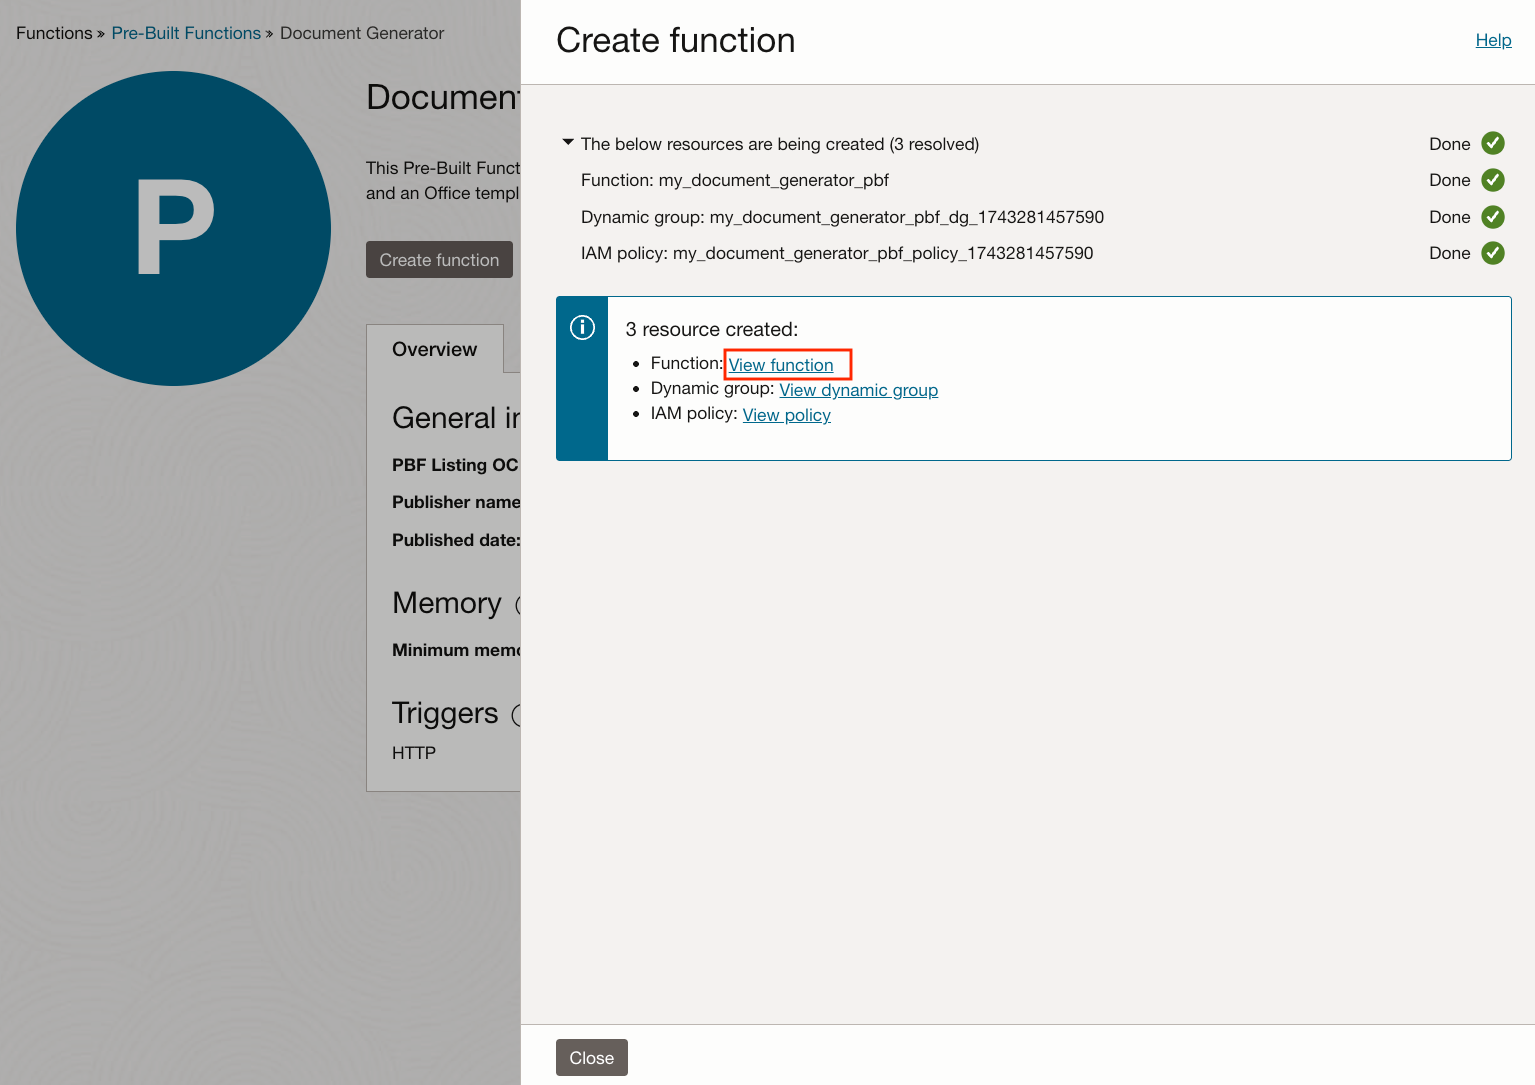
After a few seconds, the Function, the Policy, and the Dynamic Group (used by the Policy) are all created for you.
Click on View Function
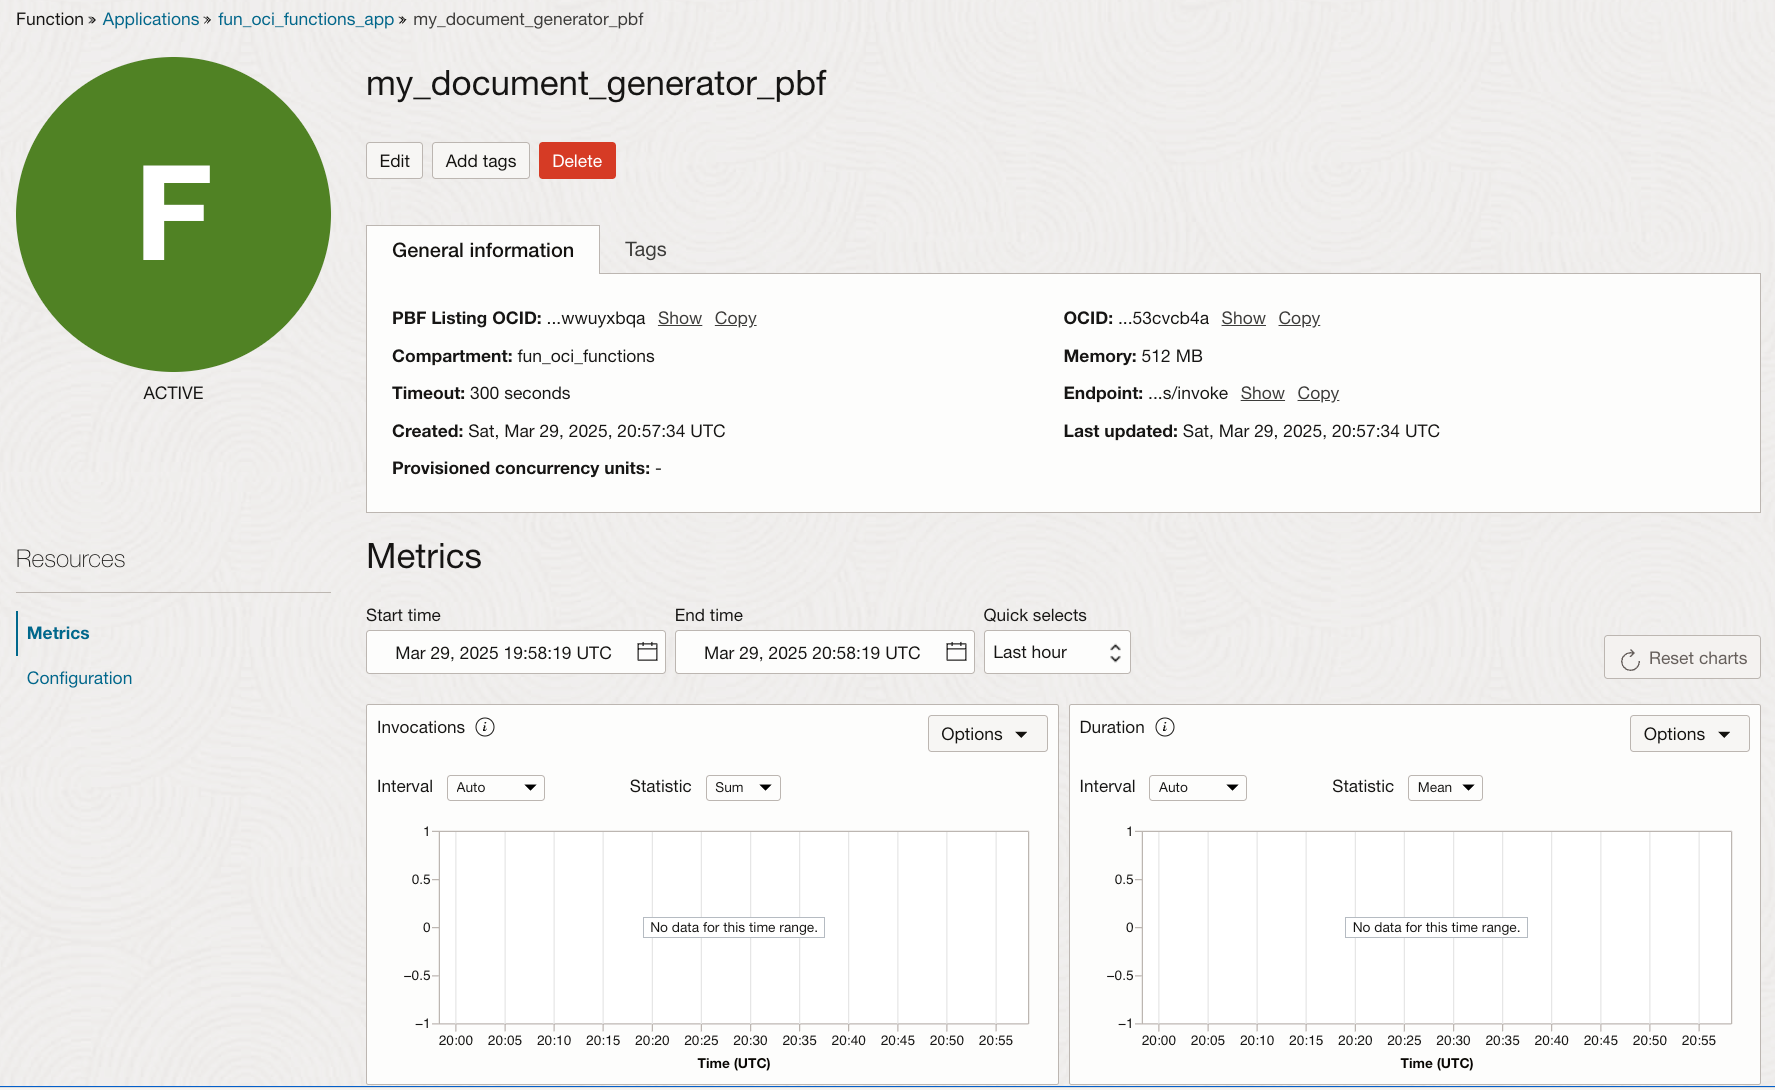
From there, you have all the important information about your newly created Document Generator PBF, In particular, note:
- The Function OCID: The unique identifier of the Function definition.
- The Function Endpoint: The endpoint to reach this specific Function. You will need the endpoint when invoking your function from:
- An OCI SDK like Python or Java
- DBMS_CLOUD from PL/SQL
- Direct HTTP requests
We also see some Metrics at the bottom, we will come back to check them in a bit.
Create a Document Generator PBF using Terraform
You may have noted that we already did that in Part 1. The Terraform code is available in my GitHub repo for Part 1. Here, I will only focus on 3 Parts:
- The Function Application
- The Document Generator PBF
- The Policy to allow Document Generator to use Object Storage
The Function Application
# Functions are in Applications
# Create the application
resource "oci_functions_application" "fun_oci_functions_app" {
  compartment_id = var.compartment_ocid
  config         = {
  }
  display_name = "fun_oci_functions_app"
  shape        = "GENERIC_X86"
  subnet_ids   = [
    var.vcn_subnet_ocid,
  ]
  syslog_url   = ""
  trace_config {
    domain_id  = ""
    is_enabled = "false"
  }
}
"oci_functions_application" serves as the Context. We indicate to use:
- a specific subnet
- a X86 compute shape
The Document Generator PBF
# Get the Pre-Built Function Listing of Document Generator
# This is equivalent to the statement: List all Pre-Built Function Listings where the name = "Document Generator"
data "oci_functions_pbf_listings" "pbf_listing_api" {
  name = "Document Generator"
}

locals {
  # There should be 1 collection with 1 list of PBF Listings
  document_generator_pbf_listing_id = data.oci_functions_pbf_listings.pbf_listing_api.pbf_listings_collection[0].items[0].id
}

# Create a Document Generator Pre-Built Function
resource "oci_functions_function" "fun_oci_function_document_generator" {
  application_id = oci_functions_application.fun_oci_functions_app.id
  config         = {
  }
  display_name   = "fun_oci_function_document_generator"
  memory_in_mbs  = "1024"
  provisioned_concurrency_config {
    strategy = "NONE"
  }
  source_details {
    pbf_listing_id = local.document_generator_pbf_listing_id
    source_type    = "PRE_BUILT_FUNCTIONS"
  }
  timeout_in_seconds = "300"
  trace_config {
    is_enabled   = false
  }
}
"oci_functions_function" is used to create any OCI Function. We indicate to use:
- The application context using
application_id - Up to 1024 MB of Memory
- Up to 300 seconds of CPU
- The trick to create a Document Generator PBF is to use
source_type = "PRE_BUILT_FUNCTIONS"and thepbf_listing_idof Document Generator
The Policy to allow Document Generator to use Object Storage
# Document Generator Pre-Built Function uses a Bucket to read its inputs and write its output
# By default, a Function has no privileges.
# Allow our created Function to read and write any bucket of our dedicated compartment.

resource "oci_identity_policy" "fn_policy" {
    compartment_id = var.compartment_ocid
    description = "Allow a specific Document Generator Function to use Buckets"
    name = "fun_oci_functions_policy"
    statements = [
      "allow any-user to manage objects in compartment ${data.oci_identity_compartment.fn_compartment.name} where any { request.principal.id = '${oci_functions_function.fun_oci_function_document_generator.id}'}"
    ]
}
We will talk more about this part in the Policy section.
Invoking Document Generator PBF
Using the OCI CLI
As seen in earlier, a simple call will look like:
oci fn function invoke --function-id ‹put-function-ocid here>
--file "-" -body '<put JSON Request payload here>'
Simple and straightforward. The information that you need are:
- The function OCID. This is something that you can find easily from the OCI console
- The request Payload
If jq is installed on your system, adding | jq will give you a nice formatted output.
Open the Cloud Shell from the OCI Console and try it yourself using your newly created Function. You can use the Template and JSON Data files from this GitHub repo.
Using an OCI SDK
Oracle provides multiple SDKs to make it easy to call an OCI Function, including:
We already covered invoking OCI Functions in Python in Parts 2 and 3. In particular, you can refer to this folder in my GitHub repo for Part 2.
Logging
Accessing the Function Log
In the OCI Console, in the top left Hamburger menu, select Developer Services, Application under Functions.
On the left, make sure that the Compartment fun_oci_functions is selected. You should see an Application named fun_oci_functions_app. Click on it.

In the Application, let's check the Logs that are generated. On the left, click on Logs.
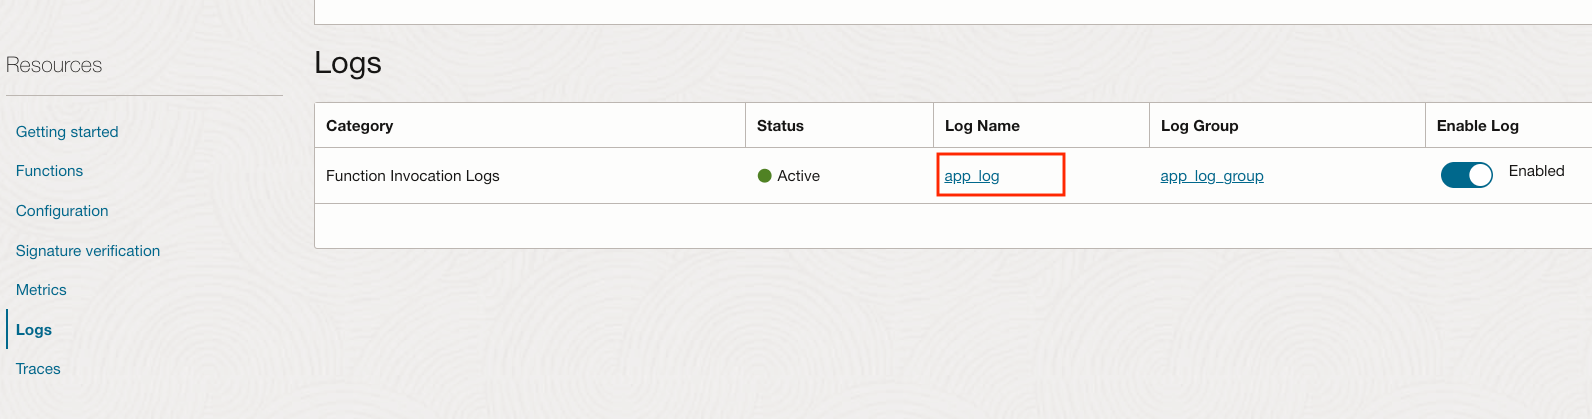
If Enable Log is not selected, select it and make a new invocation (with the OCI CLI, for example). Click on app_log.
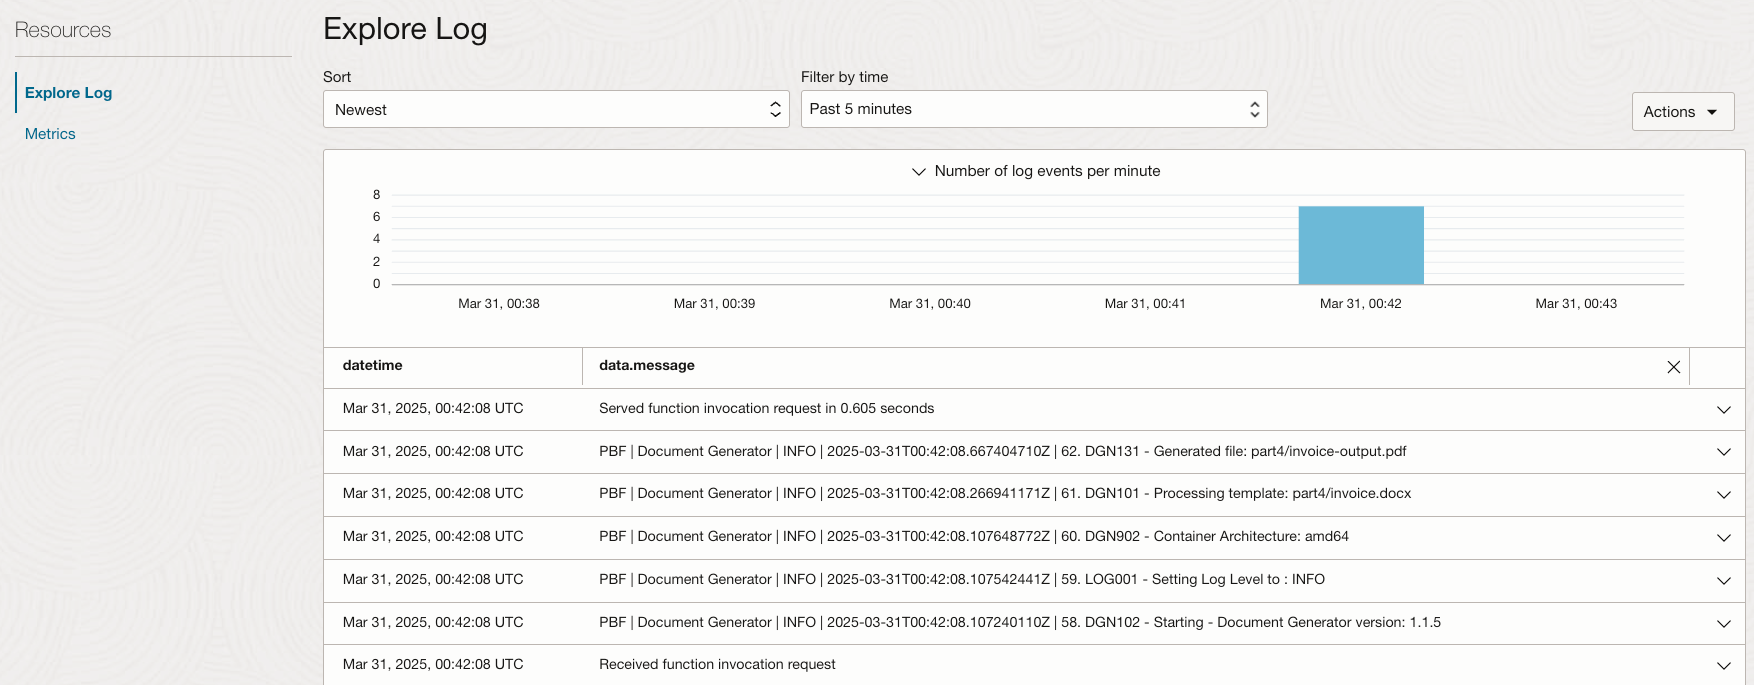
We now see Log entries for our execution. Here are a few tips regarding the Logs:
- It may take a minute or two for all Log entries to appear
- All the Functions in an Application use the same Log
- If you don't see Log entries, augment the duration in Filter by time
- To get more of Log data.messages to be visible, you can close the part related to type
Function Activity
Once you have sent a few requests, you can follow the activity for the most important metrics directly in the OCI Console.
Go back to the Function created from the OCI Console. You see the Metrics section at the bottom of the page.
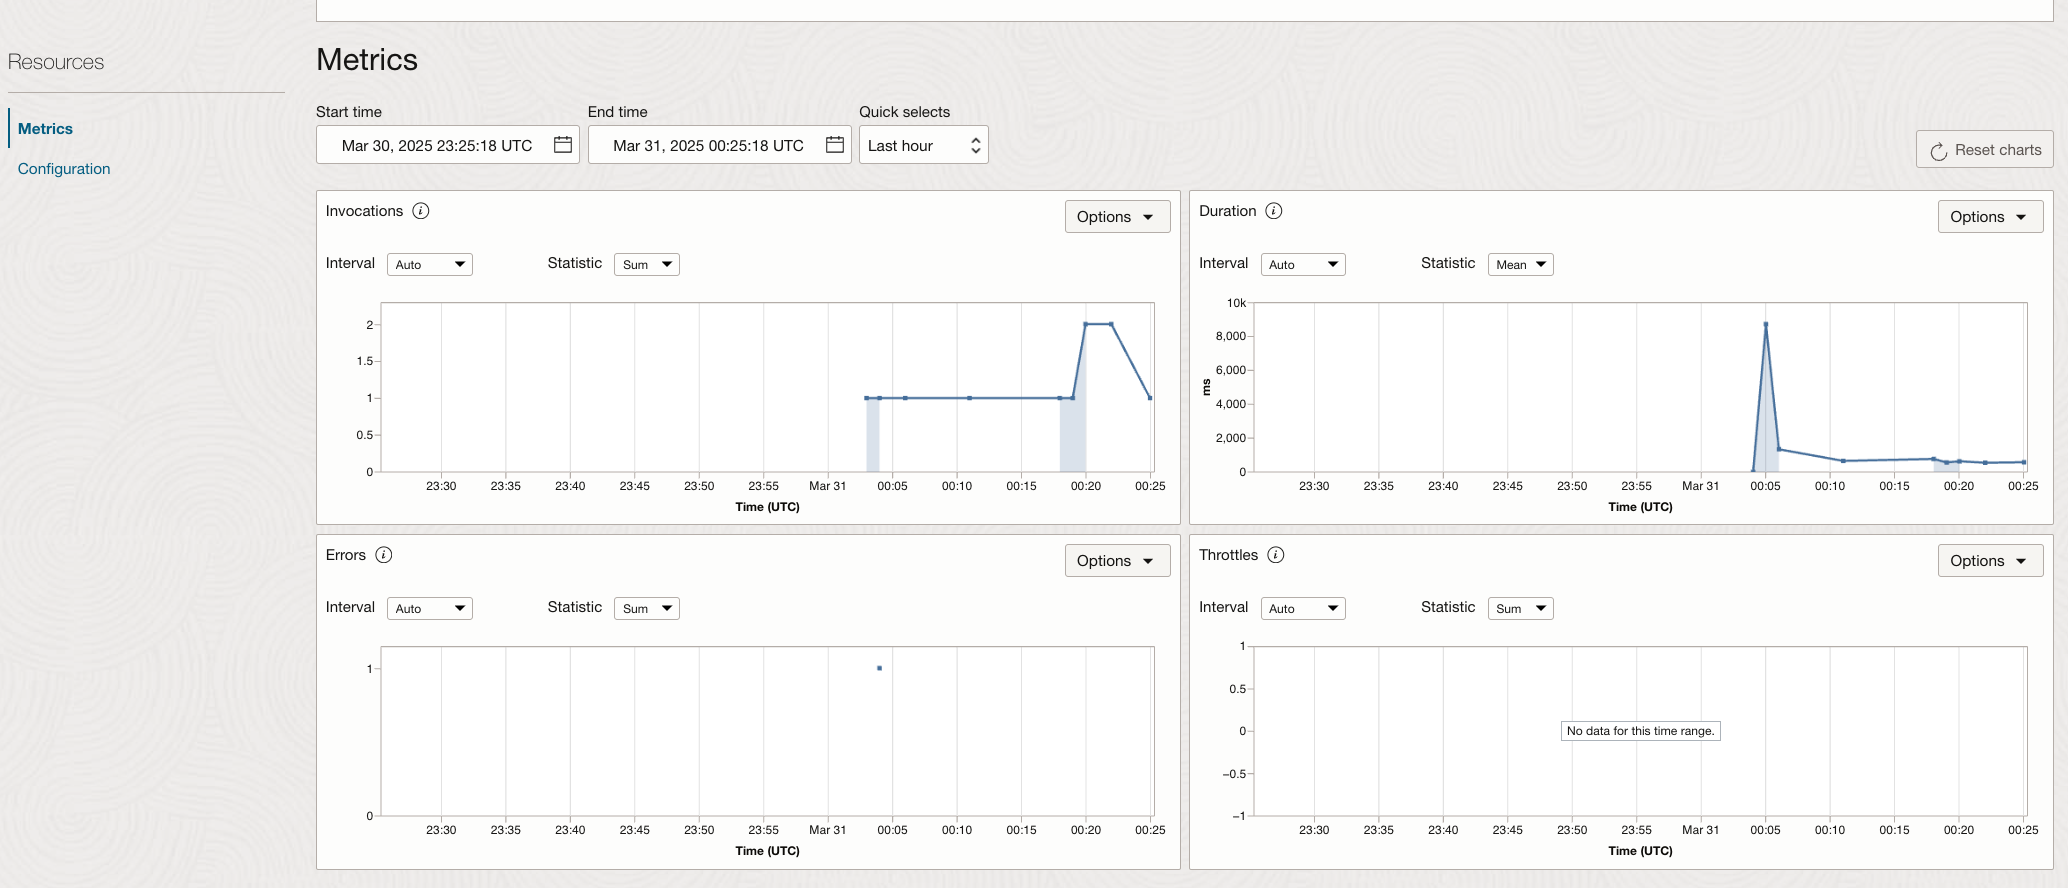
3 important metrics are immediately available for a period of your choice:
- The number of invocations
- The durations
- The number of invocations with errors
On top of this important information, a surprising amount of customization is also available.
For example, let's see the median duration over the last hour for each period of 1 minute using the Table view.
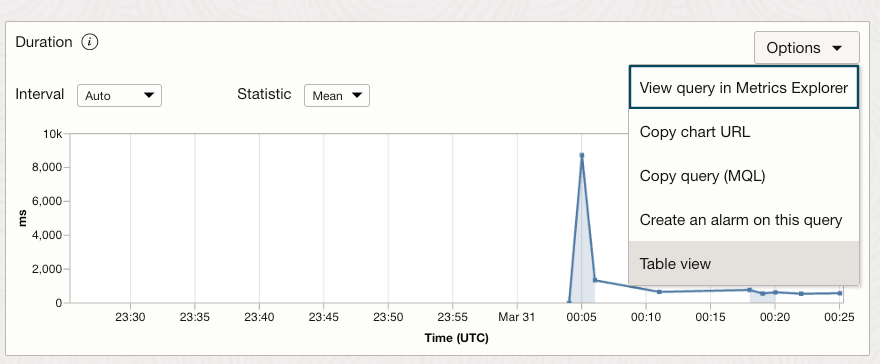
In the Options for the Duration Chart, select Table View
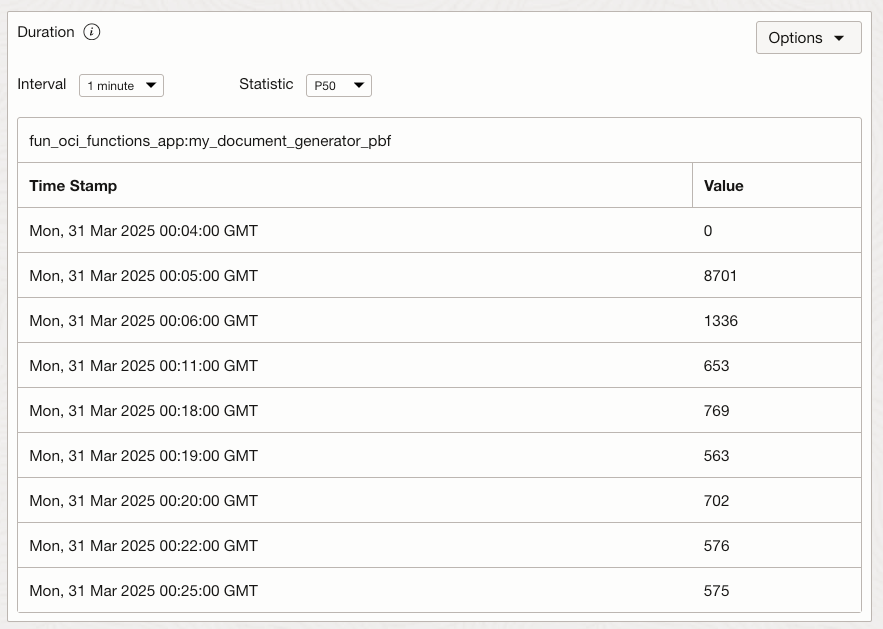
Select:
- Interval: 1 minute
- Statistic: P50 (for the Median)
Here you have it. Basic metric analysis directly from the OCI Console!
Policies
Now were are getting much deeper. Policies are essential, but often misunderstood. As you may know, OCI resources are protected by default, and Policies are required to provide any access.
Principal
In OCI IAM, a Principal is the entity that requests access to resources. It can be a user, service, or application, and policies define what actions a Principal is authorized to perform on a resource.
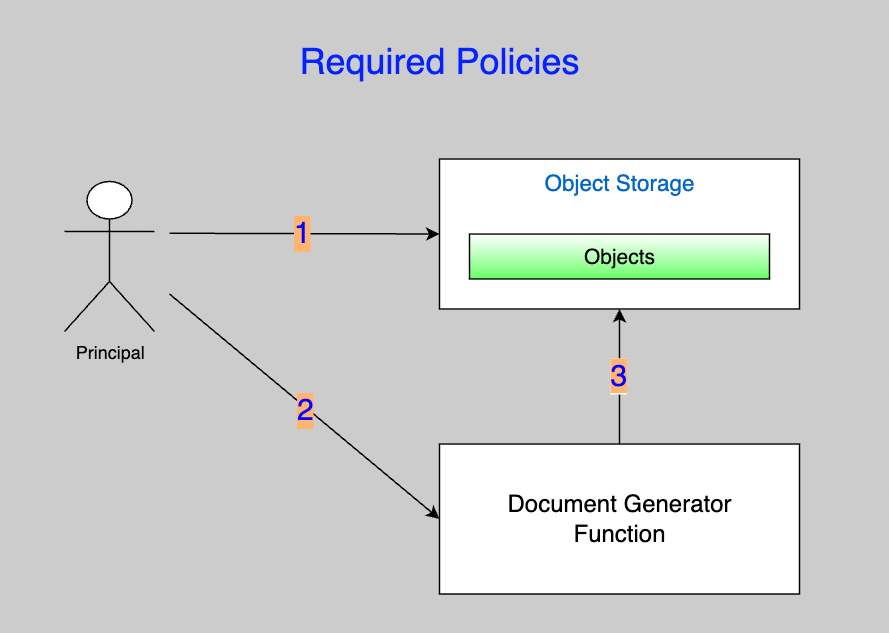
So what Policies are required when using Document Generator?
- Before calling Document Generator, you will need to put an Office Template and your JSON Data in an Object Storage Bucket. Example:
allow any-user to manage objects in compartment fun_oci_functions where any { request.principal.id = '<principal-ocid>' }. - You will then invoke your Document Generator Function. Example:
"allow any-user to use fn-invocation in compartment fun_oci_functions where any { request.principal.id = '<principal-ocid>' }". Note: Remember that this policy is created for you when you use the OCI Console PBF Wizard. - Your Document Generator Function needs to access an Object Storage Bucket to read the Office Template and your JSON Data. When the processing is completed, it will put the generated document in Object Storage. Example:
"allow any-user to manage objects in compartment fun_oci_functions where any { request.principal.id = '<document-generator-function-ocid>' }".
What are Least Privileges?
It means that Principals should only be granted the minimum permissions necessary to perform their intended tasks. Adhering to this practice is important for minimizing the potential attack surface and reducing the risk of unauthorized actions in your Tenancy.
Interested to learn more about Least Privileges? You should be. I recommend these 2 references to learn more:
Another interesting use case involving Policies is using Cross Tenancies Policies. This could allow you, for example, to use an Object Storage Bucket that resides in a separate Tenancy.
Document Generator Tips and Tricks
Check out the documentation
Main links:
- General documentation
- Examples of MS Word Templates and JSON Data
- Examples of MS Excel Templates and JSON Data
Get Help and Share Feedback
Ask questions about Document Generator in the Oracle Forums, and indicate which features you'd like to see in future developments.
Batch mode
If you want to generate multiple similar documents, Document Generator offers a Batch mode. As of April 2025, you can generate up to 50 documents in a single Batch execution. Note that you have the responsibility to make sure that you execute within the OCI Functions limit of 300 seconds.
Batch mode - Generated Document names
Imagine that you have 300 invoices to generate in Batch. You can control the document names in batch output using this syntax for output.objectName:
invoice{documentId|firstId=1,zeroPadding=3}.pdfto generateinvoice001.pdftoinvoice050.pdfinvoice{documentId|firstId=51,zeroPadding=3}.pdfto generateinvoice051.pdftoinvoice100.pdfinvoice{documentId|firstId=101,zeroPadding=3}.pdfto generateinvoice151.pdftoinvoice150.pdf- and so on...
Inline Data
Instead of being stored in Object Storage, JSON Data can be specified directly in the Request Payload. Note that you have the responsibility to make sure that the Request Payload stays within the OCI Functions limit of 6 MB.
Use "source": "INLINE" instead of "source": "OBJECT_STORAGE". Example:
{
  "requestType": "SINGLE",
  "tagSyntax": "DOCGEN_1_0",
   "data": {
    "source": "INLINE",
    "content": {"name":"John Smith", "profession":"Carpenter"}
  },
  "template": {
    "source": "OBJECT_STORAGE",
    "namespace": "my_namespace",
    "bucketName": "my_bucket",
    "objectName": "Letter.docx",
    "contentType": "application/vnd.openxmlformats-officedocument.wordprocessingml.document"
  },
  "output": {
    "target": "OBJECT_STORAGE",
    "namespace": "my_namespace",
    "bucketName": "my_bucket",
    "objectName": "Letter.pdf",
    "contentType": "application/pdf"
   }
}
Timeout after 60 seconds
Most clients (OCI CLI, Java SDK, ...) have an inner timeout of 60 seconds. Although you may have set a Timeout of up to 300 seconds for the Document Generator Function execution, your invocation may get a 502 HTTP status code with a 444 in the Function Application Logs after 60 seconds of execution.
Make sure to augment your client read timeout to address long running requests. More information here.
Null or missing Tag Value
If the value for a Tag is missing or null, Document Generator will replace the Tag in the template with an empty string.
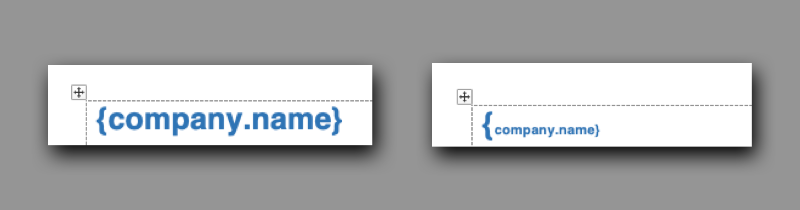
MS Word Formatting - Based on the first letter of Tag Delimiter
In an MS Word Template, the final formatting of your Tag value depends only on the first character of your Tag. So if you are constrained on space, you can set the rest of the Tag using a small font that will take less space in your Template.
In short, these 2 are equivalents:
This completes the Fun with OCI Functions series, where:
- You learned about Serverless Computing with OCI Functions
- You learned the specifics of the Document Generator PBF
- You did integrations of OCI Functions with:
- OCI Events
- OCI API Gateway
- OCI Vision AI Services
Thank you for taking this fun ride with me!