Fun with OCI Functions - Part 3
API Gateway and Functions

In Part 1 of this series on Serverless computing, we prepared an environment to play with Oracle OCI Functions, and we kicked the tires of the Document Generator Pre-Built Function (PBF).
In Part 2 of this series, we saw how OCI Functions can be first-class citizens in an Event-Based Business Logic where multiple processes are chained. We also saw that with very little logic, we can create Functions that perform a composition of disparate services.
In Part 3 of this series, we will see how OCI Functions can serve as the Backend for REST APIs by using an OCI API Gateway.
Note: Part 4 is now available.
Recap of Part 2
In Part 2, we created a Text Anomaly Detection Function which used OCI Vision AI Service and the Document Generator PBF. That function detects poorly rendered texts in Generative AI images. Here is a simple example:

Let's imagine that our manager is so delighted with our Text Anomaly Detection Function that he wants to see how we could create a publicly available REST API that uses it.
So let's create a Proof of Concept (PoC) where:
- We will use a modified version of our Text Anomaly Detection Function as the backend logic
- We will use an OCI API Gateway that will provide the public API endpoints and transformations to call our Function
- We will read the image to analyze from a public URL and we will return the anomaly report as a newly created URL
- For Authentication, we will create a separate Function with simple logic to validate an API Key passed in an HTTP request header
Our goal
In short, we want to use Postman to send a request like this:
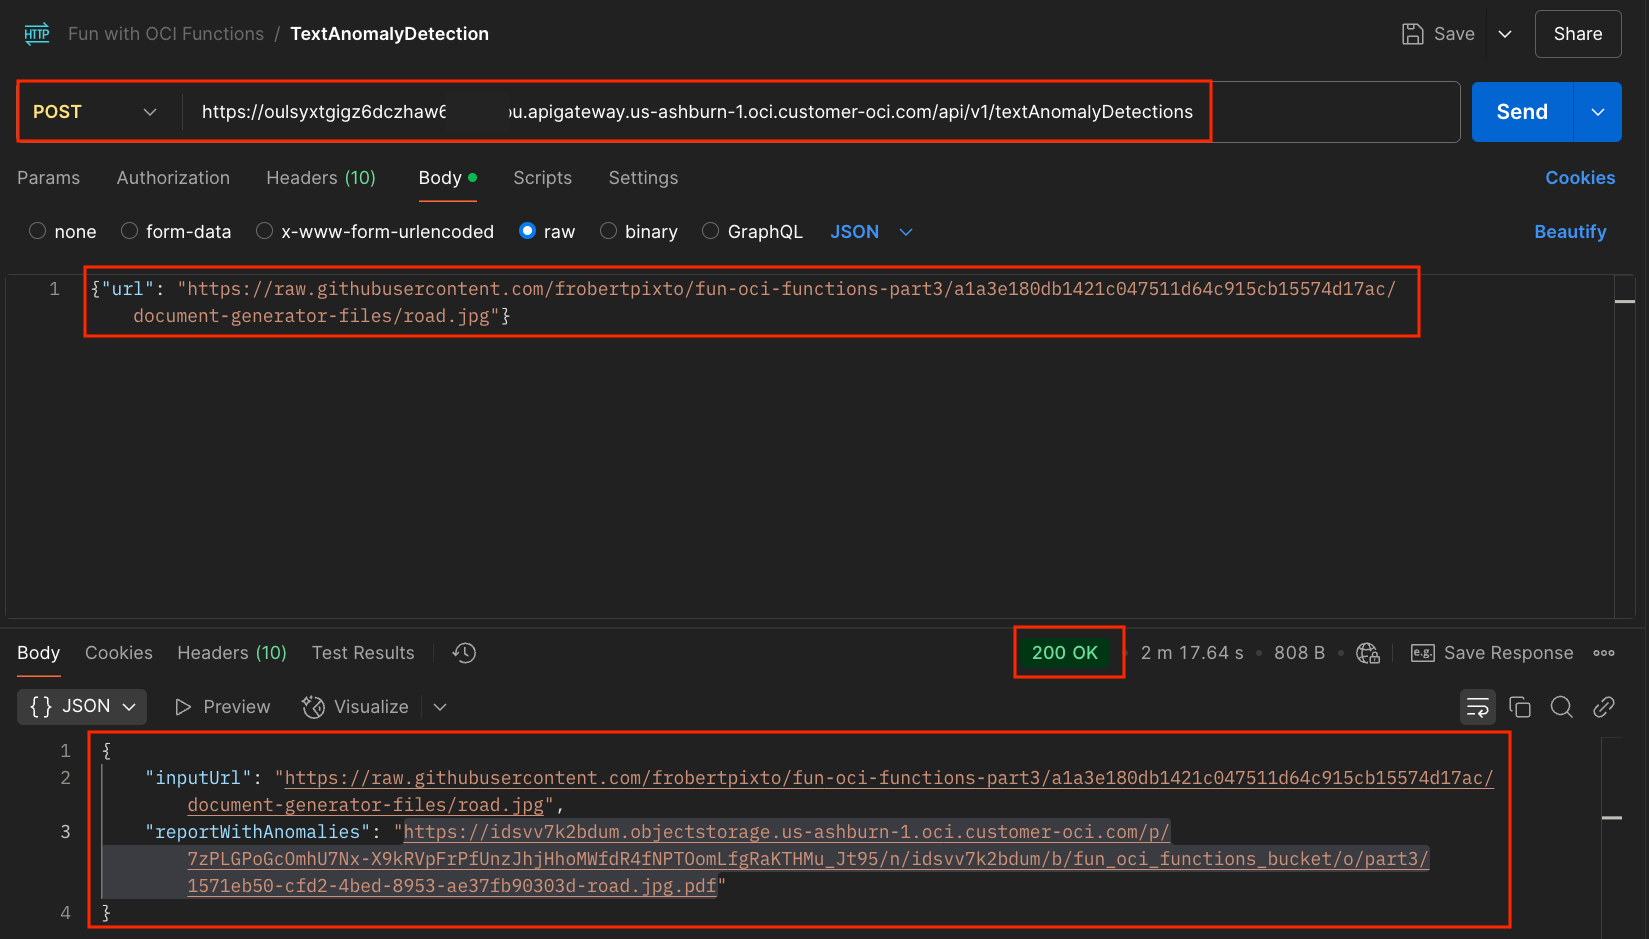
where the returned URL refers to a PDF like this:

API Gateway
All of this allows us to have fun with OCI Functions, and particularly their integration with OCI API Gateways.
OCI API Gateway is a fully managed service that allows you to create, deploy, and manage APIs for accessing Oracle Cloud services, on-premise systems, and other cloud services. With an API Gateway, you can expose your backend services through APIs, providing control over routing, security, and monitoring.
Here is my over-simplified view of what an API Gateway is:
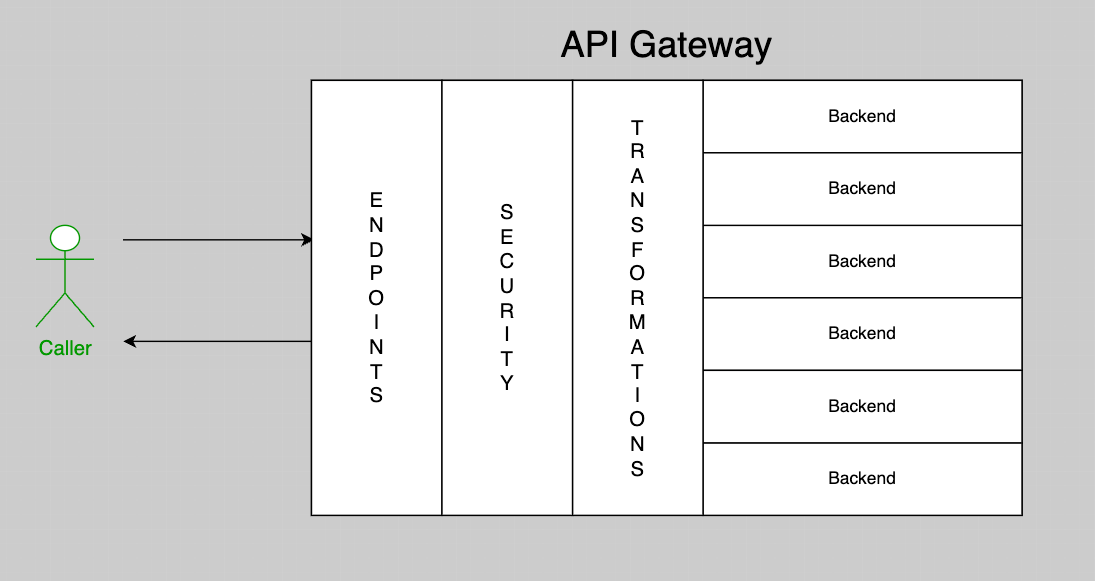
In our case, we will use the API Gateway to:
- Make a public endpoint that customers can invoke
- Call a Function TextAnomalyDetectionForAPIGateway that we will create to serve as the backend
- Use a simple API Key scheme for Authentication. A custom Function can be used for that, and we will create a ApiKeyAuthentication Function for that. So it's 1 Function for the Backend and 1 separate Function for Authentication
OCI API Gateways is a rich service with many options to cover a variety of needs. We will showcase a few simple cases in this Post.
API Gateway Concepts
I have selected the most interesting parts from the API Gateway documentation.
API Gateway
In the API Gateway service, an API Gateway routes inbound traffic to backend services including public, private, and partner HTTP APIs, as well as OCI Functions.
An API gateway resides within a compartment. Each API Gateway has a single front end, zero or more backends, and zero or more APIs deployed on it as API deployments.
API
In the API Gateway service, an API is a set of backend resources, with methods (for example, GET, PUT) that can be performed on each backend resource in response to requests sent by an API client.
API Deployment
In the API Gateway service, an API deployment is the means by which you deploy an API on an API Gateway.
When defining or modifying our API Gateway, we will spend most of our time setting up the API Deployment properties.
Backend
A backend is responsible for providing the Business Logic.
You can also grant API Gateway access to other Oracle Cloud Infrastructure services as backends. For example, you could grant an API Gateway access to OCI Functions. So you can create and deploy an API that is backed by a serverless OCI Function. This is what we will be using in our PoC.
OCI API Gateway Service vs ORDS
Oracle REST Data Services (ORDS) and the API Gateway Service are two alternatives to provide REST APIs. See the optional section at the end of this post.
Logic Flow
In Part 2, the Logic Flow to Detect Text Anomaly in images was:
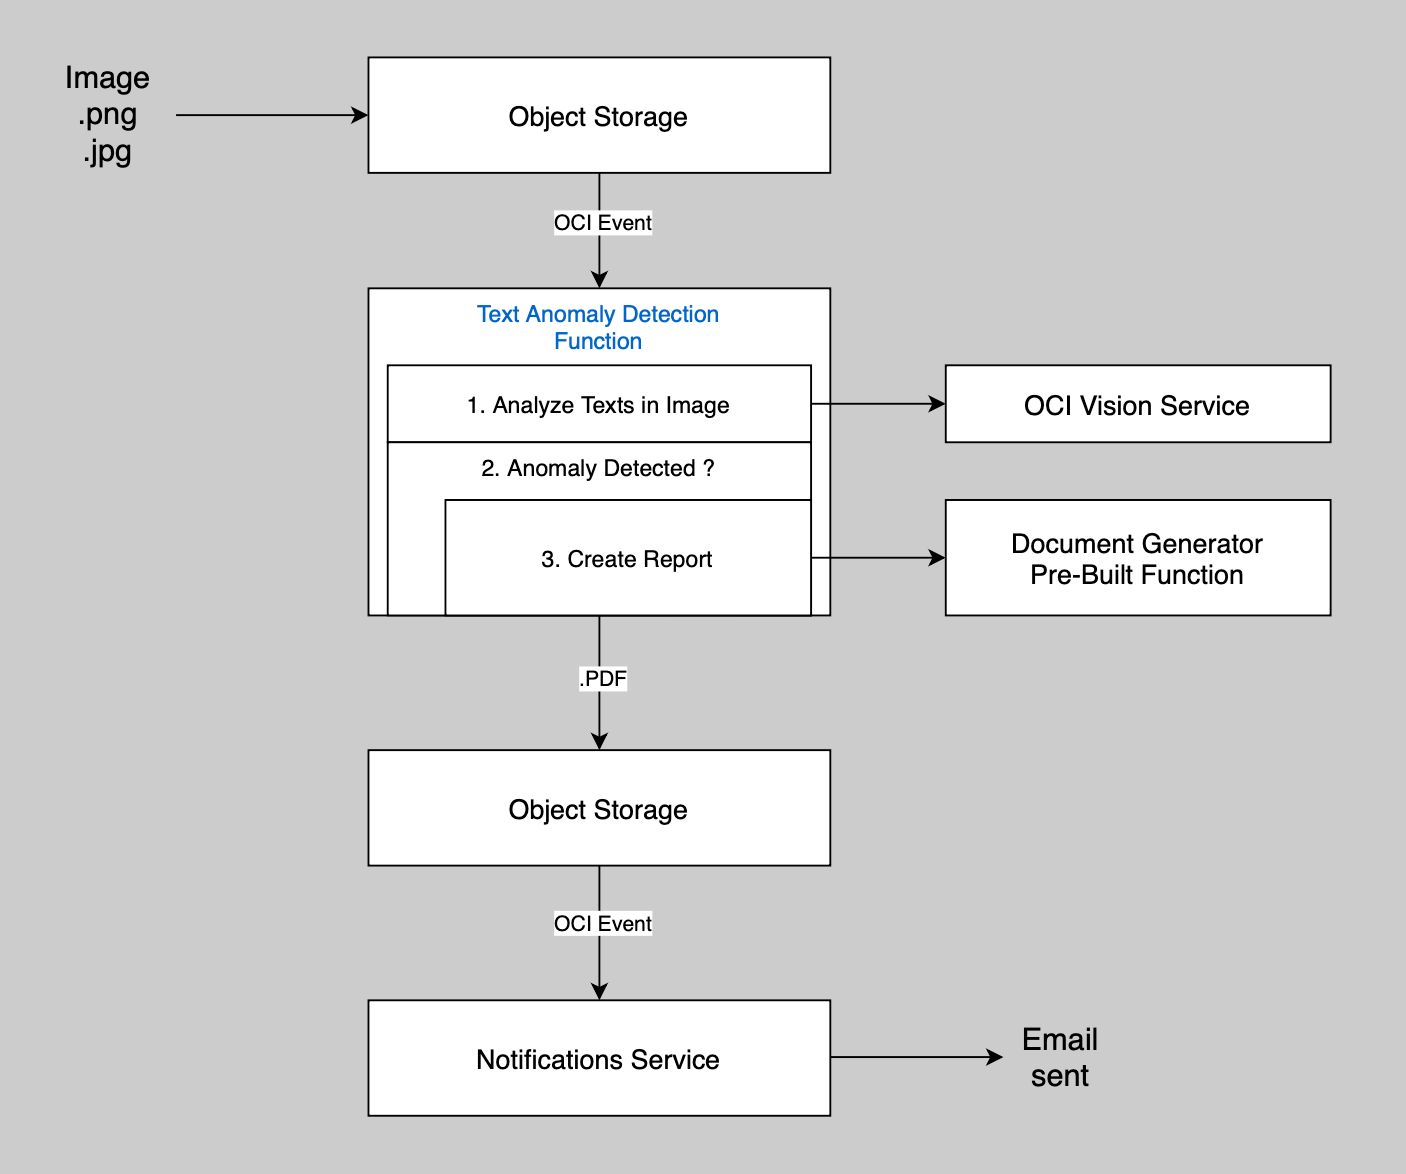
Our TextAnomaly Detection Function will now be called directly from our API Gateway instead of from OCI Events, so the new Logic flow is:
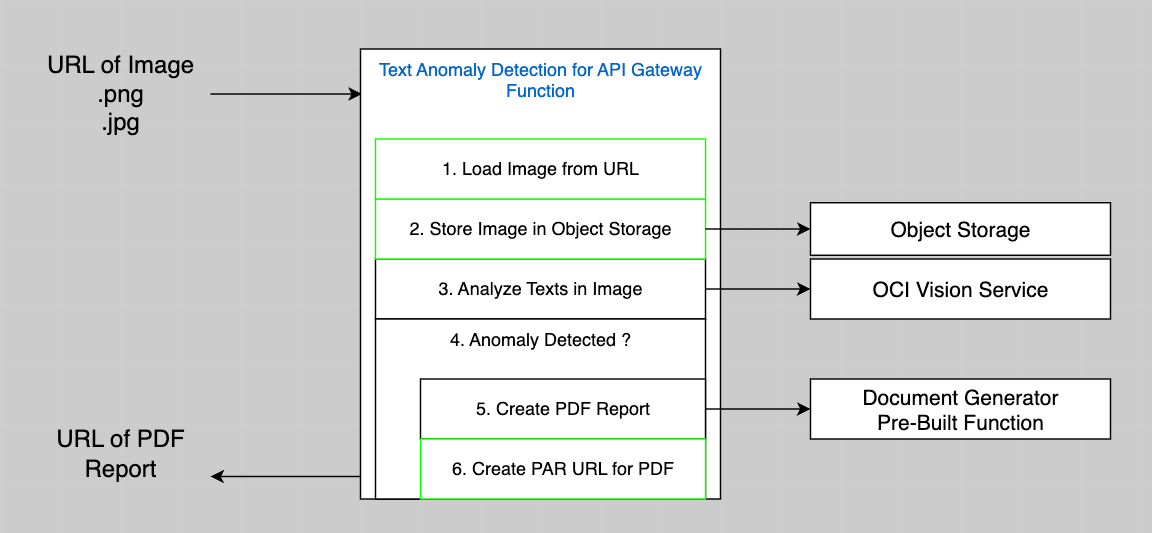
Here is a summary of the steps (the new steps are in green):
- When the Text Anomaly Detection Function for API Gateway (TextAnomalyDetectionForAPIGateway) is called, it will receive the URL of an Image to analyze
- We store the image that may contain some texts in an OCI Object Storage Bucket
- Our TextAnomalyDetection Function calls OCI Vision AI Service to detect all the texts in the image. Each word will have a confidence level that corresponds to AI Vision model's probability of being right
- When the confidence level for a word is below a certain percentage, it means that this word is hard to recognize and is considered an anomaly. If there are no Anomalies, the processing stops here
- Our Text Anomaly Detection Function calls the Document Generator Pre-Built Function that we created and used in Part 1 of this Series to generate a PDF report that includes:
- The image
- Each word that appears unclear (with its confidence level and position in the image)
- Each word that appears clear
- We generate a URL for a Pre-Authenticated Request that allows anyone to read the PDF generated by the Document Generator in Object Storage. That URL is returned in our Response to the API Gateway
Phase 1 - Create a basic API Gateway with no Authentication
To get the basics of how an API Gateway works, we will create a simple API Gateway using the OCI Console. We will use the same compartment (fun_oci_functions) and VCN (fun_oci_functions_vcn) created in Part 1.
Create a Basic API Gateway (with no security)
Login to your OCI account. In the top left Hamburger menu, select Developer Services, then Gateways under API Management.
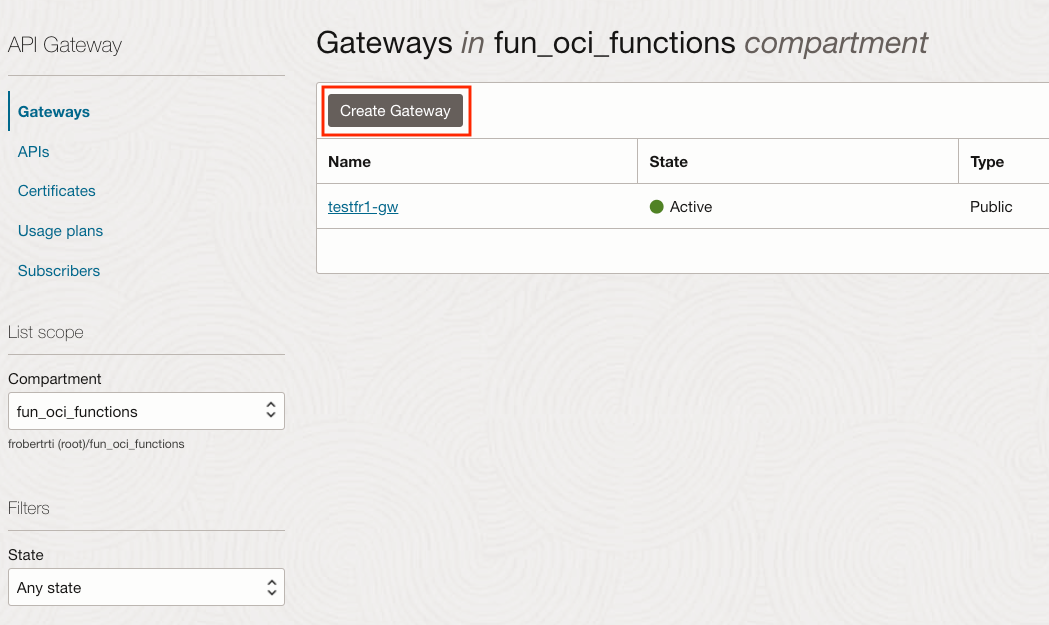
On the left, make sure that the Compartment fun_oci_functions is selected.
Click on Create Gateway. You get a page define your API Gateway.
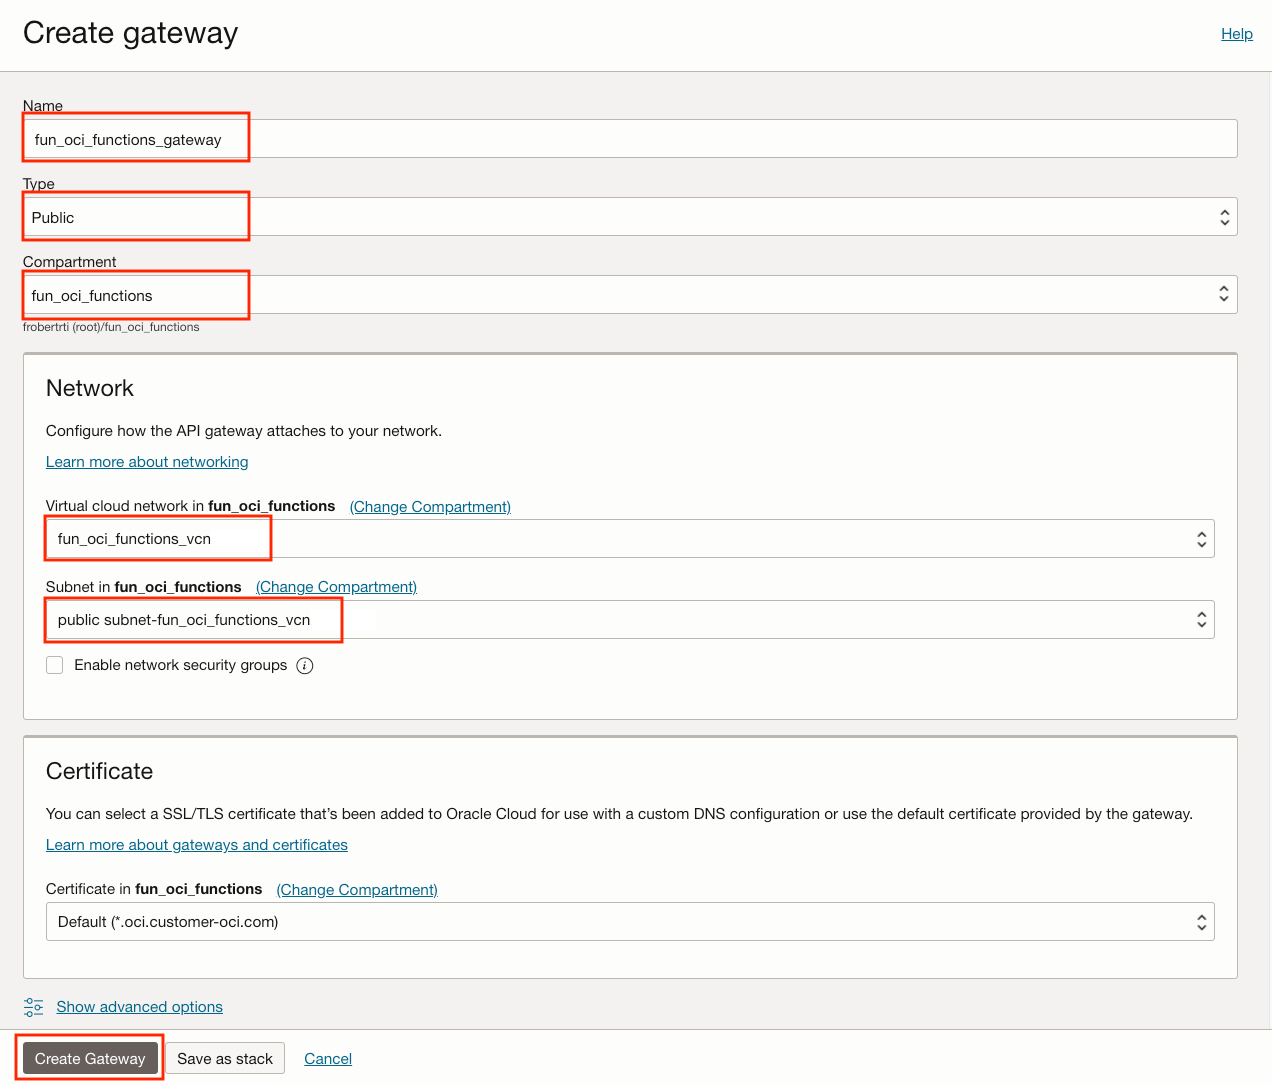
- Name: fun_oci_functions_gateway
- Type: Public, since we want a public endpoint using a public IP
- Compartment: fun_oci_functions
- Network VCN: fun_oci_functions_vcn
- Subnet: Select the public subnet-fun_oci_functions_vcn
Click on Create Gateway at the bottom.
Note that we could have used our own domain name by including our certificate here. For this PoC, we will use the default *.oci.customer-oci.com.
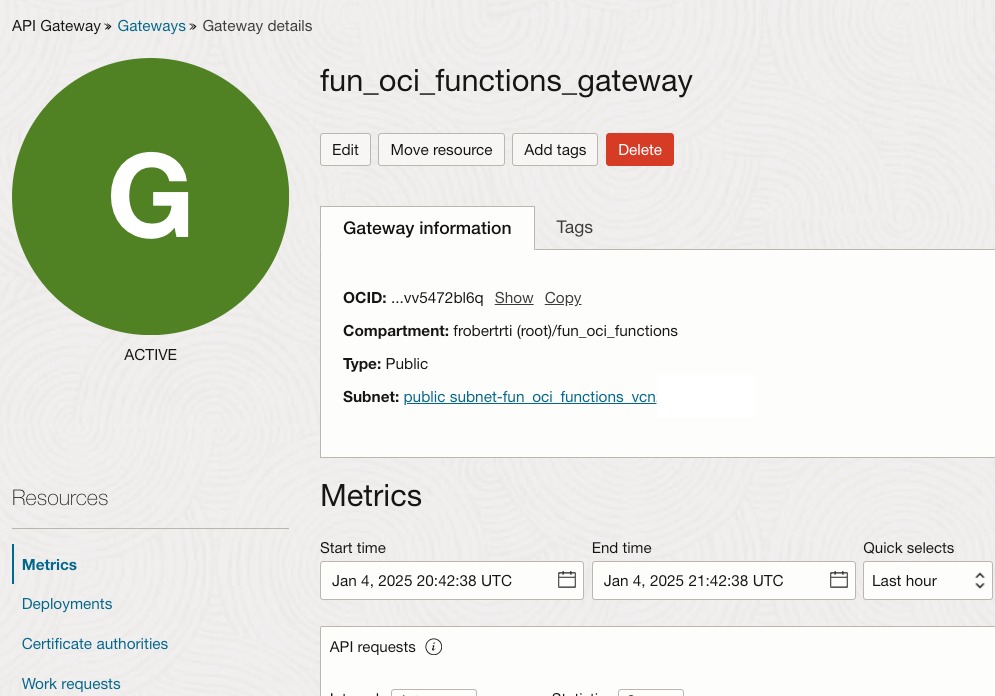
The API Gateway will be created and once it is ACTIVE you will see the above green circle.
An API Deployment is the means by which you deploy an API in an API Gateway.
Let's create a Deployment now.
Click on Deployments on the left, then click on the Create Deployment button.
This starts a Configuration Wizard that allows to completely configure this deployment.
We will focus on the essential parts of the Wizard to address the needs of our PoC
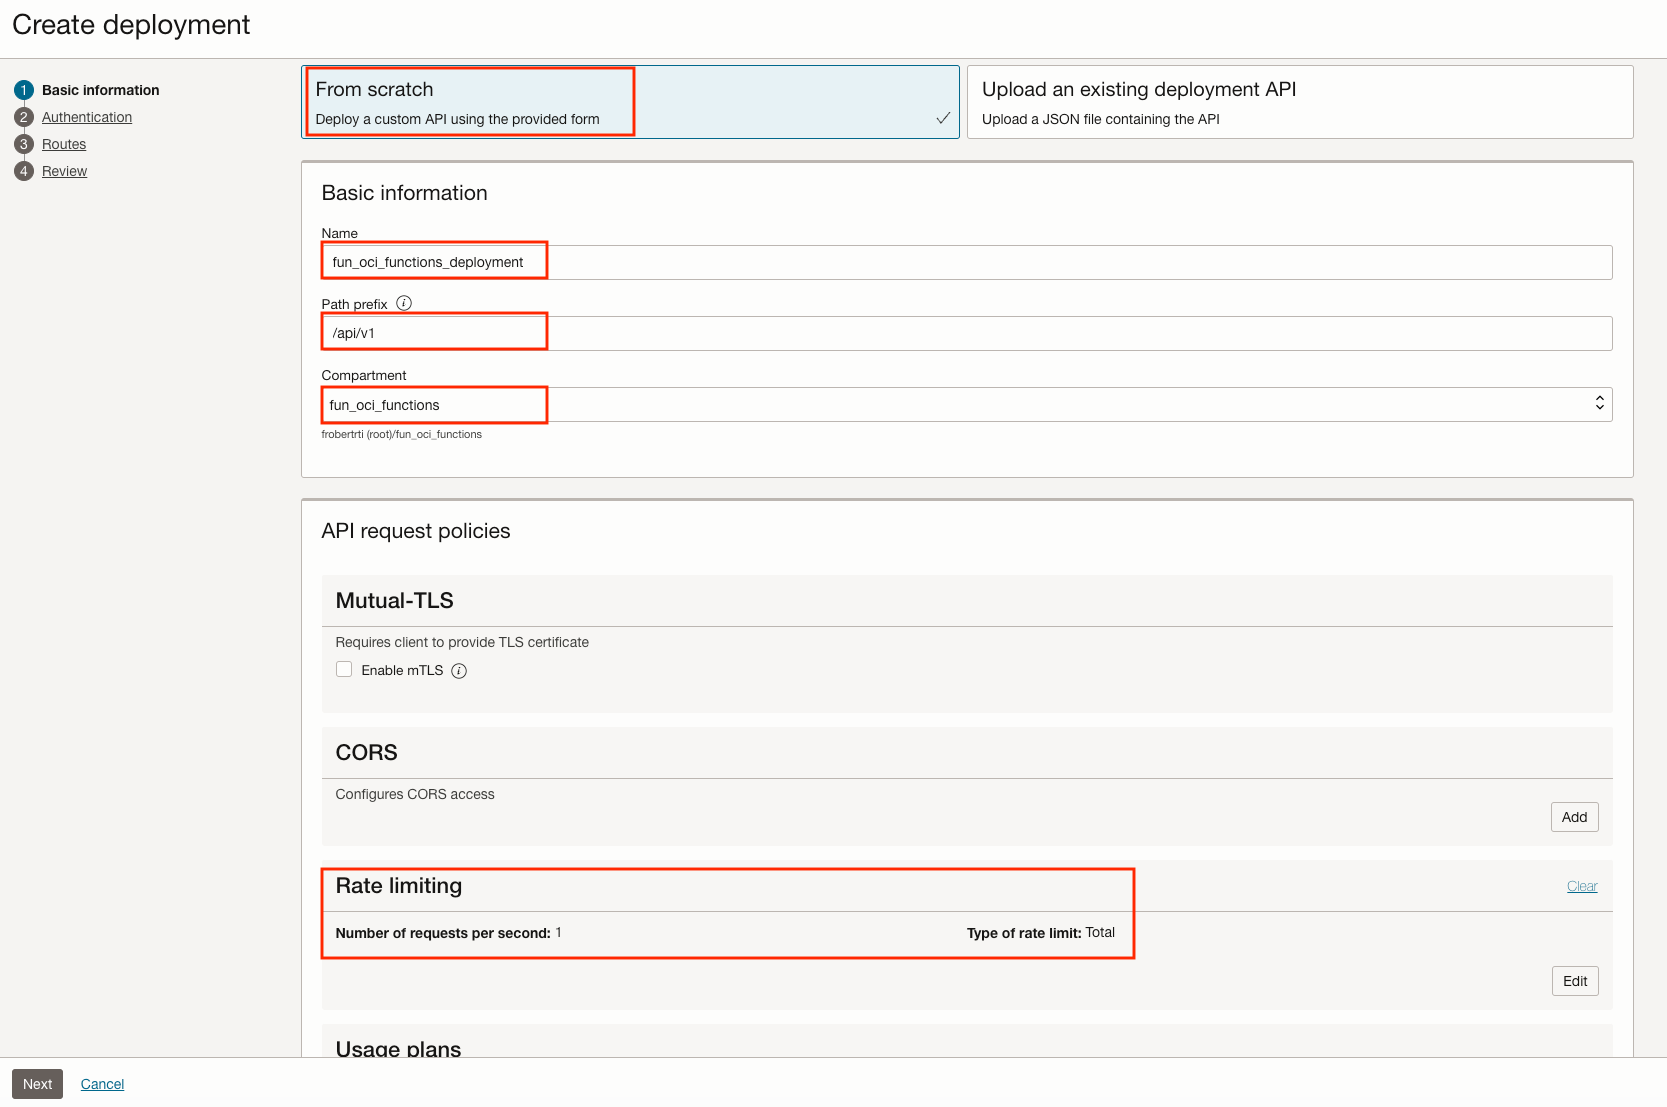
In the Basic information section:
- From Scratch
- Name: fun_oci_functions_deployment
- Path prefix: /api/v1
- Compartment: fun_oci_functions
- Rate Limiting - Number of requests per second: 1
- Rate Limiting - Type of rate limit: Total
Click on the Next button at the bottom
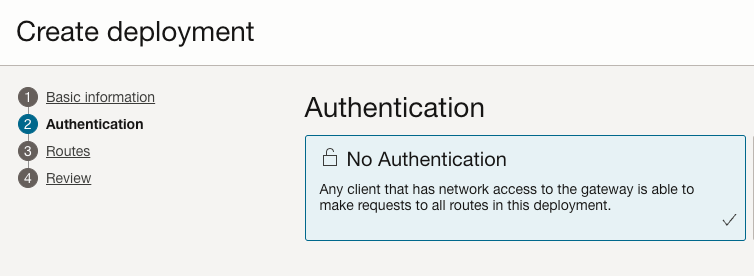
In the Authentication section:
- We will simply select No Authentication for now. Once we have verified that our minimal API Gateway works, we will revisit the Authentication model.
Click on the Next button at the bottom.
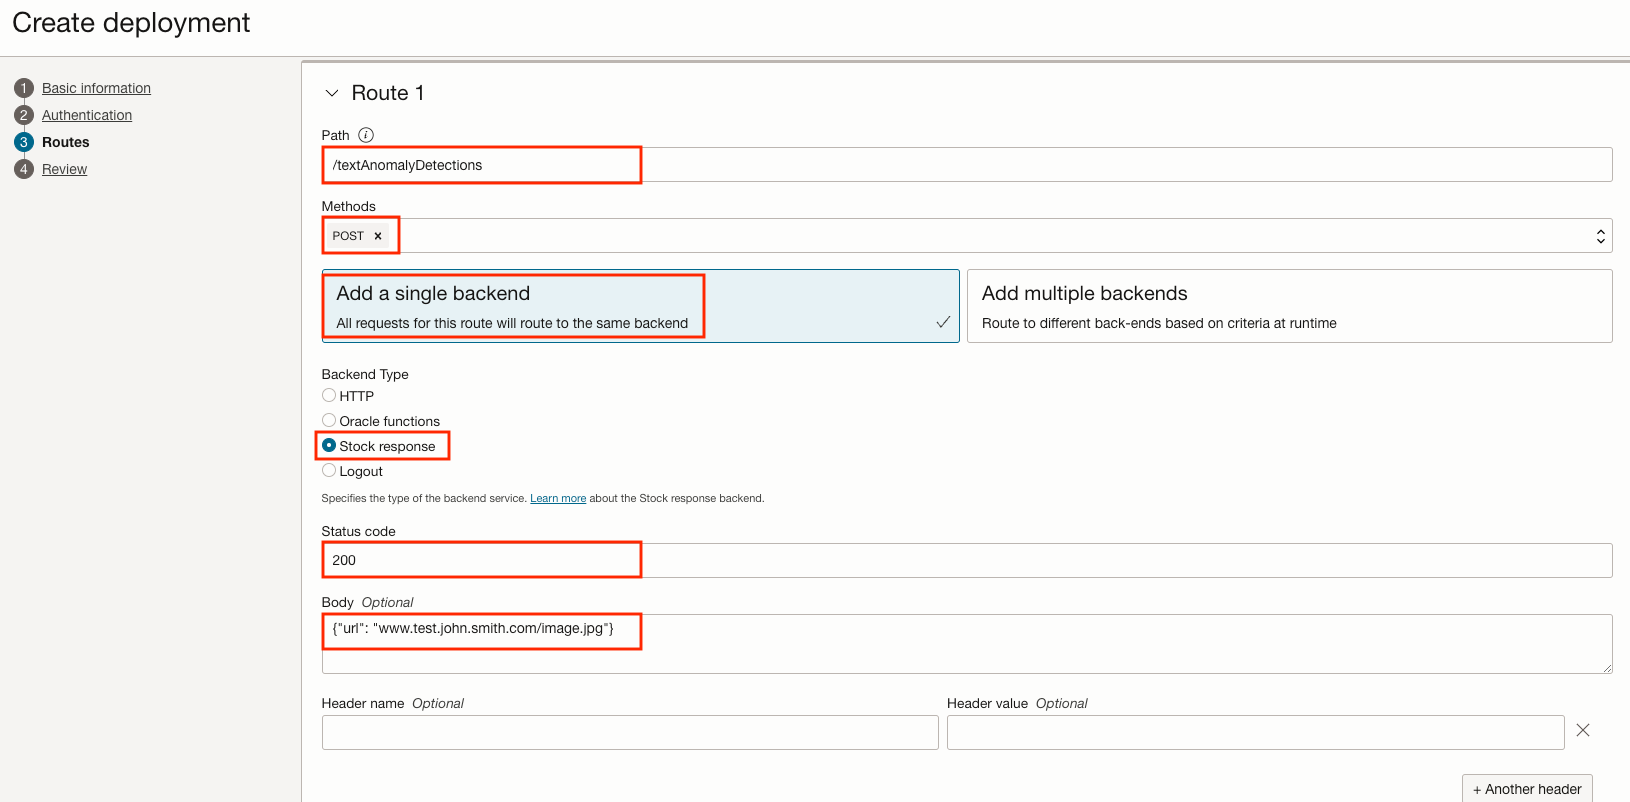
Each Deployment Route allows you to connect to 1 or more backends. In the Routes section:
- Path: /textAnomalyDetections
- Methods: Post
- Backends: Add a single backend
- Backend Type: Stock response
- Status code: 200
- Body: {"url": "www.test.john.smith.com/image.jpg"}
Click on the Next button at the bottom.
In the Review section:
- Verify that your options are OK.
Click on the Create button at the bottom.
The Deployment will be in a creating state, then it will become active after a few minutes.

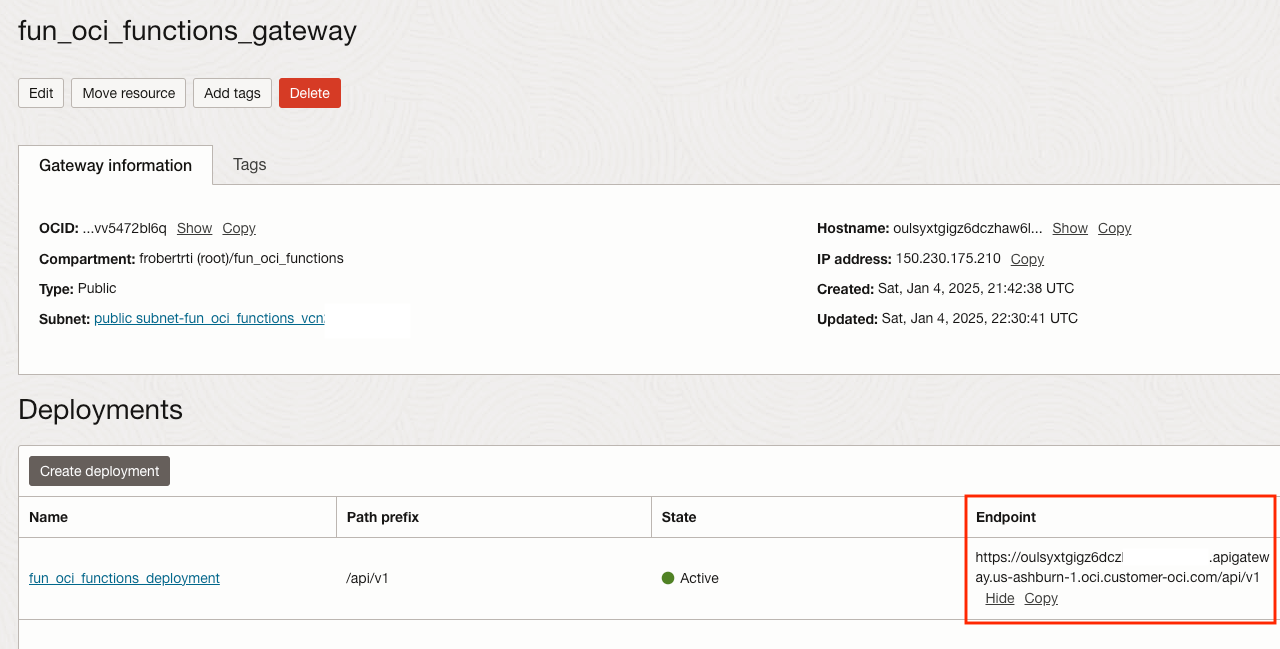
Once Active, note the deployment endpoint URL like: `https://aaazzz.apigateway.us-ashburn-1.oci.customer-oci.com/api/v1
Endpoint URL
Before we try a POST with Postman, let's clarify one thing about the final endpoint URL. The URL is composed of 4 parts:
https://as we will use HTTPS- The API Gateway unique sub-domain name. Something like
aaazzz.apigateway.us-ashburn-1.oci.customer-oci.com - The deployment path prefix,
/api/v1in our case - The route in the deployment. We created only one route named
/textAnomalyDetections
So the final endpoint URL is something likehttps://aaazzz.apigateway.us-ashburn-1.oci.customer-oci.com/api/v1/textAnomalyDetections
Allow incoming HTTPS traffic
Actually, let's also clarify a second thing. The public subnet, initially created by the VCN wizard on Part 1, is public, obviously, but by default, it does not allow incoming HTTPS traffic. To send our POST request, we will first need to add a Security List to allow HTTPS traffic. Go to the subnet configuration.
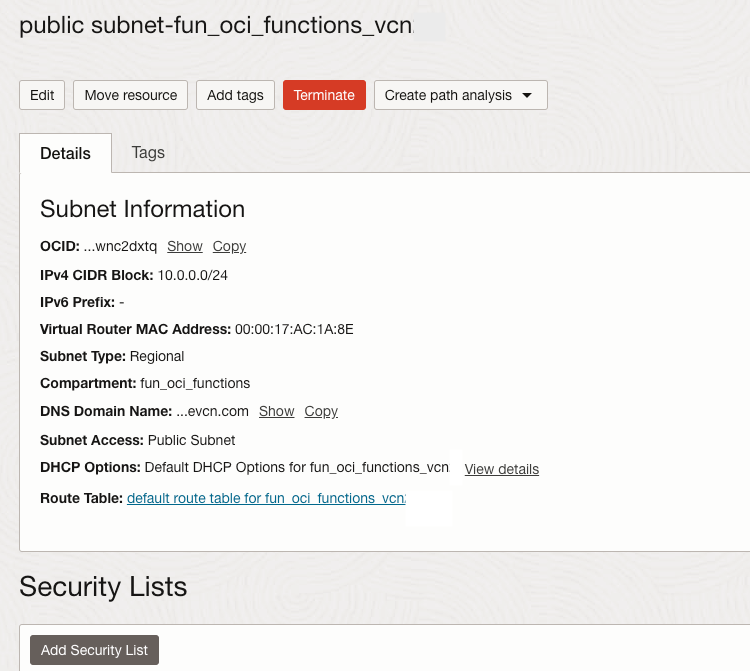
Click on Add Security List.
Then create an Ingress rule to allow all incoming HTTPS (port 443) traffic. Once defined it will look like:

Try with Postman
We are ready to do a simple POST with the URL.
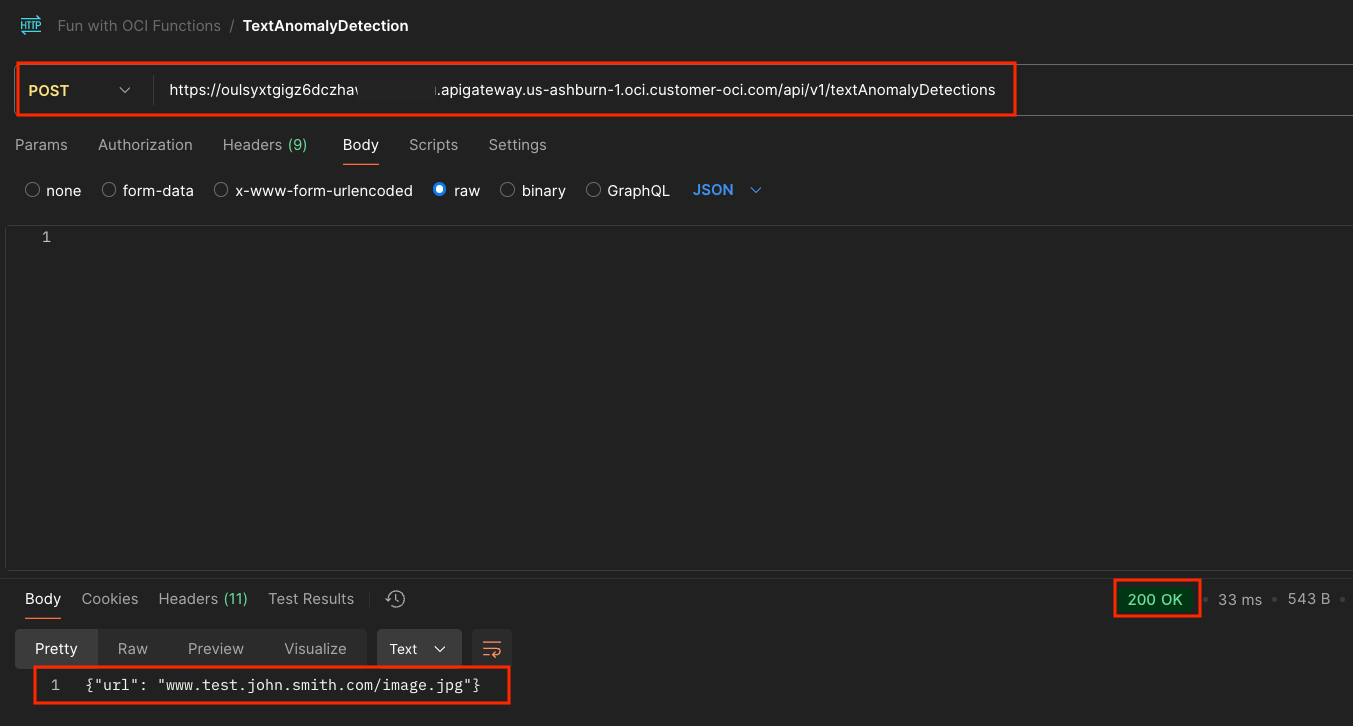
That works. We receive the Stock Response Status code (200) and body ( {"url": "www.test.john.smith.com/image.jpg"}) that we previously set.
It's time to pause and reflect on what we accomplished so far.
We have created a public endpoint that can be called from anywhere. That's good!
Now, we have to do 2 things:
- Secure our Endpoint
- Create code that will do the actual Text Anomaly Detection
The fun thing is that we will use OCI Functions to do both of these tasks!!!
Phase 2 - Adding Authentication with API Keys
API Gateways Service has multiple options to secure our API Gateways. For use in a Production system, I strongly recommend that you read and understand this API Gateway documentation. We will cover some basic cases here:
- No Authentication: Simplest option when security is not a concern. This is what we implemented so far in this Post.
- OAuth 2.0 Authentication: The API Gateway integrates with an external identity provider (IdP), such as Oracle Identity Cloud Service (IDCS), that supports OAuth 2.0 standards. It validates JWT tokens issued by the IdP to ensure the requester is authenticated and authorized.
- Authentication Function: A custom Authentication OCI Function is invoked by the API Gateway to validate incoming requests. This is a flexible approach that lets you define custom authentication and also authorization logic. This is what we will do now to implement a very simple API key validation.
Create the Authentication Function
The creation process will be similar to what we have done in Part 2. Let's generate boilerplate code for our Function. In Cloud Shell, type:fn init --runtime python ApiKeyAuthentication
Clone or Download the repo that I have prepared on GitHub;
Now, in Code Editor, replace the code of your func.py with the content of my functions-code/ApiKeyAuthentication/func.py from my GitHub repo.
The core logic is very simple:
    valid_api_keys = ["11cb5027-28d2-4359-b8e8-cc209a963a0d",
                      "6340df79-56c7-401d-b6d0-2cdfb0591ea6",
	                  "58717bb9-44a1-4072-b498-c78c22a85919"]

    try:
        auth_token = json.loads(data.getvalue())
        token = auth_token.get("data").get("api-key")

        if token in valid_api_keys:
            # Authenticated
For simplicity, we have a set of hardcoded API keys that all have the same privileges.
To create the Function's Docker image:
- In Code Editor's menu, click on Terminal/New Terminal.
- From the new terminal type:
cd ApiKeyAuthenticationfn -v deploy --app fun_oci_functions_app
We can now go in the OCI Console to verify that the Function is there.
Configure the API Deployment to use the Authentication Function
Add a Policy to allow Function invocation
As we remember from the previous posts, Policies (explicit permissions) must be created for all OCI Resources or users to invoke an OCI Function.
Here, we will allow any API Gateway in the fun_oci_function compartment to call OCI Functions. We can go in the OCI Console to define that policy.
In the OCI Console Hamburger menu, select Identity & Security, then Policies under Identity.
On the left, make sure that the Compartment fun_oci_functions is selected.

Click on the Create Policy button, and fill the screen like below. Note that:
- We use the "Show manual editor" toggle
- In the policy statement:
Allow any-user to use functions-family in compartment fun_oci_functions where all {request.principal.type = 'ApiGateway', request.resource.compartment.id = 'ocid1.compartment.oc1..aaaaaaaa6qe5zqr6dtokrxlyrwaga26wijgrydmfqc2tmnlxmz6qj5kajytq'}
For the request.resource.compartment.id value, use the Compartment OCID of your fun_oci_functions compartment.
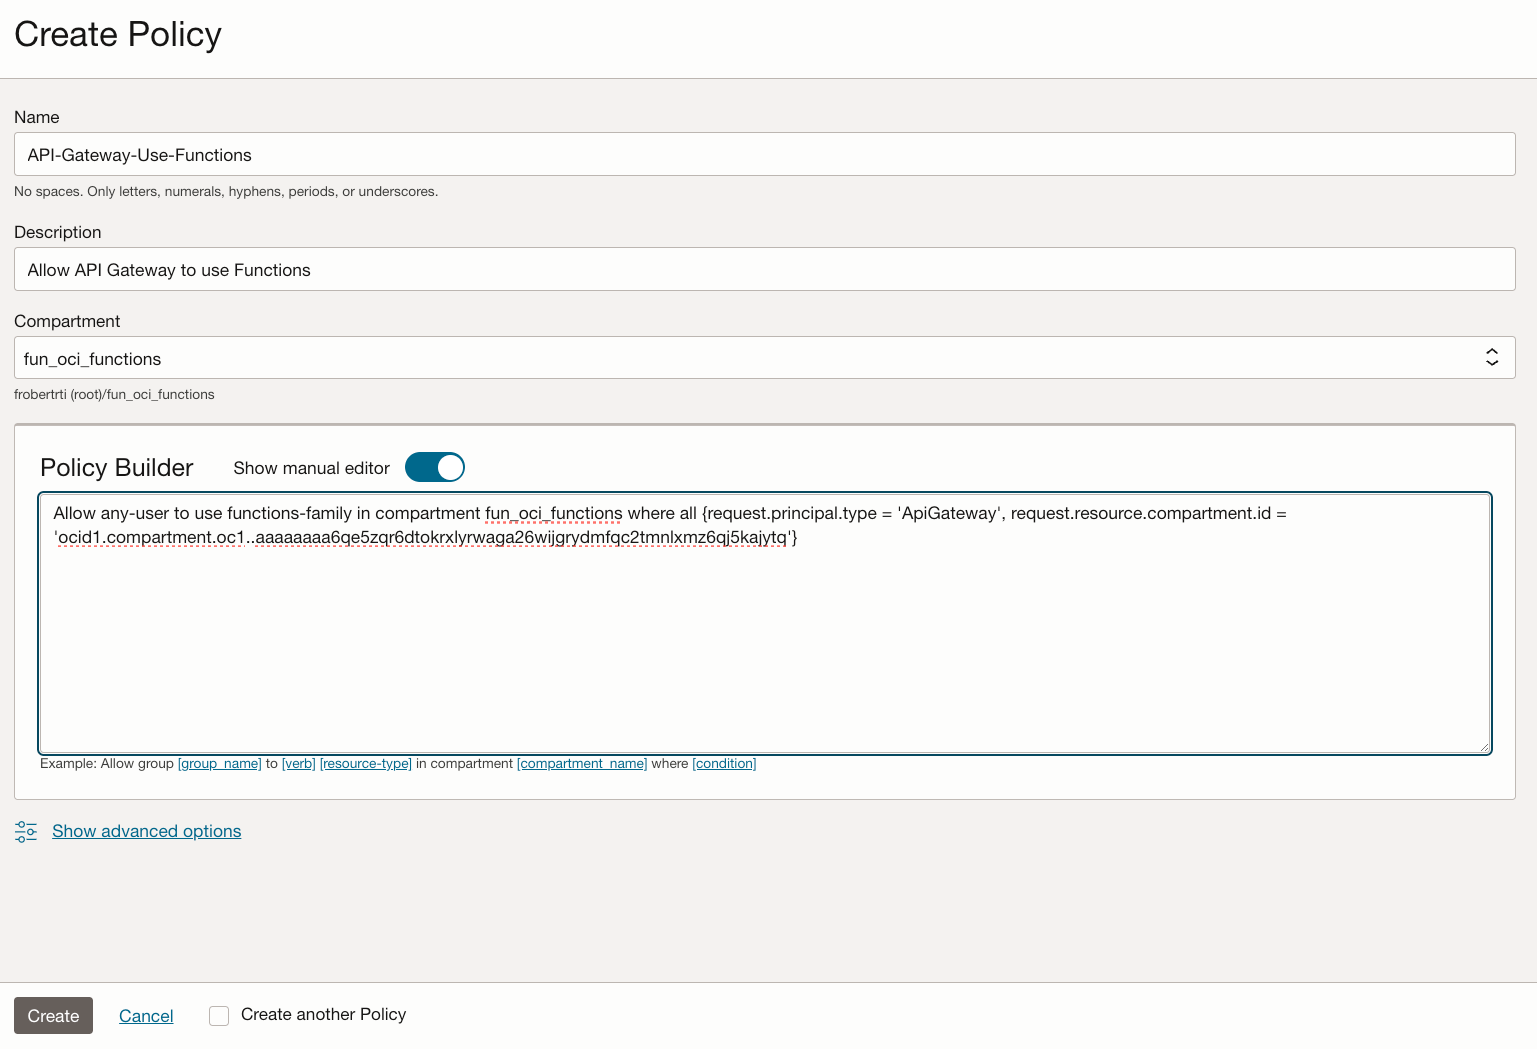
Now the policy is added, we go back to your API Gateway deployment named fun_oci_functions_deployment,
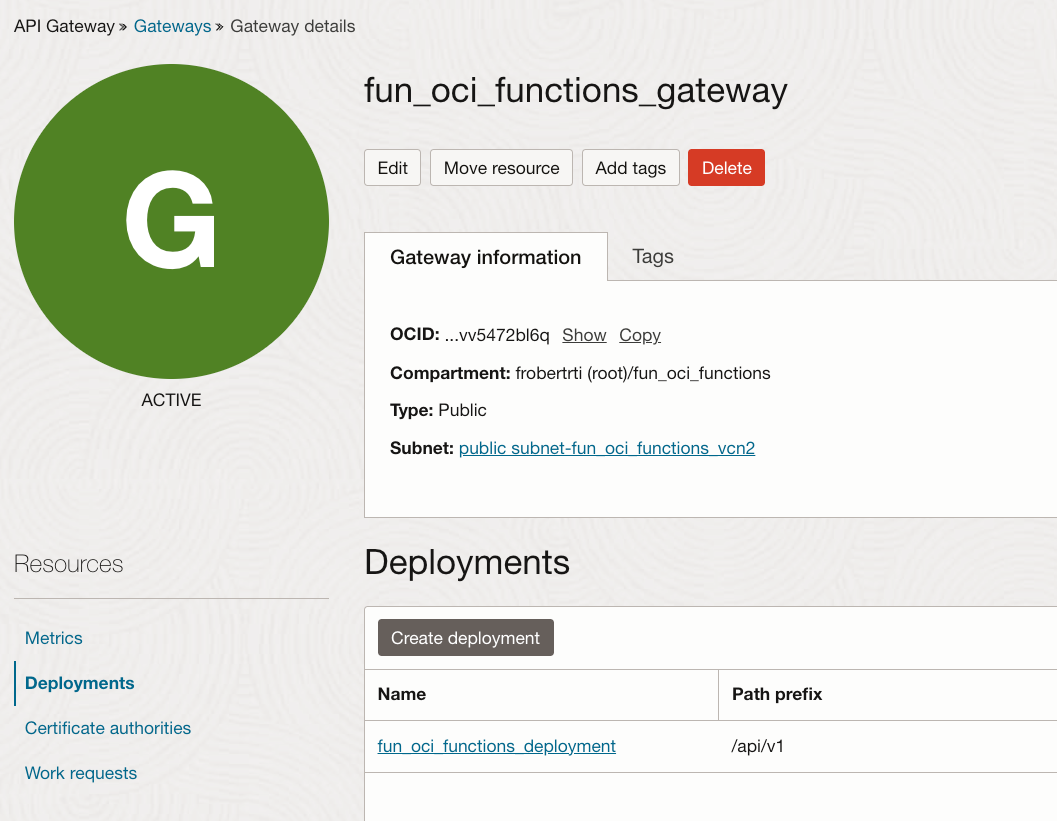
Select Deployments on the left
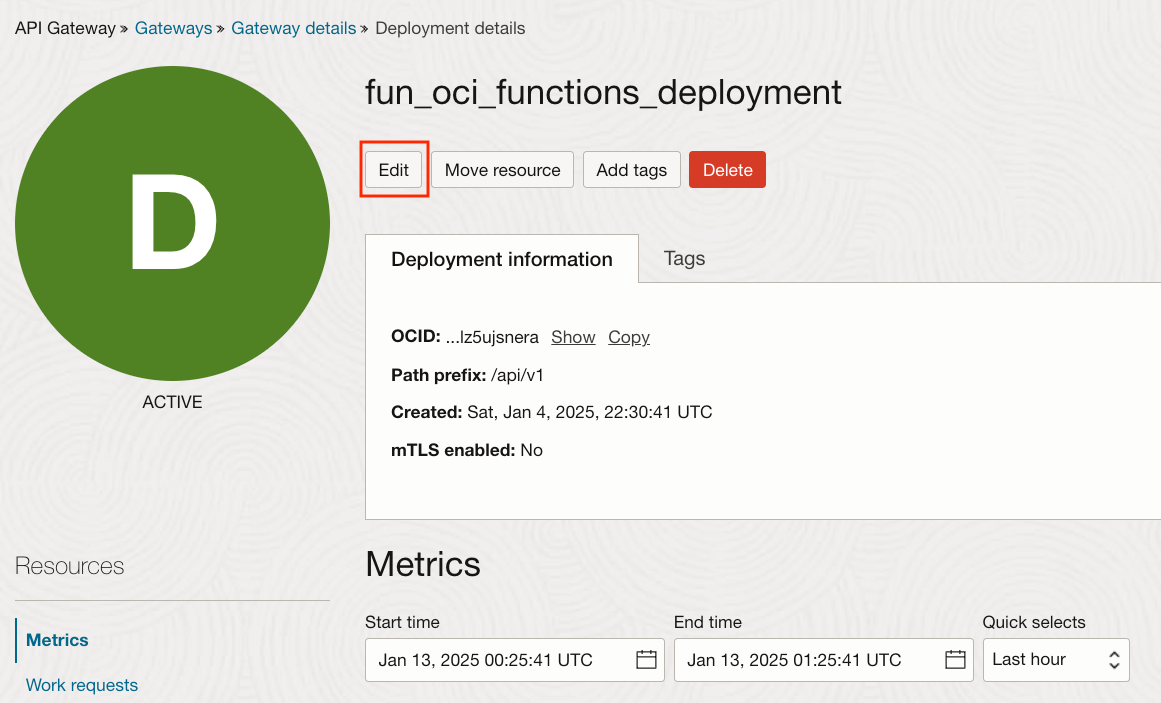
and click the Edit button at the top to get back in the API Deployment wizard.
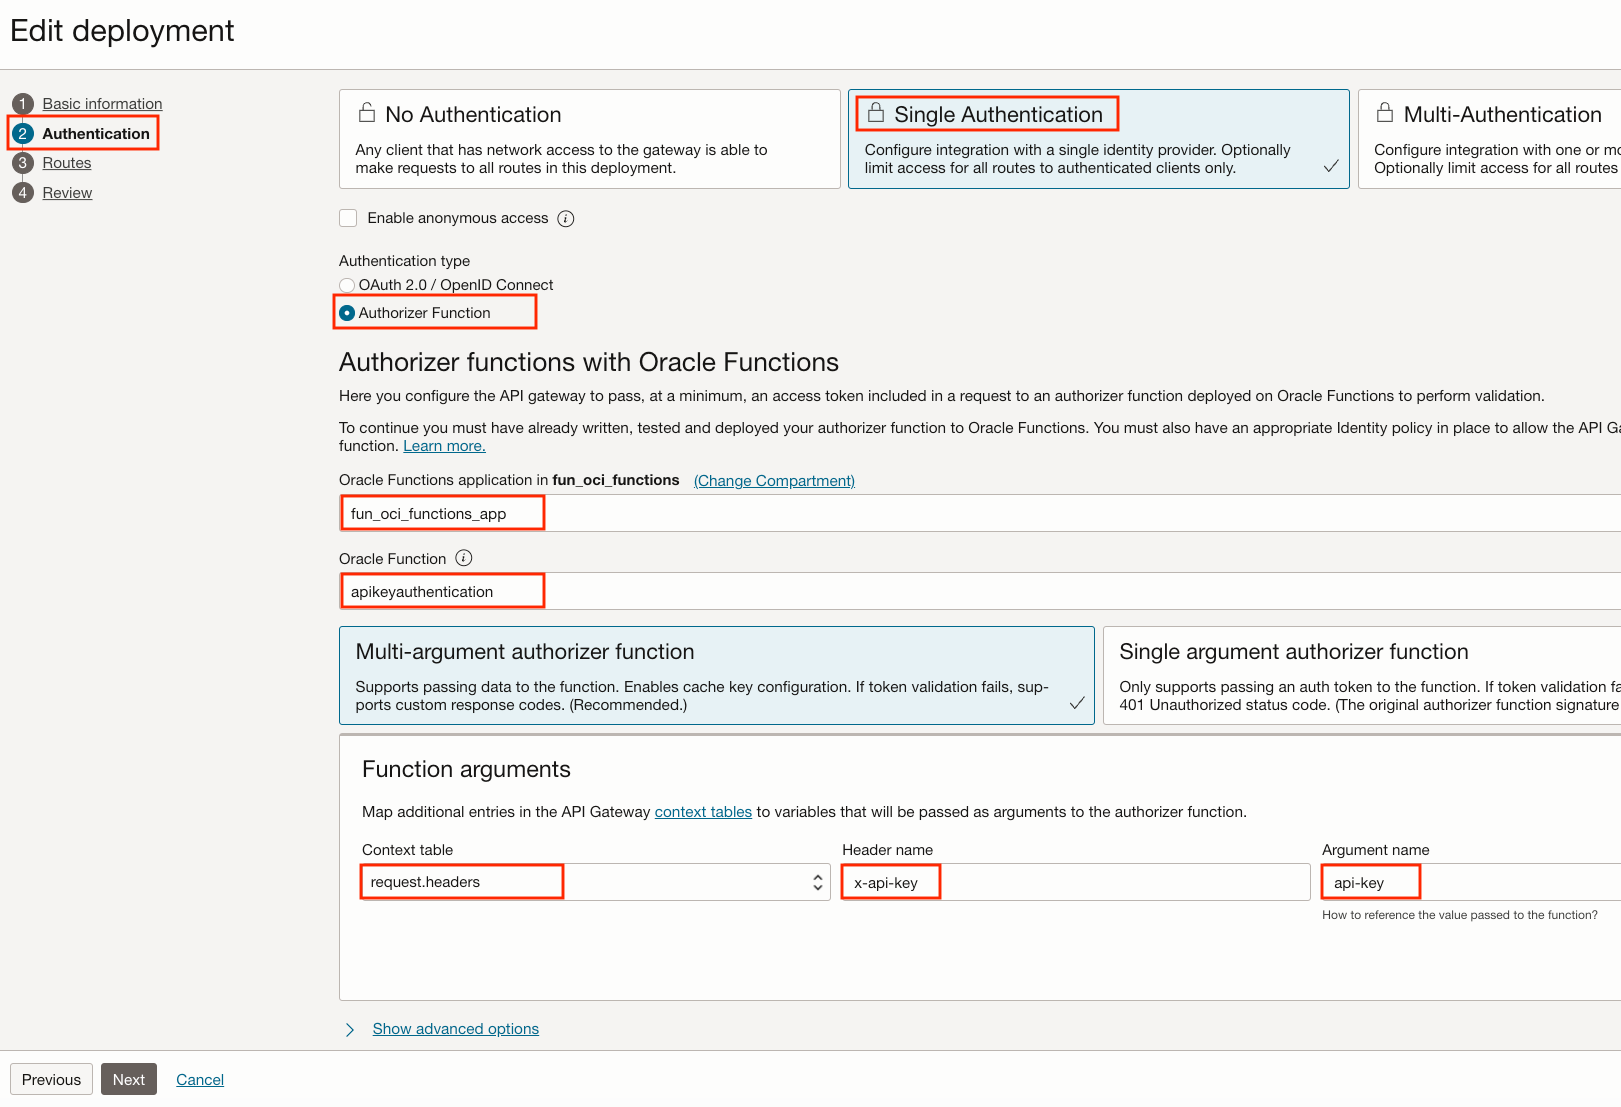
Set up the Authorizer Function
- Select Authentication on the left
- Select Single Authentication
- Select Authorizer Function
- Select the Function application named fun_oci_functions_app
- Select our
apikeyauthenticationFunction that we just created
The last thing to configure is the transformation of the API Key from the HTTP request header to our function apikeyauthentication Function.
In the Function arguments section, set:
- Context table: request.headers
- Header name: api-key
- Argument name: x-api-key
It means that the value of the header namedx-api-keywill be put in a parameter namedapi-keyin the JSON data sent to the Authorizer Function.
Click Next, then Next, then Save Changes. Our deployment will be updated in about 1 minute.
Test Authentication with Postman
Let's test the same request that we did before:
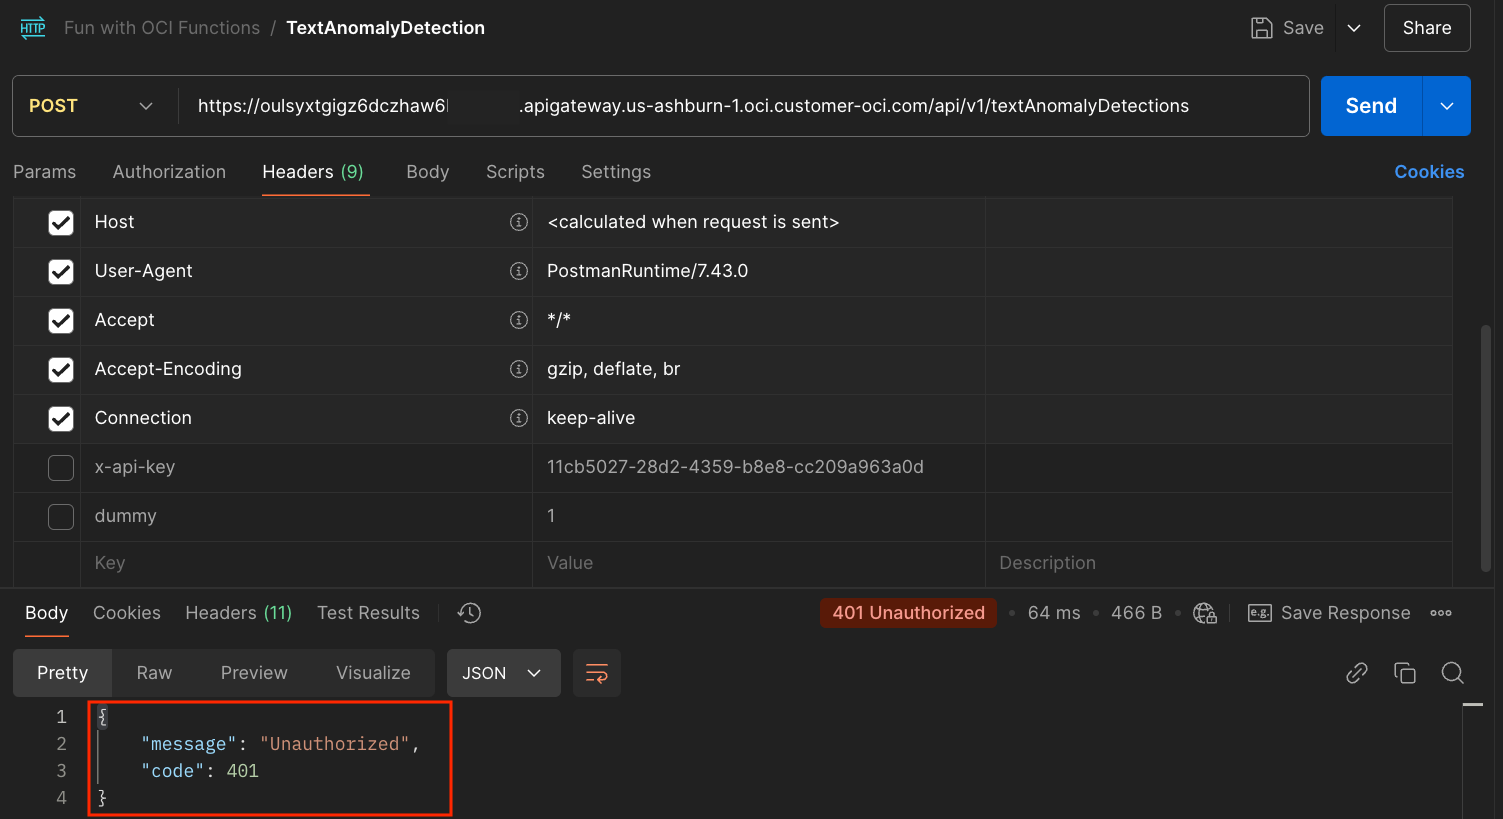
The first invocation takes about 1 minute because of the Function cold start. As expected, we receive a 401 (Unauthenticated) indicating that our API Gateway now refuses requests without an API Key.
But setting the Header x-api-key to one of the values in the set of 3 allowed API keys should work.
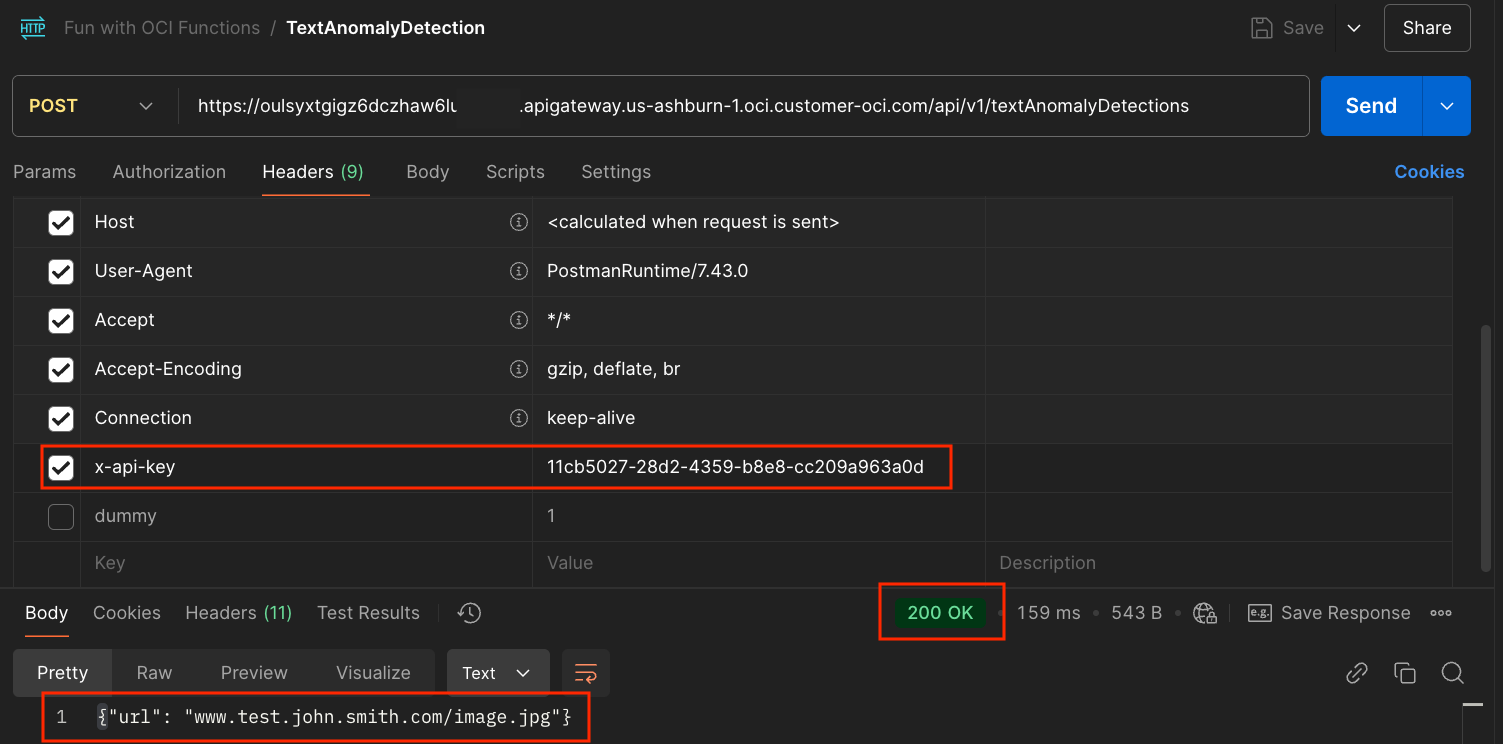
That works. We receive the Stock Response status code (200) and body ( {"url": "www.test.john.smith.com/image.jpg"}) as before.
It's time for another pause to reflect on what we accomplished so far.
We have created a public endpoint that can be called from anywhere, but only the request that uses one of the allowed API Keys will go through. The response received is the STUB response that we configured.
Our Authentication logic is very simple at this point, but we could transform that into a better and more complete solution.
It's time to replace that STUB response with real interesting logic that will do the Text Anomaly Detection.
Phase 3 - Adding Text Anomaly Detection
Create the OCI Function TextAnomalyDetectionForAPIGateway
The creation process will be similar to what we have done in Part 2. Let's generate boilerplate code for our Function. In Cloud Shell, type:fn init --runtime python TextAnomalyDetectionForApiGateway
I already created a modified version of the code that does the real processing. In my GitHub repo, I have prepared files in the function-code/TextAnomalyDetectionApiGateway folder that you can upload using the Code Editor.
Prepare the utility code
In the Explorer part of Code Editor:
- Right-click on the TextAnomalyDetectionForApiGateway Folder and select "New Folder...".
- Name it ociutils.
- Right-click on oci_utils and click on Upload Files...
- Select the 5 files in TextAnomalyDetectionForApiGateway/oci_utils from my GitHub repo. These are utility files that the main code (in func.py) will use. Make sure that they end up in the oci_utils folder.
Feel free to check the code in each file.
Prepare the main code
In the Explorer part of Code Editor, right-click on the TextAnomalyDetection and click on Upload Files.... Select the 3 files:
- func.py
- func.yaml
- requirements.txt
You will be prompted to replace each file as they already exist.
Take some time to look at the content of func.py. Then change:
# The compartment OCID under which operations will be performed. <<<
compartment_id = "ocid1.compartment.oc1..zzz"

# The OCID of the Document Generator function. <<<
fn_ocid = "ocid1.fnfunc.oc1.iad..zzz"
with your values of Compartment OCID and Document Generator OCID.
The new logic in the function handler will:
- Parse Input JSON data to obtain the image URL to process
- Read the image from URL to memory.
- Store the image in Bucket.
- Call OCI Vision AI service to detect texts in the image
- Check if Anomalies exist. If no anomalies exist, return a status code 204
- Generate a PDF report using the OCI Document generator PBF
- Create a Pre-Authenticated Request (PAR) URL from the Bucket PDF object.
- Return the PAR in response with status code 200.
Now that we have changed the code, let's generate our final Docker image for our TextAnomalyDetectionForApiGateway Function.
On the top menu, click on Terminal/New Terminal.
From the new terminal, go in the TextAnomalyDetectionForApiGateway directory and type:
fn -v deploy --app fun_oci_functions_appto redeploy.
A new Docker image is built and then pushed to your Docker repository.
OCI Functions galore!
Our end-to-end solution now uses 3 functions:
- Text Anomaly Detection For Api Gateway: To detect anomalies
- API Key Authentication: For Authentication
- Document Generator PBF: To generate a nice PDF from an Office Template and JSON Data.
API Deployment setup to call our new Function
In the OCI Console, go back to your API Gateway deployment named fun_oci_functions_deployment, and click the Edit button at the top.
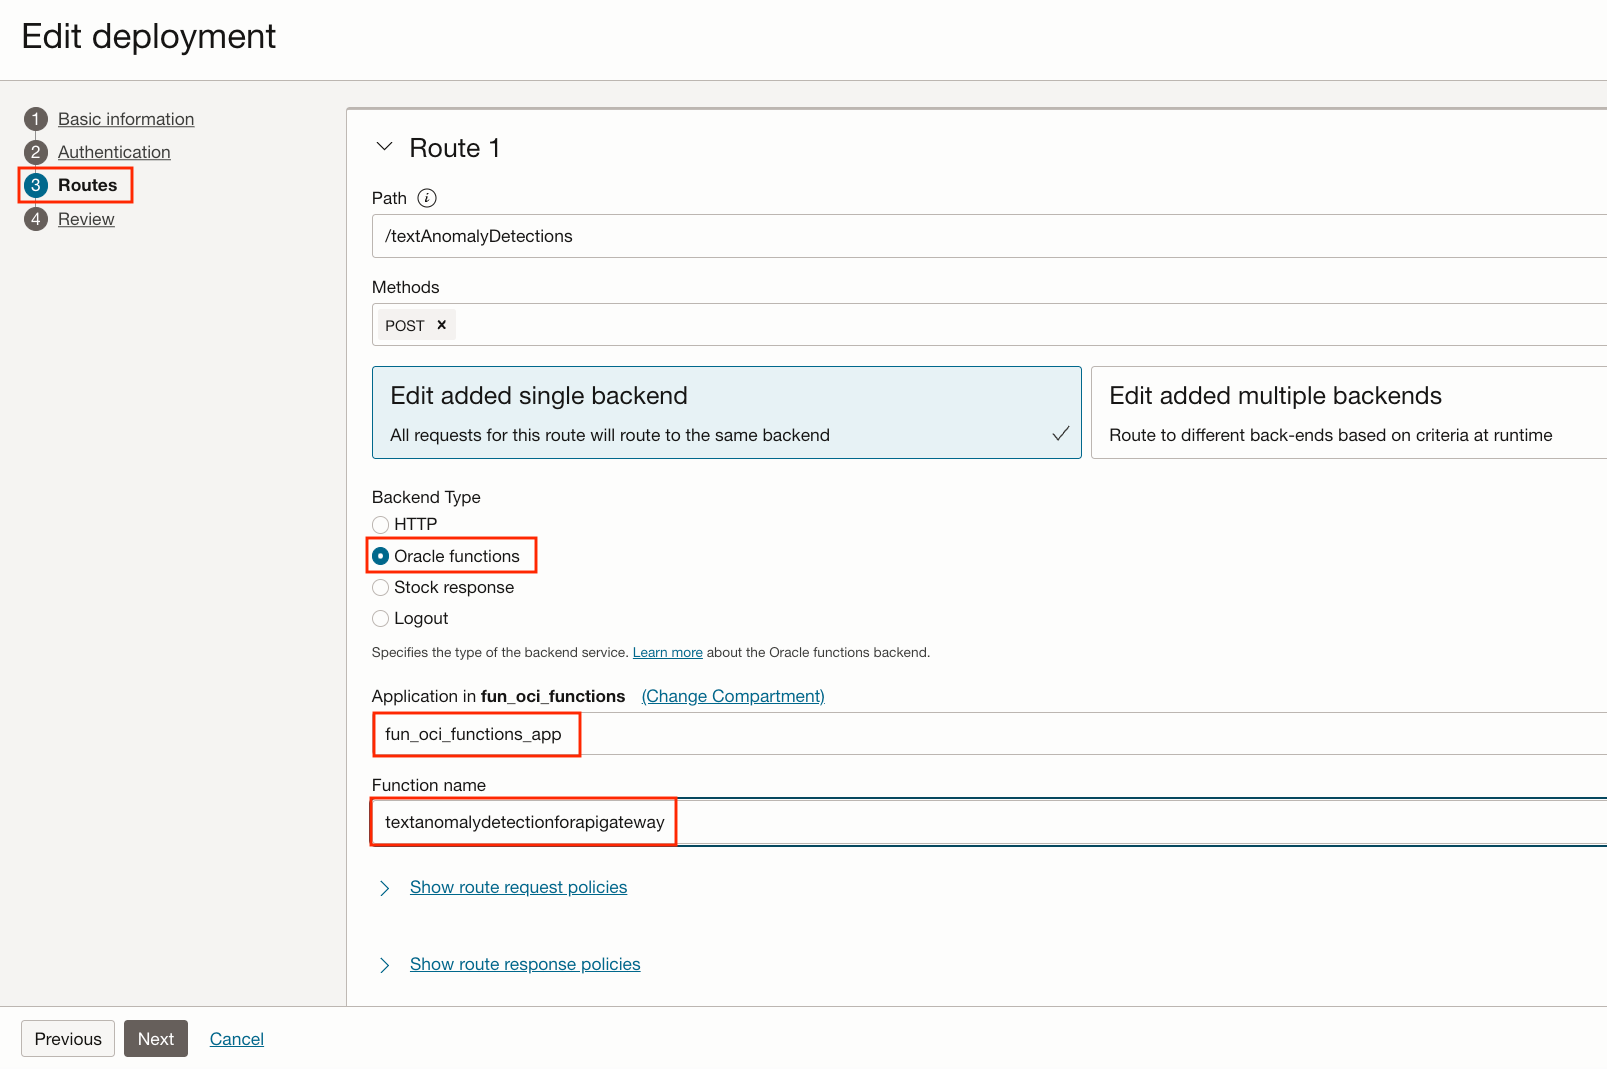
Set up the Text Anomaly detection Function
- Select Routes on the left
- Change the Backend Type from Stock response to Oracle functions
- Application: fun_oci_functions_app
- Function name: textanomalydetectionforapigateway
Click Next, then Save Changes. Our deployment will be updated in about 1 minute.
Final preparation before lift off
Same in Part 2, before we invoke our API Gateway endpoint to test the entire flow, let's take care of the MS Word template and the Font zip file that the Document Generator PBF will use to generate its report. Go into your fun_oci_functions_bucket bucket, create a part3 folder, and upload these 2 files from the document-generator-files folder my GitHub repo:
Monoton.zip. A Zip file that contains a font to be used in the PDF Title.TextAnomalyTemplate.docx. The MS Word template for the report.
Are we ready to test it now?
Well, everything is almost in place to test our Text Anomaly Detection logic. Let's take the time to go through our new logic.
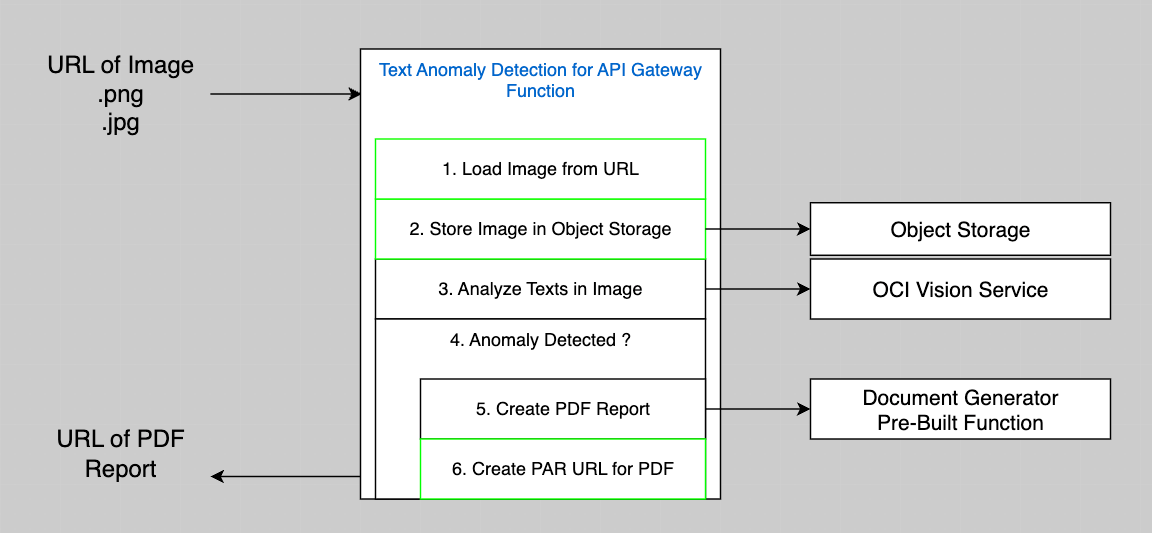
Let's consider the green boxes in the Logic diagram as they are new compared to what we had in Part 2.
- -> 1. Load Image from URL. The VCN created in Part 1 has an Internet Gateway, so it means that our Functions can read URL from the Internet. Nothing to add here.
- -> 2. Store Image in Object Storage. We will need a Policy that allows our Function to write Objects to an Object Storage Bucket.
- -> 6. Create a Pre-Authenticated Request (PAR) URL for the PDF Document that we will produce when we find anomalies. We will need a Policy that allows our Function to create PAR in an Object Storage Bucket.
Actually, we will also need a policy to allow the Function that we just created to:
- Use the OCI Vision Service
- Read and execute other functions (Document Generator PBF)
Policies
Let's go Back to the Policies in the OCI Console and create a new policy that covers all this:
allow any-user to use ai-service-vision-analyze-image in compartment fun_oci_functions where any { request.principal.id = 'ocid1.fnfunc.oc1.iad.zzz'}
allow any-user to read fn-function in compartment fun_oci_functions where any { request.principal.id = 'ocid1.fnfunc.oc1.iad.zzz'}
allow any-user to use fn-invocation in compartment fun_oci_functions where any { request.principal.id = 'ocid1.fnfunc.oc1.iad.zzz'}
allow any-user to manage objects in compartment fun_oci_functions where any { request.principal.id = 'ocid1.fnfunc.oc1.iad.zzz'}
allow any-user to manage buckets in compartment fun_oci_functions where any { request.principal.id = 'ocid1.fnfunc.oc1.iad.zzz'}
Where ocid1.fnfunc.oc1.iad.zzz is the OCID of the Function that we just created for TextAnomalyDetectionForApiGateway.
Minimizing Cold Start in Production
So far, when we invoked OCI Functions for the first time, we experienced Cold Starts, meaning that we had to wait between 30 and 60 seconds for the Function to be ready. We can get that wait time to be close to zero using Provisioned Concurrency. Using Provisioned Concurrency Units (PCU) has a small cost (Provisioned Concurrency is priced at 25% of the Execution Time when unused), but it may be worth the cost in a Production environment.
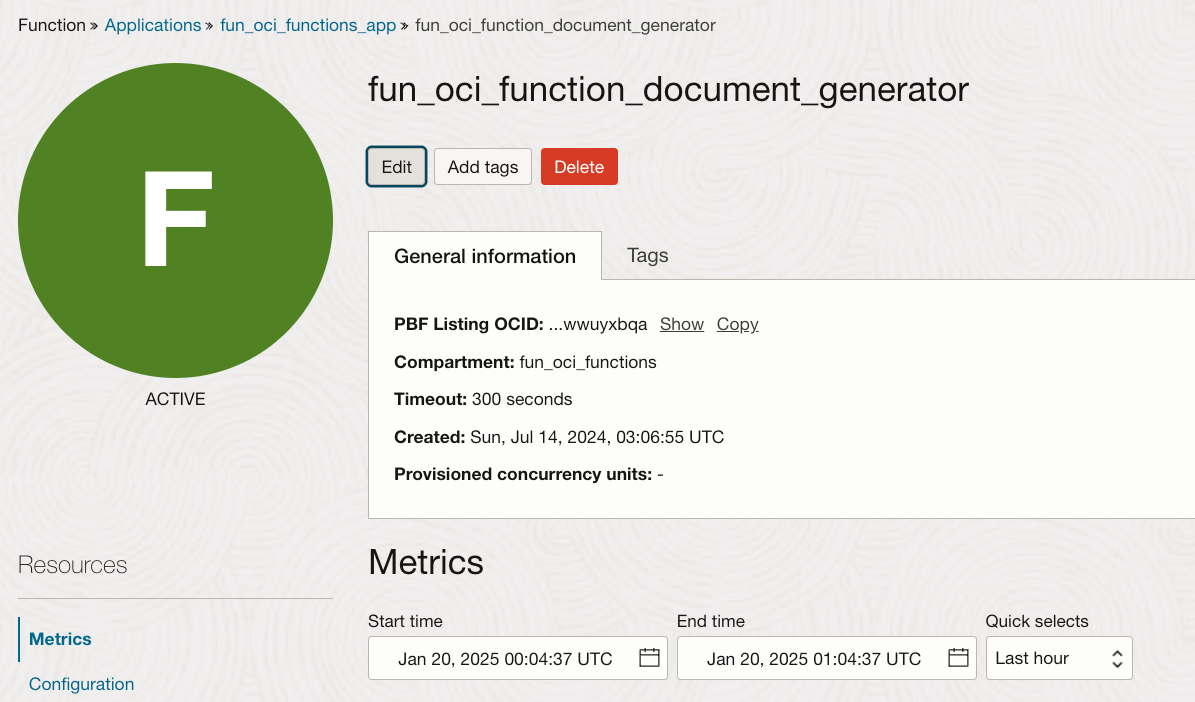
To add PCU, you can go back to your Function in the OCI Console, and click the Edit button.
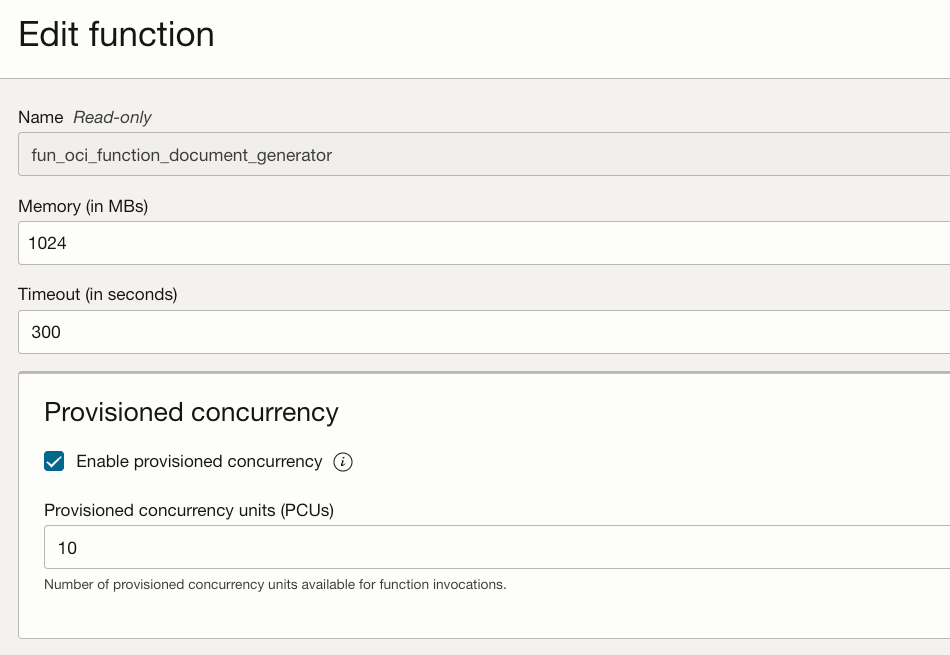
From there, check Enable provisioned concurrency and select the minimum allowed value, which may be 10 or 20 for our functions. Then click Save.
End-to-end complete test
Back to our Postman request, modify the body to use a real URL that refers to a real image. You ear the drum roll in your head... Send the request.
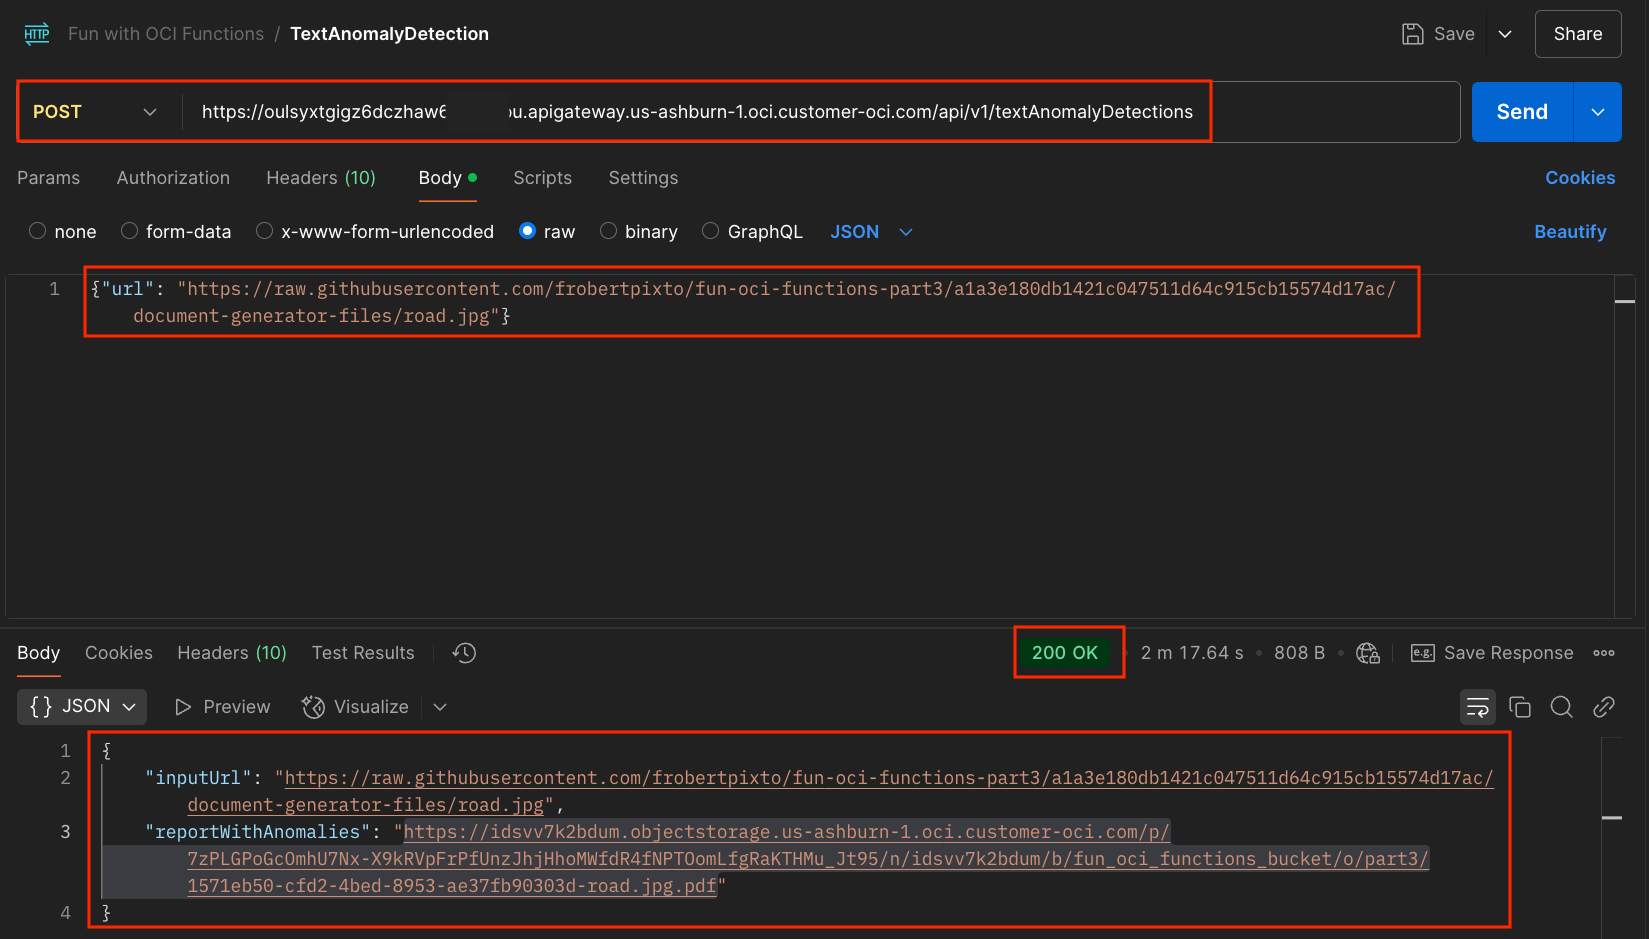
That works. We receive the response Status code (200) and response body:
{
    "inputUrl": "https://raw.githubusercontent.com/frobertpixto/fun-oci-functions-part3/a1a3e180db1421c047511d64c915cb15574d17ac/document-generator-files/road.jpg",
    "reportWithAnomalies": "https://idsvv7k2bdum.objectstorage.us-ashburn-1.oci.customer-oci.com/p/7zPLGPoGcOmhU7Nx-X9kRVpFrPfUnzJhjHhoMWfdR4fNPTOomLfgRaKTHMu_Jt95/n/idsvv7k2bdum/b/fun_oci_functions_bucket/o/part3/1571eb50-cfd2-4bed-8953-ae37fb90303d-road.jpg.pdf"
}
The reportWithAnomalies is the URL of a PAR that will be valid for 1 hour.
If we put that URL in a browser, we get:

Again, you can now try with your own images or modify the code to add additional logic. Have fun!
You can also play with the Template. See the Document Generator PBF general documentation here and examples of MS Word Templates and JSON Data here.
This completes Part 3 of the Fun with OCI Functions series, where you used an API Gateway to create a public endpoint with an OCI Function as the backend.
In Part 4, we will do a Deep Dive into the Document Generator PBF that we used in Parts 1, 2 and 3.
Optional - ORDS vs OCI API Gateway
Oracle REST Data Services (ORDS) might be a simpler or better solution, especially for Database centric applications.
What is ORDS?
ORDS is a mid-tier Java application that helps you develop, deploy, and manage RESTful services for Oracle Databases.
ORDS is often used to:
1. Publish Oracle Database CRUD Operations Over REST
ORDS makes it straightforward to expose relational data through REST endpoints. It automatically generates REST endpoints for tables, views, and stored procedures/packages in the Oracle Databases.
2. Manage Databases
ORDS includes a collection of more than 500 REST APIs to perform operations such as monitoring and maintaining an Oracle Database, including PDB lifecycle management, performance, security,and data dictionary.
3. Integrate with Oracle APEX
If your application uses Oracle APEX, ORDS is already there to handle web requests between browser and database. In such scenarios, exposing additional REST endpoints via ORDS can be a natural extension with minimal extra setup.
Check the ORDS documentation to know more about ORDS.
Thanks for reading, and see you in Part 4.


