Fun with OCI Functions - Part 2
Stronger Together - Events and Composition

In Part 1 of this series on Serverless computing, we prepared an environment to play with Oracle OCI Functions, and we kicked the tires of the Document Generator Pre-Built Function (PBF).
Note: Part 3, and Part 4 are now available.
In Part 2 of this series, we will see how OCI Functions can be first-class citizens in an Event-Based Business Logic where multiple processes are chained. We will also see that with very little logic, we can create Functions that perform a composition of disparate services.
Today, our mission is to build a system that detects anomalies in images that contain texts.
Why? Today's best Generative AI models are pretty great at generating Images or Texts. Still, when it's time to generate images that contain texts, well, as of September 2024, the quality is not always there. Thus, let's create a process that finds these images with unclear texts. For example, look at this image and observe how the words SHOP and COFFEE are poorly rendered.

For that, we will create our own OCI Function, which we will call Text Anomaly Detection. The Function itself does not have a huge amount of logic, as we will use other services to do the hard parts. That will show the power of composition.
Logic flow
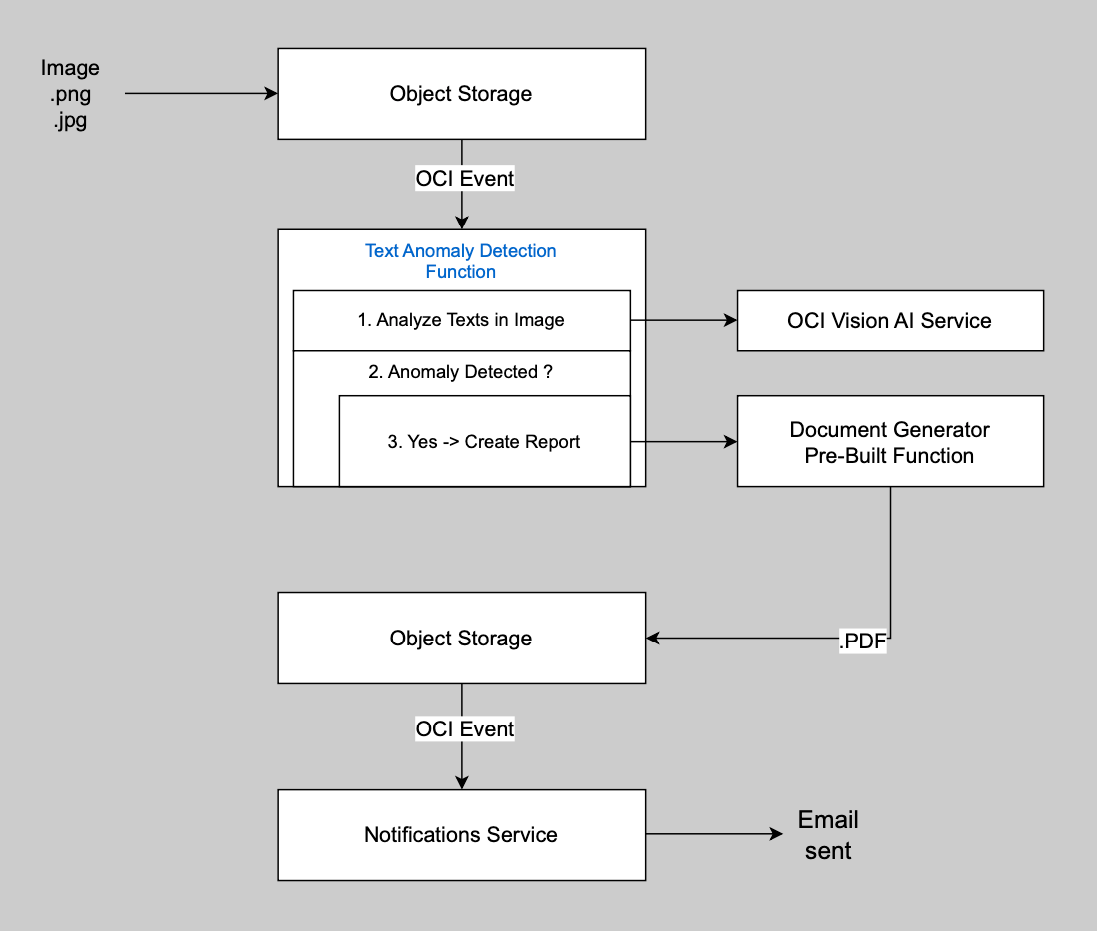
Here is a summary of the steps:
- A new generated image that may contain some texts is put in an OCI Object Storage Bucket by any external process
- Our OCI Event detects that a png or jpg image is created, and its Event Rule calls our Text Anomaly Detection Function
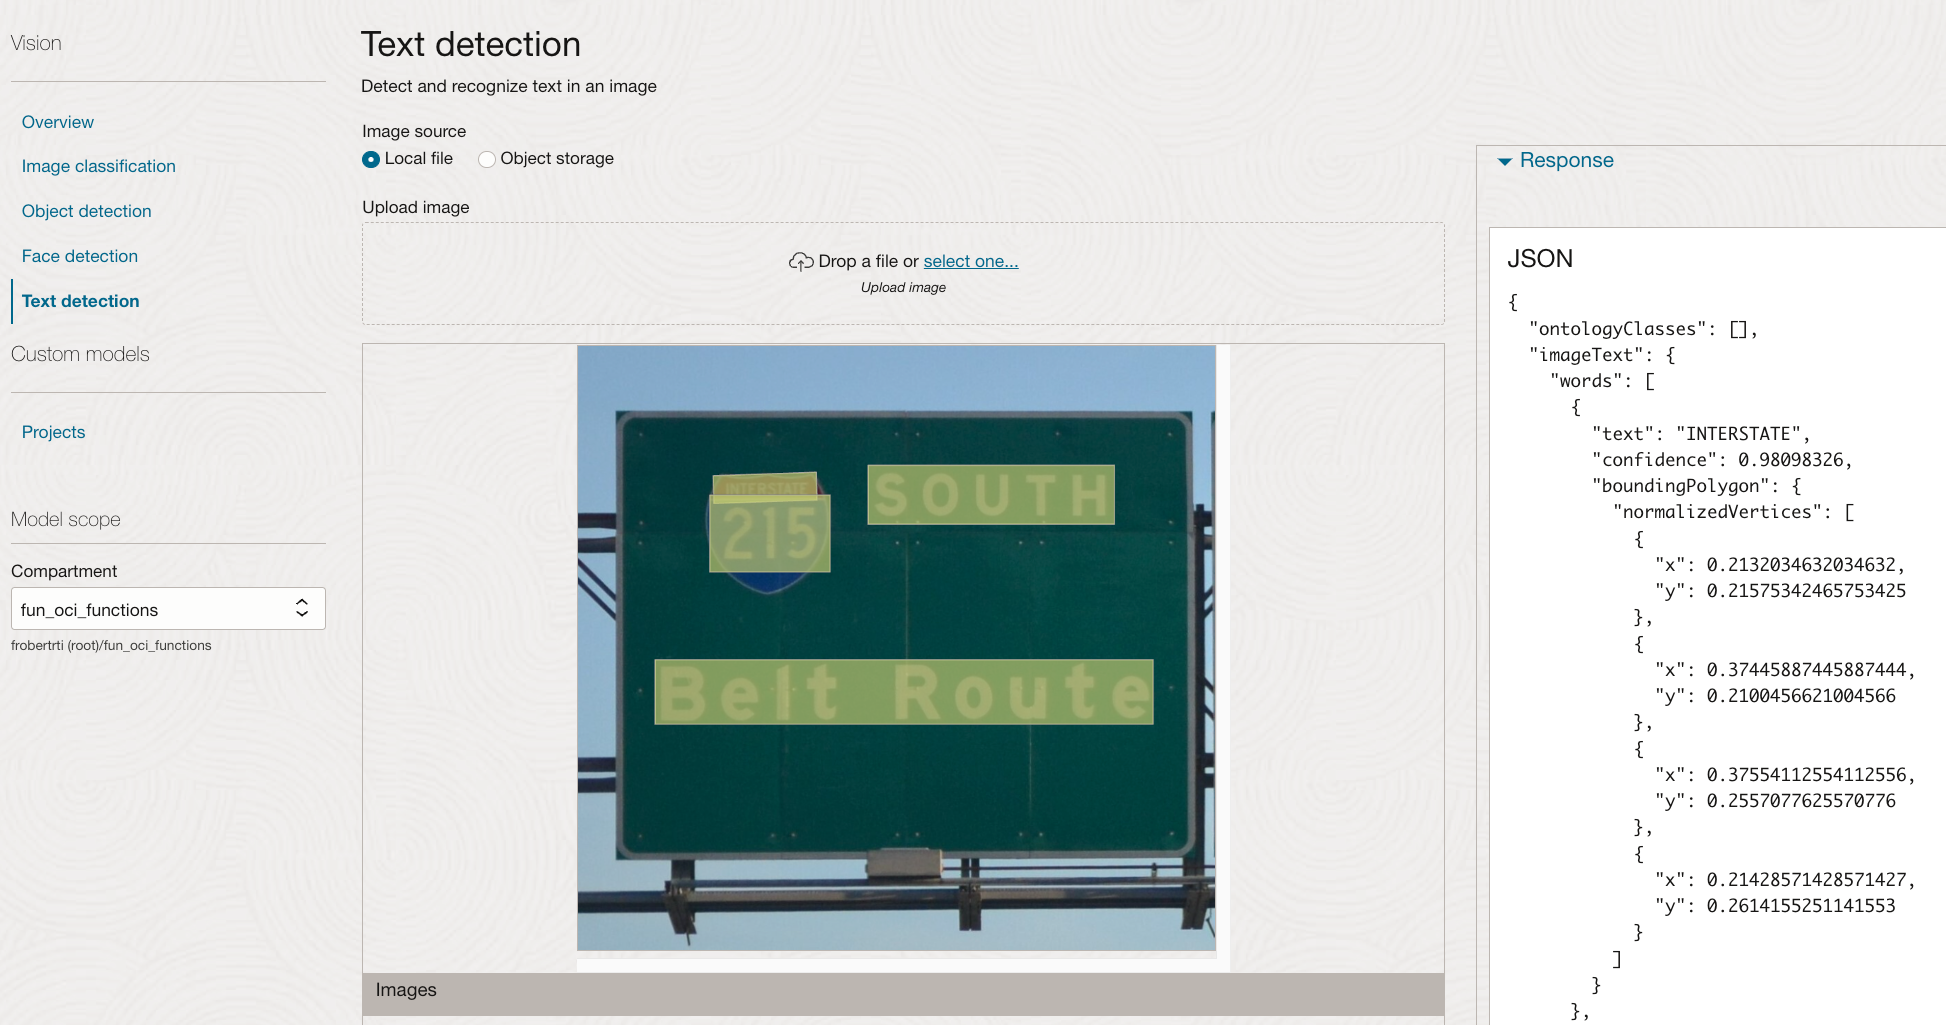
- Our Text Anomaly Detection Function calls OCI Vision AI Service to detect all the texts in the image. Each word will have a confidence level that corresponds to AI Vision model's probability of being right
- When the confidence level for a word is below a certain percentage, it means that this word is hard to recognize and is considered an Anomaly. If there are no Anomaly, the processing stops here
- Our Text Anomaly Detection Function calls the Document Generator Pre-Built Function that we created and used in Part 1 of this Series to generate a PDF report that includes:
- The image
- Each word that appears unclear (with its confidence level and position in the image)
- Each word that appears clear
- Document Generator puts the PDF report in Object Storage
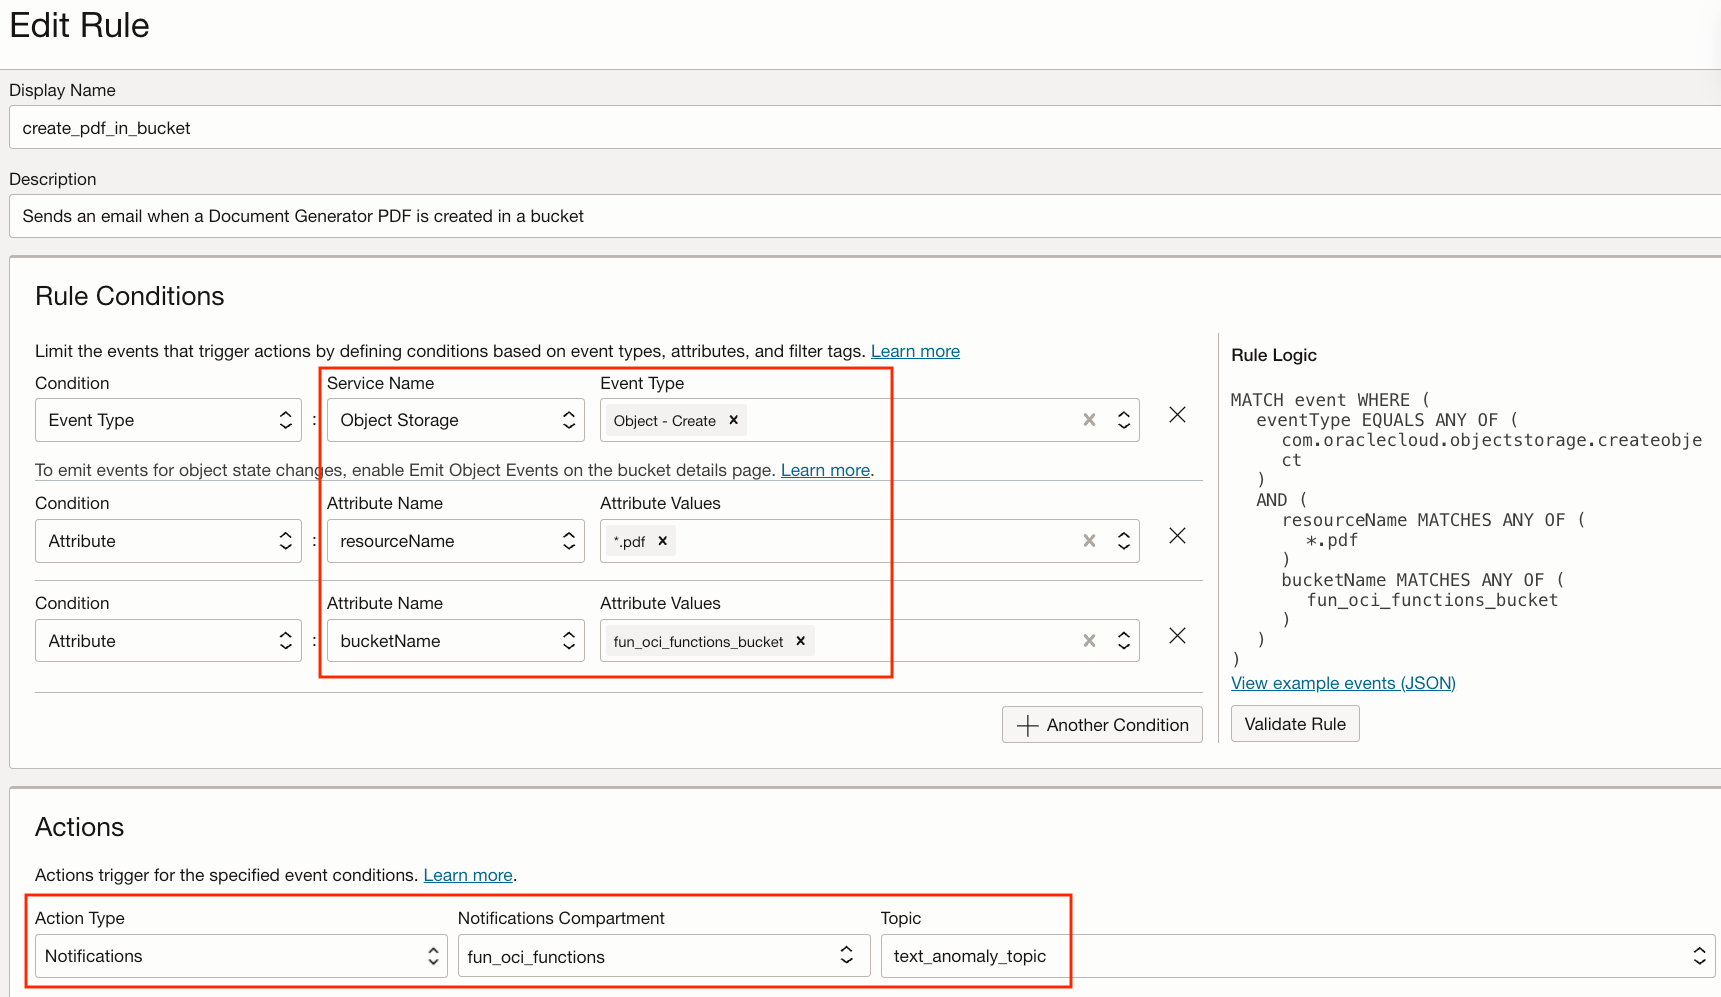
- Our OCI Event detects that a PDF Object is created in Object Storage, and its Event rule calls the OCI Notification Service
- OCI Notification Service sends you an Email
That's a good number of parts that we will set up. Luckily for us, we already prepared a lot of what is required in Part 1 of this Series, more specifically:
- An OCI Cloud Account with a PAYG subscription. Everything in Part 1 and in this Part 2 is within the Free Monthly usage.
- A Compartment named
fun_oci_functions - A VCN
- An Application (a place that holds the context of Functions)
- A Document Generator Pre-Built Function
- An OCI Registry to hold our Function's Docker Image.
- An Object Storage Bucket for which we activated the generation of OCI Events when Objects are added or removed (we used
object_events_enabled = true) - A Policy to allow Document Generator Pre-Built Function to read and write to Object Storage
Here is what we need to create:
- The Text Anomaly Detection Function
- A Policy to allow our Text Anomaly Detection Function to:
- Read from Object Storage
- Use the OCI Vision AI Service
- Invoke our OCI Document Generator Function
- The OCI Event and OCI Notifications setups.
The Anomaly Report
Our objective is to create an Anomaly Report that looks like this:
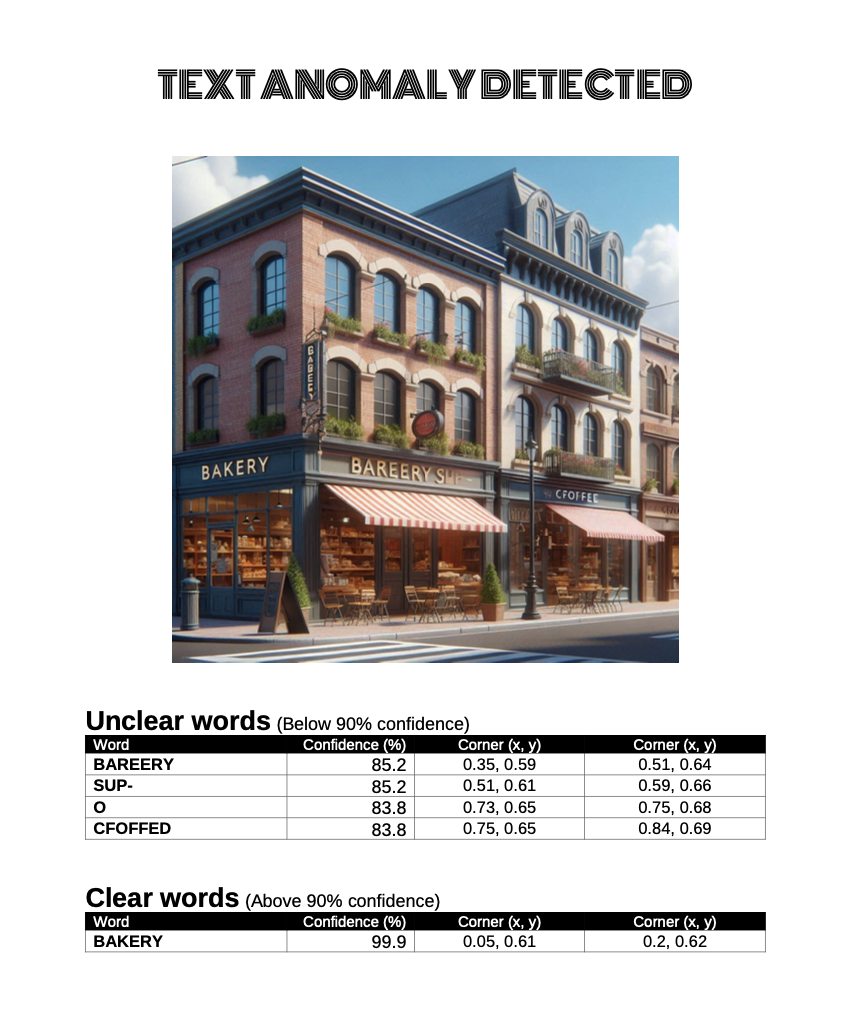
We see which words are unclear, and for each word, we get its enclosing rectangle coordinates delimited by 2 corners (where (0,0) is top left and (1,1) is bottom right in the image). The name of the PDF will contain the name of the initial image that triggered the whole chain.
Text Anomaly Detection Function preparation
What is a Function, again?
Functions is a serverless platform based on the Fn Project. As we will see today, Functions end up being Docker images with a specific entry point that are instantiated as needed.
The local setup of a Docker environment will not be required, as we will do our development directly in the OCI Console, thanks to the integrated Cloud Shell and Code Editor facilities.
Environment setup
Before playing with code, let's set up our environment to create a Function. Do the following:
Login to your OCI account. In the top left Hamburger menu, select Developer Services, then Applications under Functions.
On the left, make sure that the Compartment fun_oci_functions is selected. You should see an Application named fun_oci_functions_app. Click on it.
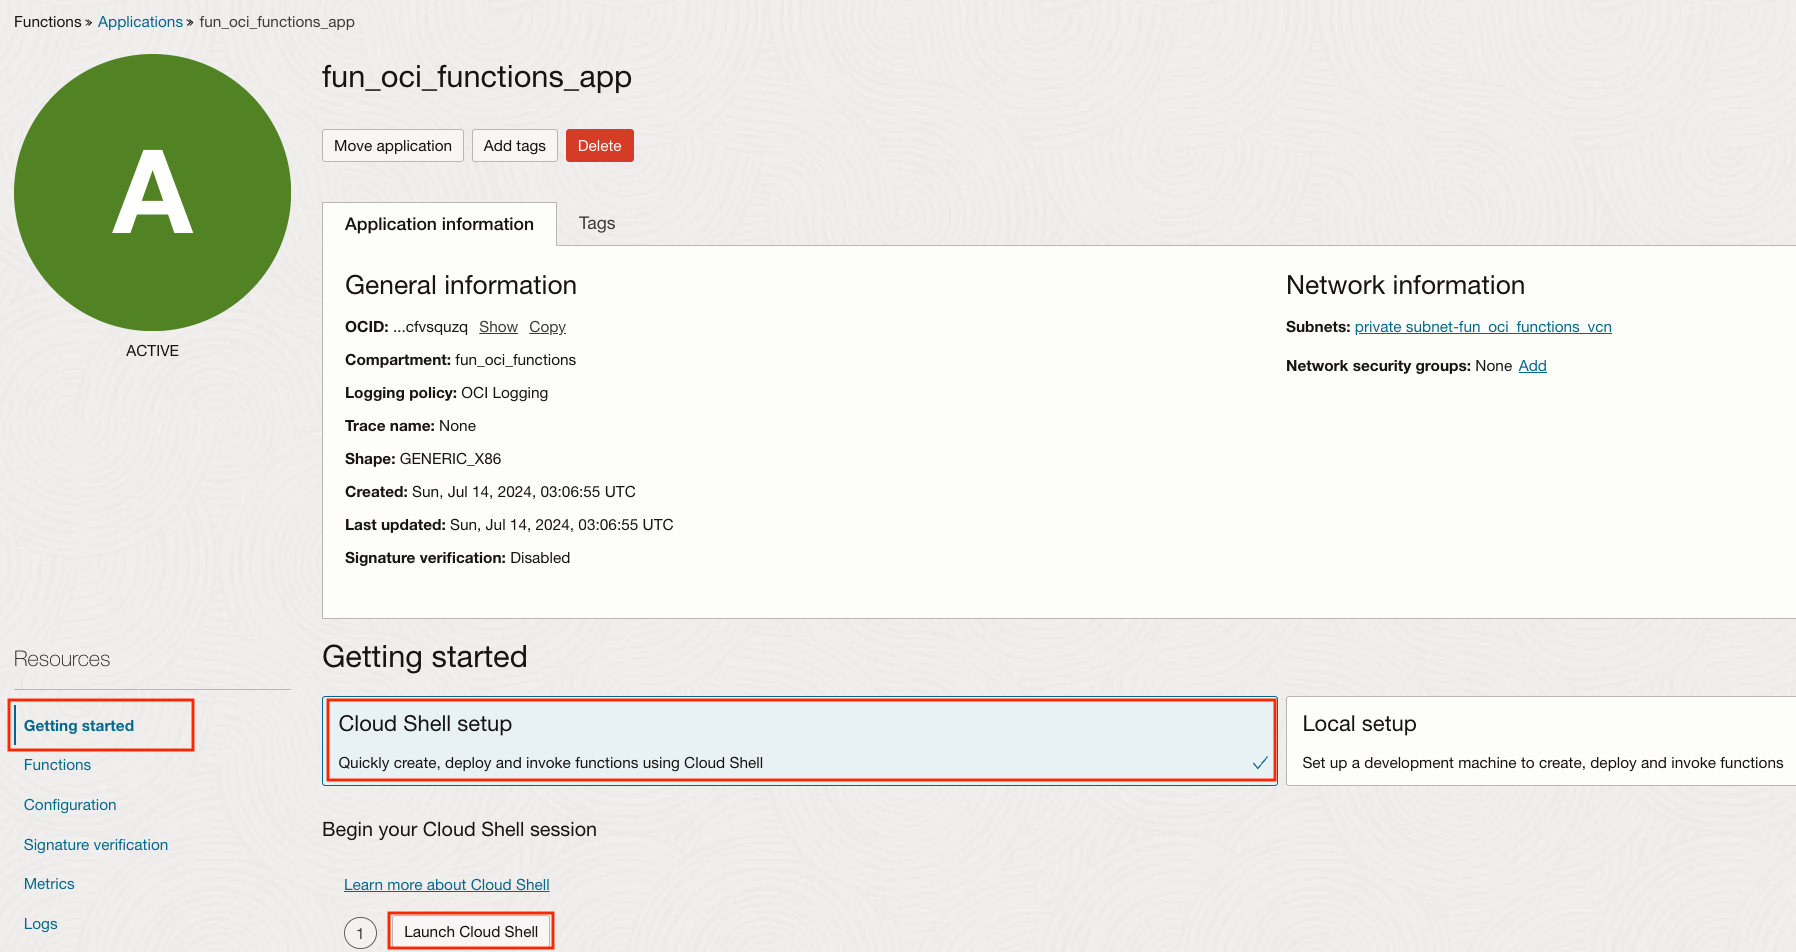
On the Left, under Resource, Click on Getting started, then click on Cloud Shell setup. We will follow some of these steps.
Click on the Launch Cloud Shell button. Cloud Shell is almost an old friend now, as we used it in Part 1.
Once the Cloud Shell Environment is ready, you will get a Terminal Prompt.
We will start by configuring the fn CLI, a useful tool to manipulate Functions.
Run the first three commands as they are displayed on the Getting started page:
fn list contextfn use context <your_region>. Your actual command will depend on your current OCI region.fn update context oracle.compartment-id <your_compartment_id>. Your actual Compartment Id will be set up for you.
The next command indicates where the Docker images will be stored. The command looks like:
fn update context registry iad.ocir.io/idsvv7k2bduz/[repo-name-prefix]
Replace [repo-name-prefix] with fun_oci_functions_repo as this is the name of the Docker Repository that we created in Part 1.
Run:
fn update context oracle.image-compartment-id <your_compartment_id> using the same value that you used above.
Click on Generate an Auth Token to generate an Auth Token.
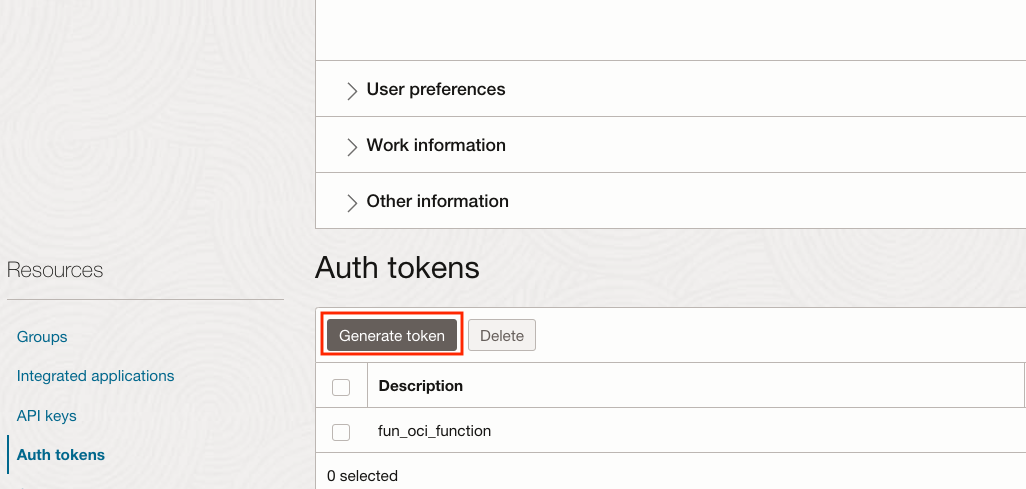
Click on Generate token
- For Description, you can use something like fun_oci_function
- Click Generate token on the bottom
- Click Copy and paste it in a safe place, as it will be displayed only once. If you lose it, you can always delete that Auth Token and Generate a new one.
Almost there... Connect your session to your Docker Repository with the command that looks like:
docker login -u 'idsvv7k2bduz/frobert1@gmail.com' iad.ocir.io
Enter the Auth Token
You get Login Succeeded
Phew, the Function environment setup is completed. It's time to play with some code.
Text Anomaly Detection Function initial code
Let's generate boilerplate code for our Function. We will use Python today, but know that your OCI Function can also be in Java, Node, Go, Ruby, and C#. In Cloud Shell, type:
fn init --runtime python TextAnomalyDetection
A very basic Function is generated for you. As we want to look at the code, let's switch to the Code Editor.

In the OCI Console, open Code Editor. The Code editor is very similar to Visual Studio Code.
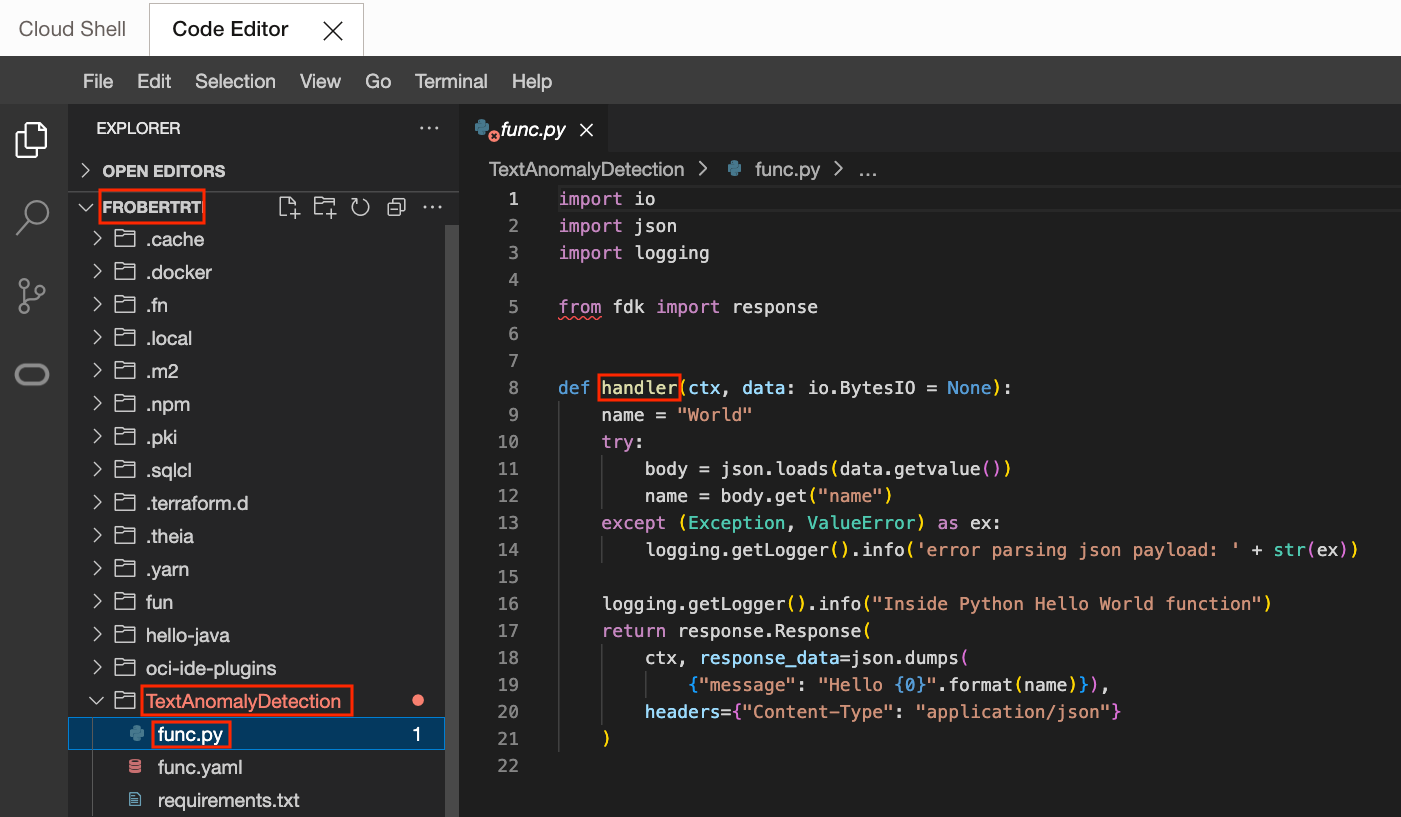
Click on your Tenancy name, then on TextAnomalyDetection, Then on func.py.
The current application is a Hello Word Function. Note that the entry point is called handler.
It is very simple, but simple is good for our first OCI Function.
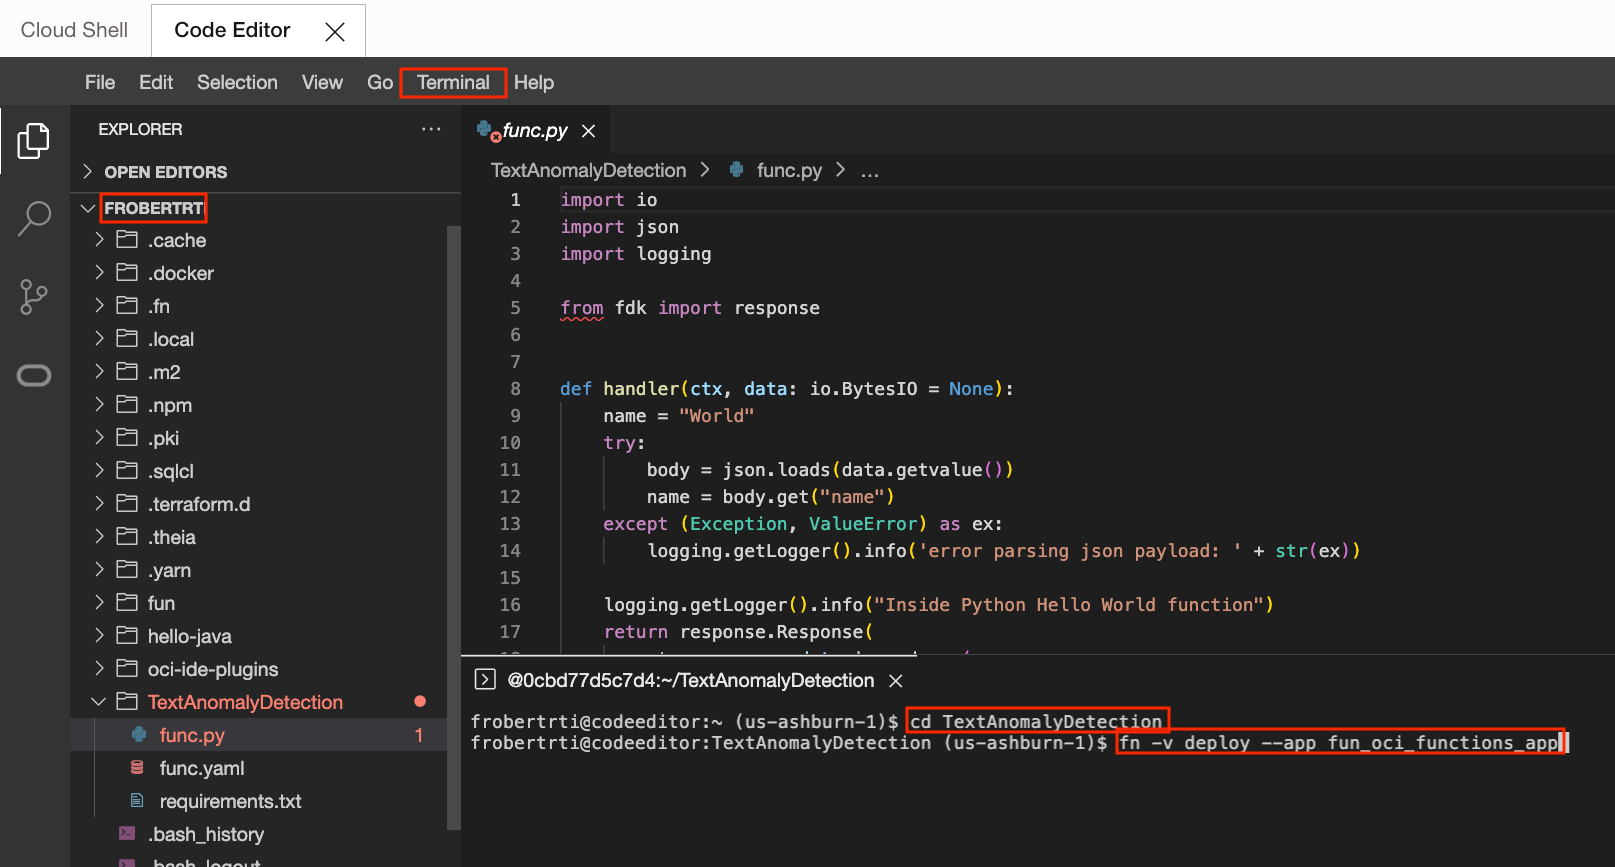
To create the Function's Docker image:
- In Code Editor's menu, click on Terminal/New Terminal.
- From the new terminal type:
cd TextAnomalyDetectionfn -v deploy --app fun_oci_functions_app
Interesting things happen here. A Docker image is constructed and then pushed to your Docker repository, ready to be instantiated.
For the avid learner, I recommend that you check the whole output of the Docker image construction.
So, it's time to invoke our first Function from the Terminal Window with:
fn invoke fun_oci_functions_app textanomalydetection
After a little while, you will get the following response:
{"message": "Hello World"}
Just like that, you executed your own function. We will build up on that.
Note that there was a delay to account for the Docker Container being instantiated from your Docker Image. This is a Cold Start 🥶 . It happens when your OCI Function has not been instantiated recently. In a future Post, we will see how to reduce that delay.
Run fn invoke fun_oci_functions_app textanomalydetection again, and you will see that the response comes much faster as it is already instantiated. This is a Warm Start ♨️ .
Since we want an OCI Event to call the Function that we just defined, we need to know what is the OCID of our new Function
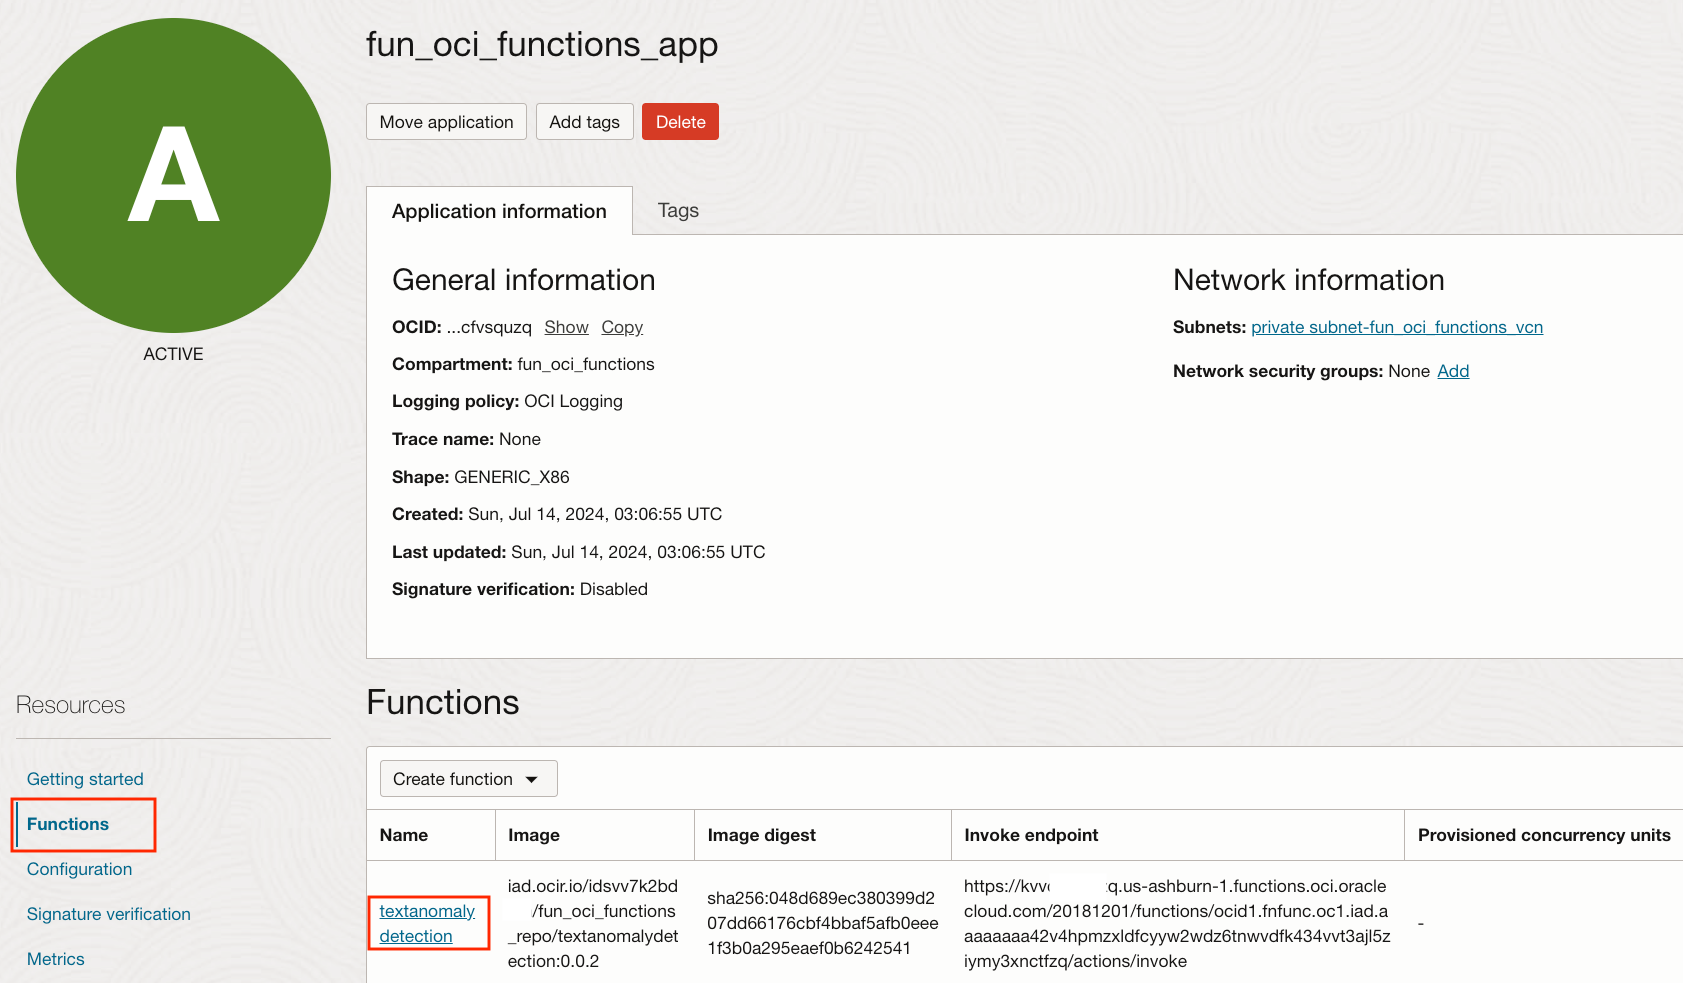
Minimize the Code Editor to see the Getting started page. Then click on Functions on the left and click on textanomalydetection to get our Function's Detail page.
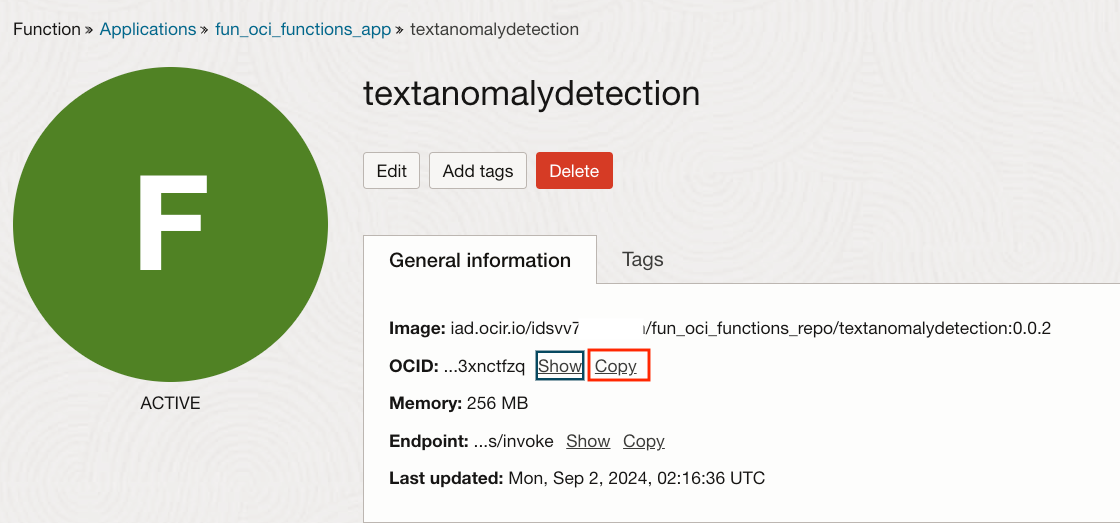
Click on Copy on the right of the OCID and store the OCID as we will need it soon. We will call this OCID fff. Now, also grab the OCID of the fun_oci_function_document_generator Function that we defined in Part 1. We will call that OCID ggg.
Good! Before we do our next iteration in the code, we will need the OCI Events to be enabled, so let's define them now.
OCI Events and OCI Notifications
OCI Events
Here is OCI Events in one paragraph. All OCI Services generate OCI Events when resources are created, deleted or modified. You can define an Event Rule that matches specific events with a filter and define which action will be done.
We will use the Function action type to call our TextAnomalyFunction when a png or jpg image is created in our Bucket. Here is our objective:
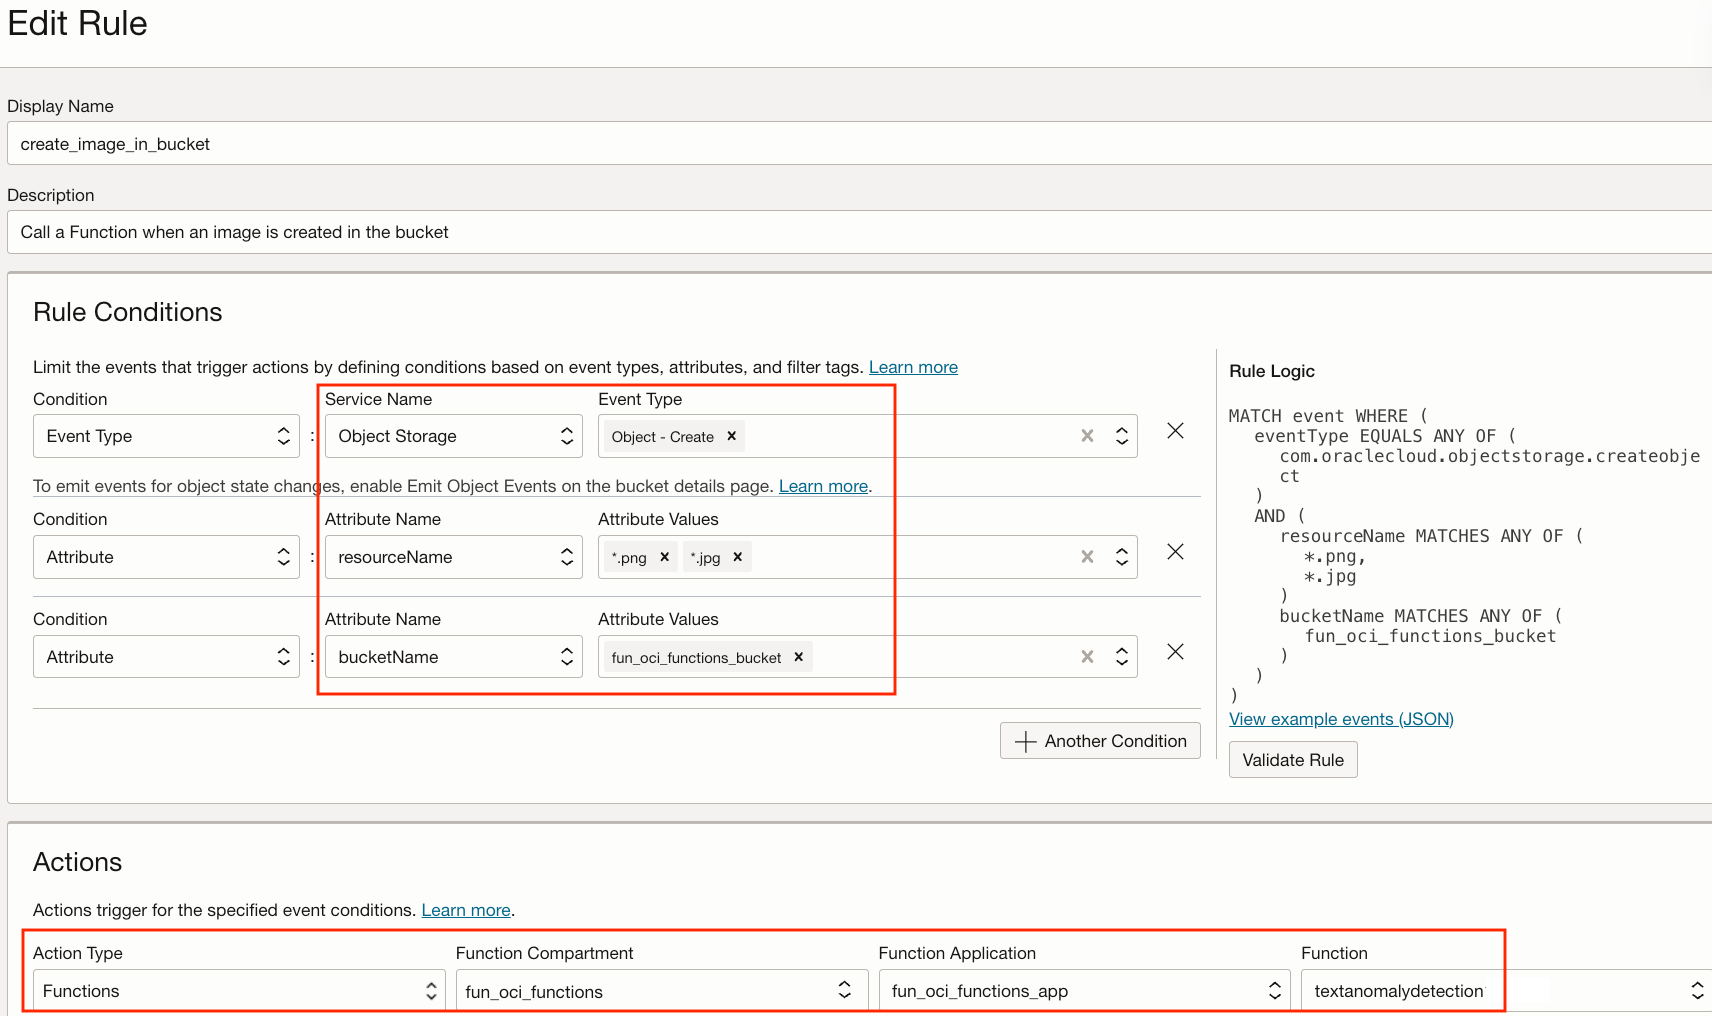
We will use the Notification action type to send an email when a PDF is created in our same Bucket.
Setup with OCI Resource Manager Service (RMS)
Let's set up these OCI Events. We will do that, as well as set up the OCI Notifications and the OCI Policy using Terraform.
Clone or Download the repo that I have prepared on GitHub; it contains the Terraform code that we will use. Since we already used RMS in Part 1, we will not cover that in detail. The main points are:
- Create a Resource Manager Stack using the folder terraform-files
- For compartment_ocid, RMS will fill it with your Compartment OCID. Note it as ccc
- For text_anomaly_detection_fn_ocid, specify the OCID fff of our newly created Text Anomaly Detection Function
- For email_address_to_receive_notifications, specify your email address that will receive the OCI Notifications email
- Note: For the email notification to be activated, an email will be sent to you. Click Confirm subscription in the email to activate the subscription that you just defined
OCI Notifications
Here is OCI Notifications in one short paragraph. Using alarms or event rules, you can subscribe to receive messages in different ways, including email and text messages.
Text Anomaly Detection Exploration code
Back to the code. Let's modify our function to ensure we understand the input that our Function will receive. We will focus on this part of the Logic:
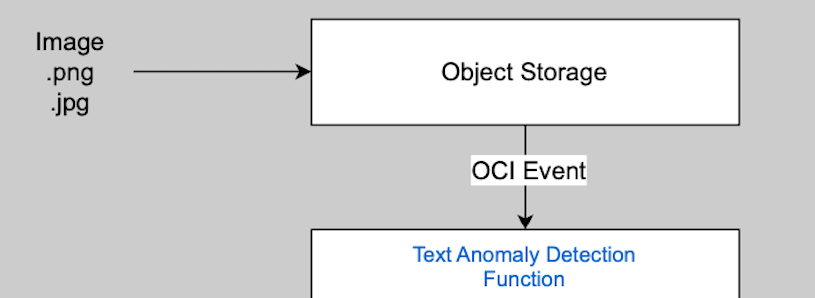
To understand exactly what is the content of that OCI Event, we will log the event content. Go back to the Code Editor, then go in func.py and replace the handler function with:
def handler(ctx, data: str):
    logging.getLogger().setLevel(logging.INFO)
    try:
        event = json.load(data)
        # Log the full content of the Event
        logging.info(f"Received event: {json.dumps(event)}")

        # Additional processing can be added here if needed
        return "Event logged successfully"
    except Exception as e:
        logging.error(f"Error processing event: {str(e)}")
        return "Error logging event"
You can see the full func.py in my text-anomaly-detection-code/step2 folder.
Save the current file in the Code Editor and, in the terminal, redeploy with
fn -v deploy --app fun_oci_functions_app
Now upload any image that ends with .png or .jpg in fun_oci_functions_bucket bucket. We will see that creating an image will trigger our TextAnomalyDetection Function.
In Part 1, we already saw how to find and open the Application Logs. The Application Logs will receive entries like:

Note that the Log entry with "Received event" has JSON data. If we format this JSON data, we get:
{
    "eventType": "com.oraclecloud.objectstorage.createobject",
    "cloudEventsVersion": "0.1",
    "eventTypeVersion": "2.0",
    "source": "ObjectStorage",
    "eventTime": "2024-08-17T20:47:31Z",
    "contentType": "application/json",
    "data": {
        "compartmentId": "ocid1.compartment.oc1..aaaaaaaa6qe5zqr6dtokrxlyrwaga26wijgrydmfqc2tmnlxmz6qj5kajytz",
        "compartmentName": "fun_oci_functions",
        "resourceName": "part2/my_image.png",
        "resourceId": "/n/idsvv7k2bduz/b/fun_oci_functions_bucket/o/part2/my_image.png",
        "availabilityDomain": "IAD-AD-3",
        "additionalDetails": {
            "bucketName": "fun_oci_functions_bucket",
            "versionId": "6c302032-31c6-490f-a0c4-16f26e78a845",
            "archivalState": "Available",
            "namespace": "idsvv7k2bduz",
            "bucketId": "ocid1.bucket.oc1.iad.aaaaaaaabmbcpblc2zl6lydfe5brpp4s65jwasd24esw6m7hrc7pcn4rcrxz",
            "eTag": "9a49f1d1-170b-4564-a228-39033825678f"
        }
    },
    "eventID": "7d6d3217-f94d-4586-fe05-d3ab093577d2",
    "extensions": {
        "compartmentId": "ocid1.compartment.oc1..aaaaaaaa6qe5zqr6dtokrxlyrwaga26wijgrydmfqc2tmnlxmz6qj5kajytz"
    }
}
This is our input Payload created when the OCI Event triggered the call to our Function. The format is a CloudEvent, a standard used by many Cloud providers. The fields that we are going to use are:
- "resourceName": "part2/my_image.png"
- "bucketName": "fun_oci_functions_bucket"
- "namespace": "idsvv7k2bduz"
Composition - Harnessing the Strength of Specialized Services
OCI Vision AI Service
We use the OCI Vision AI Service to detect texts in images; here is an example of a JSON response when detecting texts in an image
OCI Document Generator PBF
We use Document Generator PBF to generate a PDF document based on an MS Word Office template and JSON data.
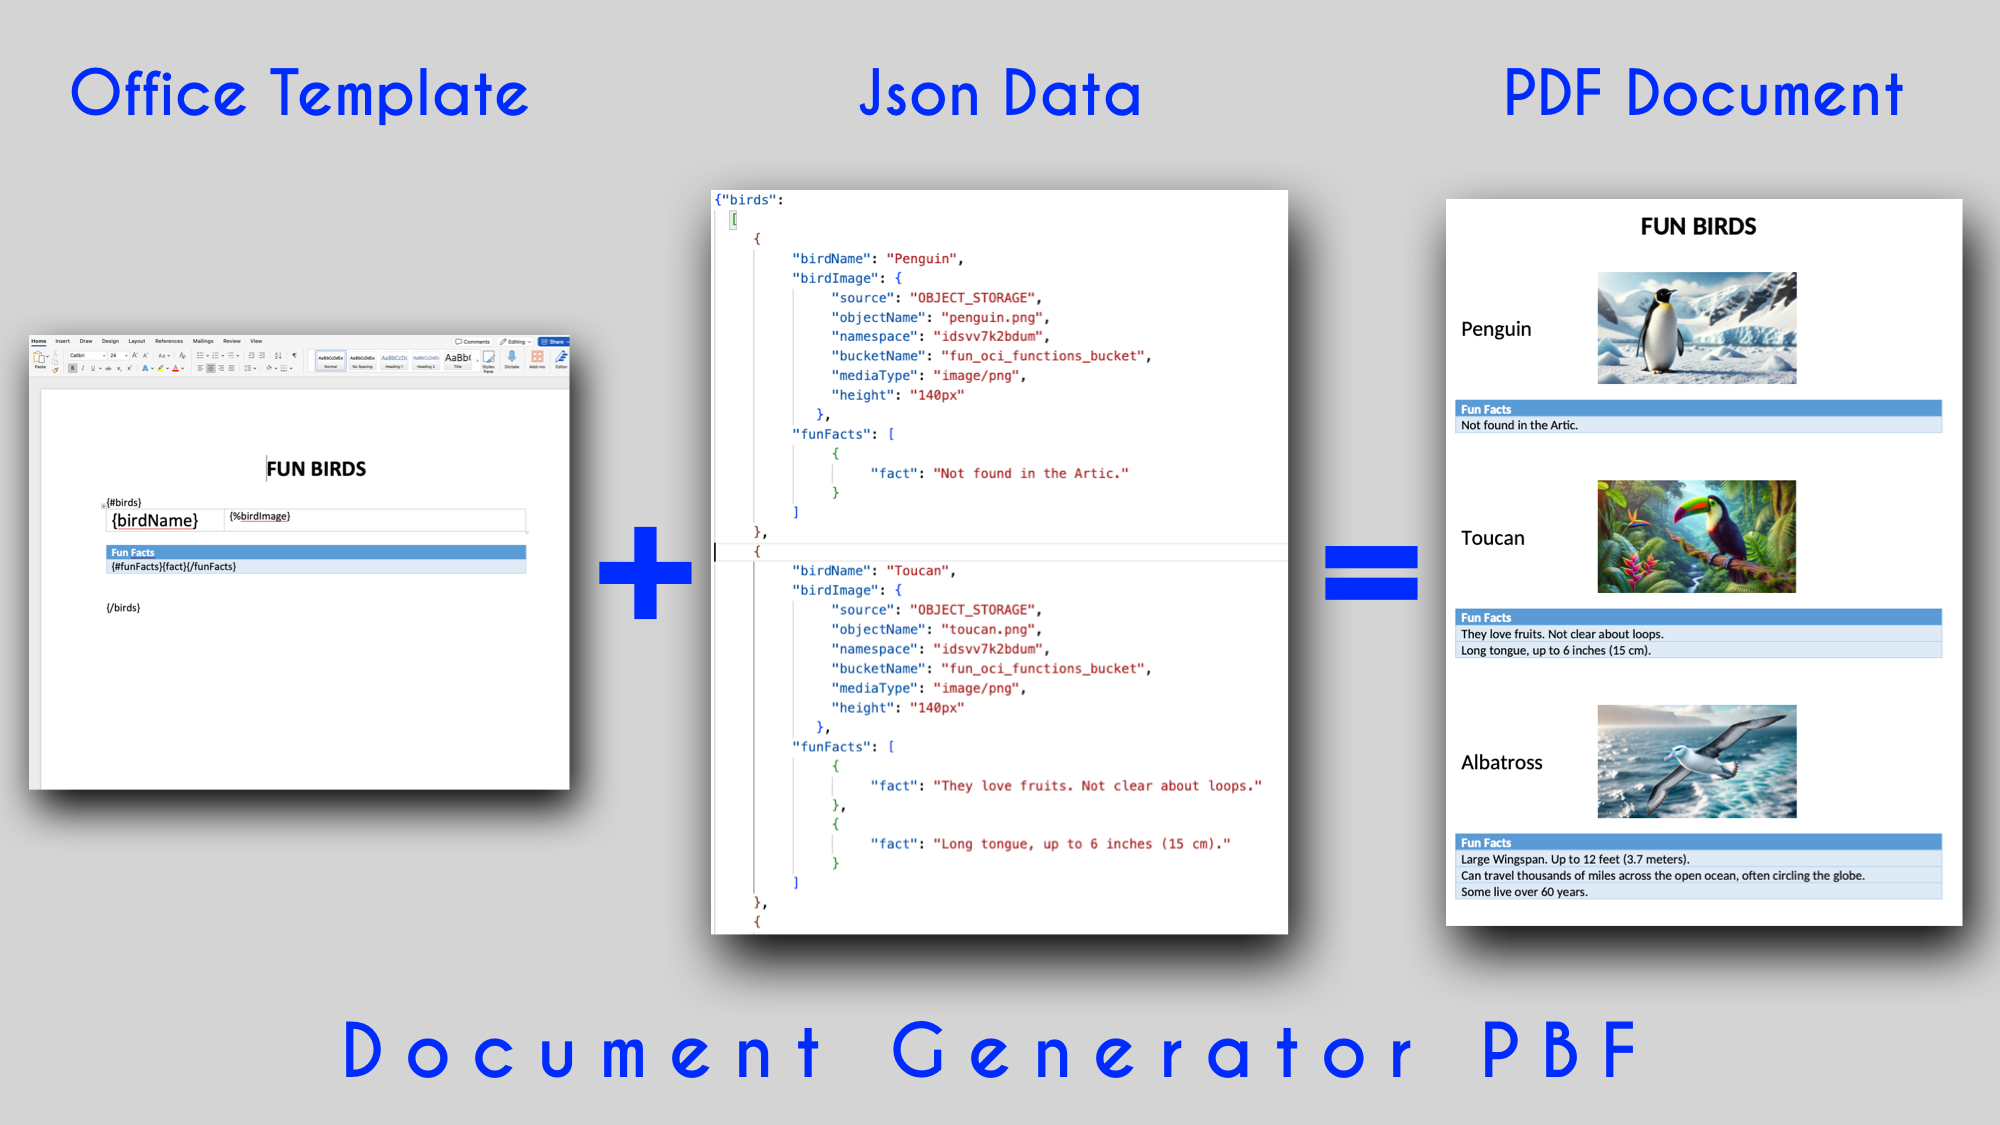
We talked about Document Generator in Part 1. I recommend that you also take a look at the optional section at the end of this Post, named Document Generator - Data & Template.
Text Anomaly Detection Complete code
Now that we understand our input and the Services that we will use, let's get real code for real processing. In my GitHub repo, I have prepared files in the text-anomaly-detection-code/step3 folder that you can upload using the Code Editor.
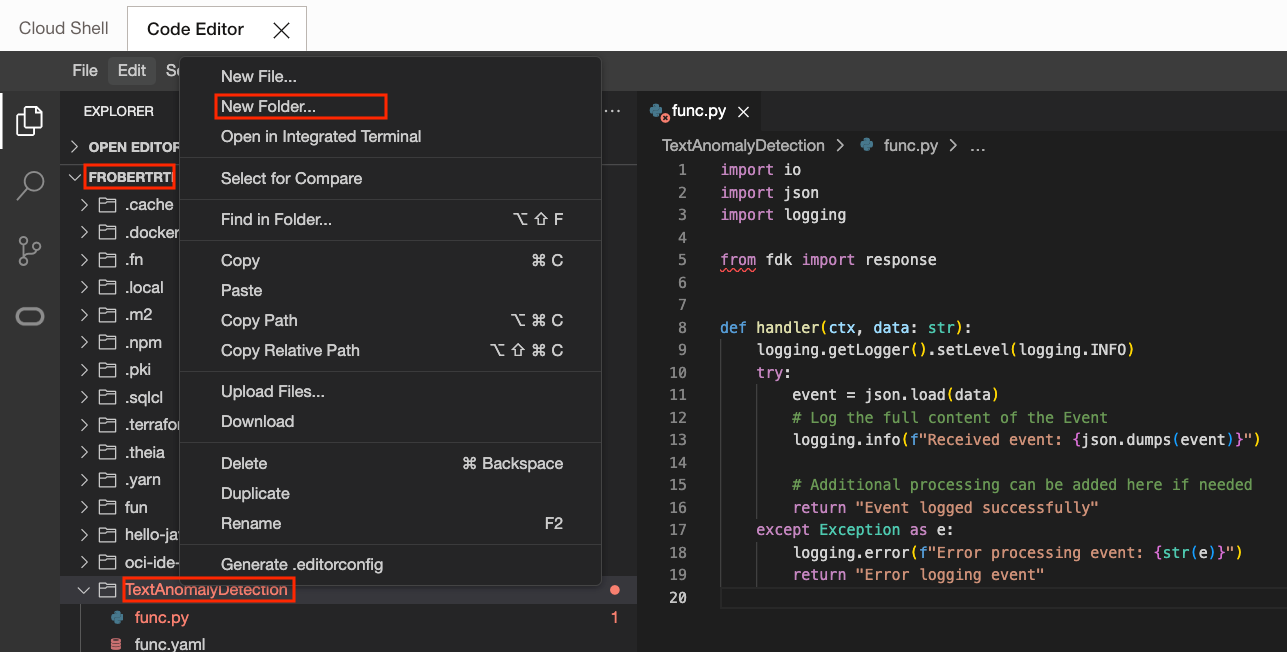
In the Explorer part of Code Editor, right-click on the TextAnomalyDetection Folder and select "New Folder...". Name it oci_utils. Then right-click on oci_utils and click on Upload Files... Select the 3 files in step3/oci_utils from my GitHub repo. These are utility files that the main processing will use. Make sure that they end up in the oci_utils folder. Feel free to check each of them.
In the Explorer part of Code Editor, right-click on the TextAnomalyDetection and click on Upload Files... Select the 3 files:
- func.py
- func.yaml
- requirements.txt
You will be prompted to Replace each file as they already exist.
Take a little time to look at the content of func.py. Then change:
# The compartment OCID under which operations will be performed. <<<
compartment_id = "ocid1.compartment.oc1..zzz"

# The OCID of the Document Generator function. <<<
fn_ocid = "ocid1.fnfunc.oc1.iad..zzz"
with your values of Compartment OCID ccc and Document Generator OCID ggg.
Note that just below, the code refers to an MS Word template and a Font zip file. We will create them soon.
The new logic in the function handler is still relatively simple, it will:
- Parse the OCI Event data to extract the necessary details for processing.
- Use OCI Vision AI service to detect texts in the specified object storage image.
- Verify if we have anomalies in some detected words. Processing stops if no anomalies are found.
- Generate a PDF report using the OCI Document Generator PBF. The PDF is pushed in Object Storage.
Now that we have changed the code, let's generate our final Docker image for our Text Anomaly Detection Function
On the top menu, click on Terminal/New Terminal.
From the new terminal, go in the TextAnomalyDetection directory and type:
fn -v deploy --app fun_oci_functions_appto redeploy.
A new Docker image is built and then pushed to your Docker repository.
All the parts of our logic are now in place. Let's revise that logic flow.
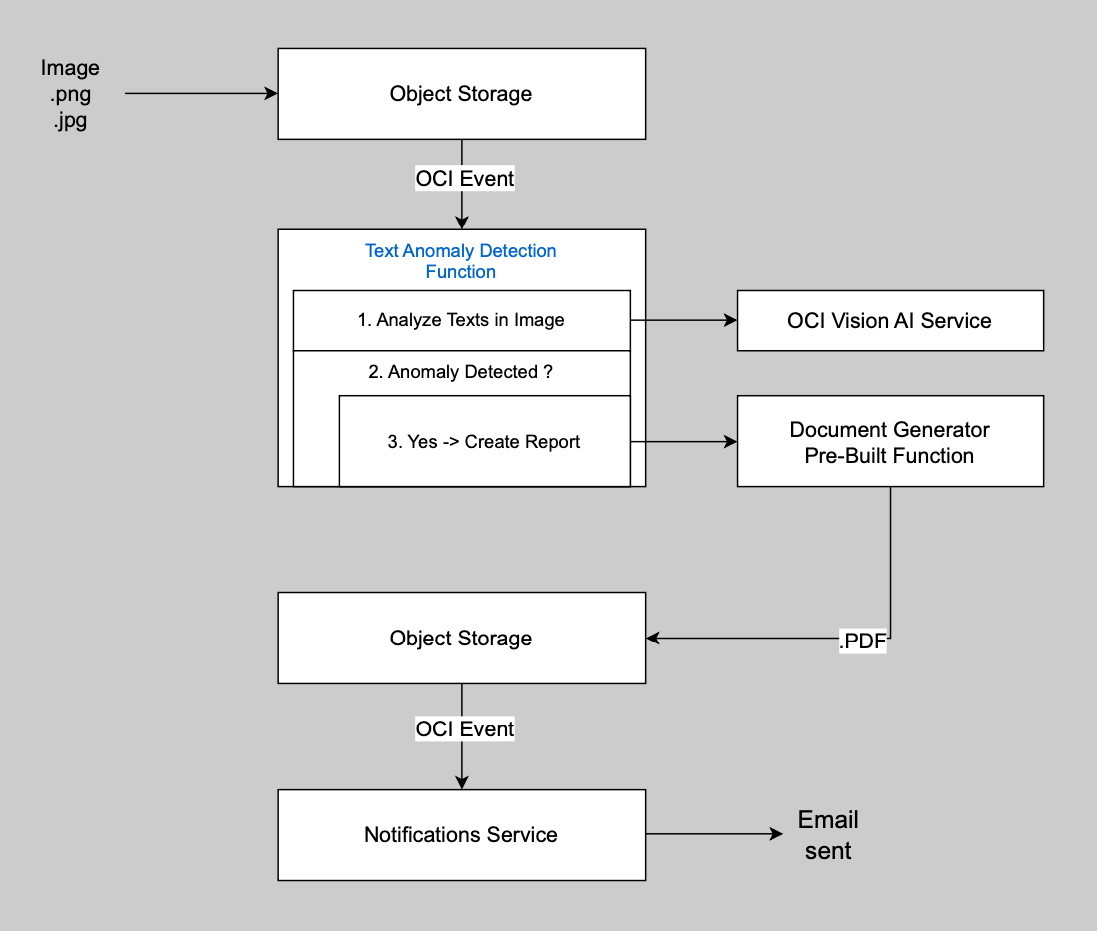
At this point, you should be able to understand every part. Take the time to revisit each box and arrow to ensure the whole thing has sunk in.
Before we put an image to test the entire flow, let's take care of the MS Word template and the Font zip file that the Document Generator will use to generate its report. Go into your fun_oci_functions_bucket bucket, create a part2 folder, and upload these 2 files from the part2 folder from my GitHub document-generator-files folder:
Monoton.zip. A Zip file that contains a font to be used in the PDF Title.TextAnomalyTemplate.docx. The MS Word template for the report.
Drum roll... It's time to test the complete flow by uploading an image to Object Storage. In the Object Storage folder part2, upload Street.png from the same location.
That image having unclear texts, 3 things will happen:
- A PDF report will be generated by the Document Generator.
- You will receive an email indicating that an anomaly was found. You can use the location specified in the email to verify the PDF content.
- Entries in the Application Logs will be created. You can go and check these Logs. They will contain entries for both your TextAnomalyDetection Function and the Document Generator PBF as they are both in the same Application named fun_oci_functions_app.
The actual PDF report will look like:

You can now try with your own images or modify the code to add additional logic. Have fun!
You can also play with the Template. See the Document Generator PBF general documentation here and examples of MS Word Templates and JSON Data here.
This completes Part 2 of the Fun with OCI Functions series, where you created your own OCI Function using composition, and you created an event-based process to activate it. Fantastic!
Optional - Document Generator - Data & Template
Let's find out how we used the Document Generator PBF for this Post.
Payload
Here is an example of the JSON Payload that the Text Anomaly Detection Function creates to invoke the Document Generator Function
{
  "requestType": "SINGLE",
  "tagSyntax": "DOCGEN_1_0",
  "data": {
    "source": "INLINE",
    "content": {... see Data below ...}
  },
  "template": {
    "source": "OBJECT_STORAGE",
    "namespace": "idsvv7k2bduz",
    "bucketName": "fun_oci_functions_bucket",
    "objectName": "part2/TextAnomalyTemplate.docx",
    "contentType": "application/vnd.openxmlformats-officedocument.wordprocessingml.document"
  },
  "fonts": {
    "source": "OBJECT_STORAGE",
    "namespace": "idsvv7k2bduz",
    "bucketName": "fun_oci_functions_bucket",
    "objectName": "part2/Monoton.zip",
    "contentType": "application/zip"
  },
  "output": {
    "target": "OBJECT_STORAGE",
    "namespace": "idsvv7k2bduz",
    "bucketName": "fun_oci_functions_bucket",
    "objectName": "part2/Street1.png.pdf",
    "contentType": "application/pdf"
  }
}
The important elements are:
- The JSON Data ("data"). It is typically stored in Object Storage, but when it's only a small amount (< 6 MB), it can be passed INLINE in the JSON payload as we do here.
- The MS Word Template ("template"). MS Excel support is also available.
- The Font zip file ("fonts"). An optional zip file with 1 or more fonts. Since the PDFs are generated in a Docker container, special fonts that the Template requires must be provided. Note that some fonts are always available.
- The Output ("output"). Document Generator can generate .docx or PDF documents.
The full specification for Document Generator Requests and Responses is documented here.
Data
Here is the JSON Data used to fill the Template for the Street.png image.
    {
      "image_with_anomalies": {
        "source": "OBJECT_STORAGE",
        "objectName": "part2/Street.png",
        "namespace": "idsvv7k2bduz",
        "bucketName": "fun_oci_functions_bucket",
        "mediaType": "image/png",
        "height": "450px"
      },
      "words": [
        {
          "word": "BAKERY",
          "confidence": 99.9,
          "corner1": {"x": 0.05, "y": 0.61},
          "corner3": {"x": 0.2,  "y": 0.62}
        },
        {
          "word": "BAREERY",
          "confidence": 85.2,
          "corner1": {"x": 0.35, "y": 0.59},
          "corner3": {"x": 0.51, "y": 0.64}
        },
        {
          "word": "SUP-",
          "confidence": 85.2,
          "corner1": {"x": 0.51, "y": 0.61},
          "corner3": {"x": 0.59, "y": 0.66}
        },
        {
          "word": "O",
          "confidence": 83.8,
          "corner1": {"x": 0.73, "y": 0.65},
          "corner3": {"x": 0.75, "y": 0.68}
        },
        {
          "word": "CFOFFED",
          "confidence": 83.8,
          "corner1": {"x": 0.75, "y": 0.65},
          "corner3": {"x": 0.84, "y": 0.69}
        }
      ]
    }
Template
In general, creating nice reports is easy since you use the formatting power of MS Word with special Document Generator Tags documented here.
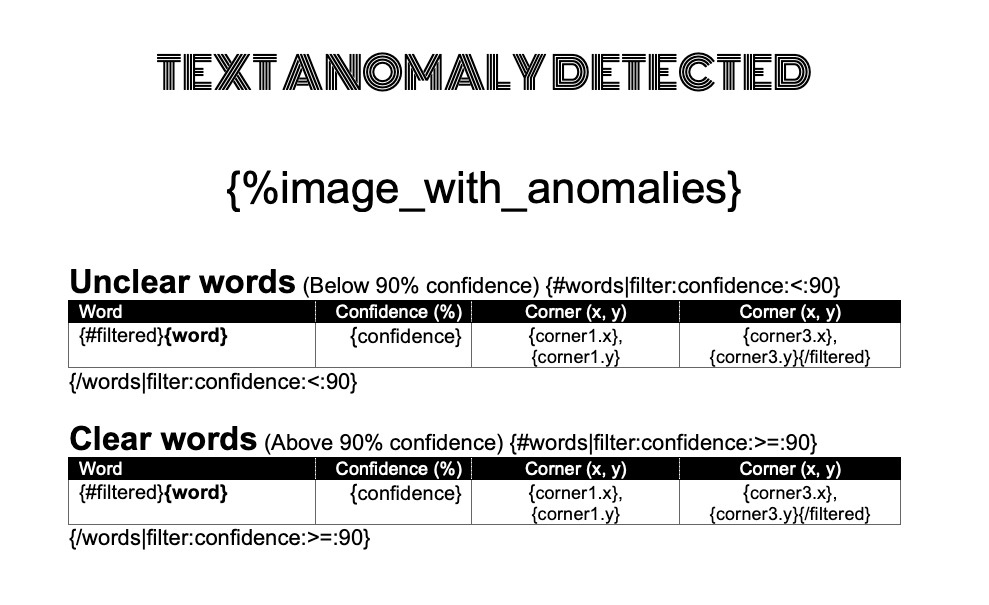
Here are a few notable points:
Using special fonts
The TEXT ANOMALY DETECTED title uses the special font Monoton. Monoton-Regular.ttf is included in the Monoton.zip file
Injected image
{%image_with_anomalies} refers to an Image Tag that will be resolved with the JSON data
      "image_with_anomalies": {
        "source": "OBJECT_STORAGE",
        "objectName": "part2/Street.png",
        "namespace": "idsvv7k2bduz",
        "bucketName": "fun_oci_functions_bucket",
        "mediaType": "image/png",
        "height": "450px"
      },
Here, the image source is OBJECT_STORAGE, but URL is also supported.
We specify a height of 450 pixels, but no width. This means that the width will be dynamically adjusted to preserve the image aspect ratio.
List
{#words} defines a Vertical List in which tags like {word} and {confidence} will be replaced with values from the JSON data
  "words": [
    {
      "word": "BAKERY",
      "confidence": 99.9,
      ...
Filtering
Both the Unclear words table and the Clear words table use the same array of "words", but filtering is applied to the data to take array elements that are below 90% and above 90%, respectively.
Thanks for reading, and see you in Part 3.


